GEEKSOAP’s 2012 Beat the [Holiday] Rush SALE!
This November, save 20% off of your entire order at geeksoap.net and BEAT THE HOLIDAY RUSH at the same time!
Be the friend that gives the most geektastic gifts this holiday season… click the flyer below to find out how you can SAVE BIG all November long!

Christmas shipping delivery not guaranteed on orders placed after December 7, 2012 on domestic U.S. orders. Though GEEKSOAP ships USPS Priority, the U.S. postal service experiences heavy delays this time of year, so it’s best to place your order well in advance just to be safe!
Questions? Don’t hesitate to email me. :)
It’s Beginning to Look a Lot Like Knitting Season
 While it certainly doesn’t FEEL like knitting season yet, the fall months are just around the corner and I’ve already begun the season’s first knits… despite the weather being in the 90s as recently as last weekend. Instead of easing back into the groove with something simple, I decided to kick off knitting season with an ambitious project… a sweater for the geekling. Because… you know. Why not?
This was an ambitious project for a few reasons. One being that even though I’ve been knitting for 6 years, I am intimidated by sweaters because I think of them as being a more complex project for the pros… and a pro I am most certainly not. I mean… sweaters have sleeves and a yoke, for crying out loud! It’s not a simple square or a hat in the round. THERE ARE SLEEVES! AND MULTIPLE PARTS! AND POTENTIALLY SEAMING! (Yuck.) And I’ve never been good at projects that require picking up stitches, which is usually a requirement of something made up of so many parts, or with seams.
Two being that I am one of those knitters that generally prefers smaller projects. I love knitting hats. LOVE! Hats (toques) are my favorite thing to knit. They’re small enough projects that I can finish one in a short period of time, (Which equals nearly instant gratification) BUT they have the potential for being a little more complex depending on the pattern, to keep knitting one interesting and fun. People think that cables are SO COMPLICATED (trust me, I was one of those people for the longest time.) so I love that hats allow me just the right amount of instant gratification and complexity to keep me engaged long enough to actually finish the project. You mean I can knit something that looks complicated and beautiful in a couple of hours or days? YES PLEASE. This is also a reason why I like crochet… and though I can crochet faster than I can knit, I really prefer the *look* of knit stitches for this kind of thing.
 But back to the sweater. There are sweater patterns out there that don’t require picking up ANY stitches and very little seaming, thank goodness, and the one I chose for Liam’s sweater is such a pattern. It’s called the Almost Seamless Pullover Sweater, a free pattern by Helen Rose at Craft Foxes and you can find it on Ravelry here. (See my project on Ravelry here!) I did, however, find errata that is not reported on the originating website so if you give it a try, be sure to change the number of stitches you begin knitting in row 1 of step 4 when you begin the shoulders and collar so that you go all the way around the sweater before turning your work instead of just halfway. (Don’t ask how I figured that out. Just know that spending 2 hours precariously ripping back rows when I felt like something was off was not something I ever want to do again.)
The sweater itself was fairly plain and simple, with the exception of a little garter and seed stitching at the collar, which was a nice touch to give the sweater some texture. I appreciated instructions that said, “Knit until the pieces measures 8.5″ from the cast on edge,” because I could literally zone out and just keep knitting the same knit stitch around and around for what felt like forever. It’s incredibly therapeutic and yet again I found myself asking why I always take a summer break from knitting when it’s so relaxing. (I’m sure the 100 degree plus weather had something to do with it.) But at the same time I know myself, and I realize that if I had been knitting an *adult* size sweater, that much plain knit stitch in the round would’ve gotten SO. BORING. And I probably would’ve given up on the project in favor of something smaller with a quicker gratification turn-over rate. But I’ve found that infant and toddler sweaters are like hats… that perfect balance of complexity to keep it interesting and project size to still finish it. I actually completed this sweater before the kid grew too big for it! And wow, I ACTUALLY KNIT A SWEATER. Which to be able to say *seems* like a big accomplishment and makes me feel really awesome. Nevermind that Liam will only be able to wear it this one season.
 Also around the corner *should* be hockey season, which may be another reason that the itch to knit has returned before the cooler temperatures. I learned how to knit during my first few months in Canada, just in time to start knitting things for my first winter and my first hockey season there. I have fond, nostalgic memories of snuggling on the (orange) couch, knitting while we watched (and I learned about) hockey. I’m quite certain that I will cry if there’s a lockout and we don’t end up having a hockey season this year. I guess I’ll have to get all of my knitting done during Sunday/Monday Night Football instead.
Next on my knitting to do list will be a hat for myself to match some fabulous red and white Team Canada mittens I picked up this summer, (Yes, I know it sounds funny that I bought mitts in the summer) and then I’m thinking it will be time to knit a few hats for family members, followed by a few baby hats for my friends that are expecting in the spring. Bring on knitting season!
[flickr-gallery mode=”photoset” photoset=”72157631343009450″]
Oh and on the GEEKSOAP front… be sure to watch for two new soaps coming soon… a Darth Vader themed bar and a trilogy Hunger Games guest soap set! Keep your eye on geeksoap.net for those goodies to show up in the near future.
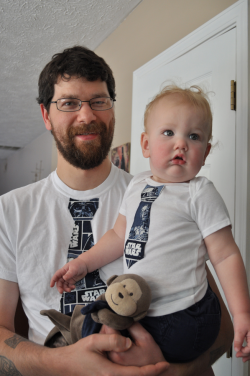
Free Pattern: Father & Son Matching Star Wars Tie Shirts
This is a cross post from our family blog; family crafts also get posted there under “We Made…”
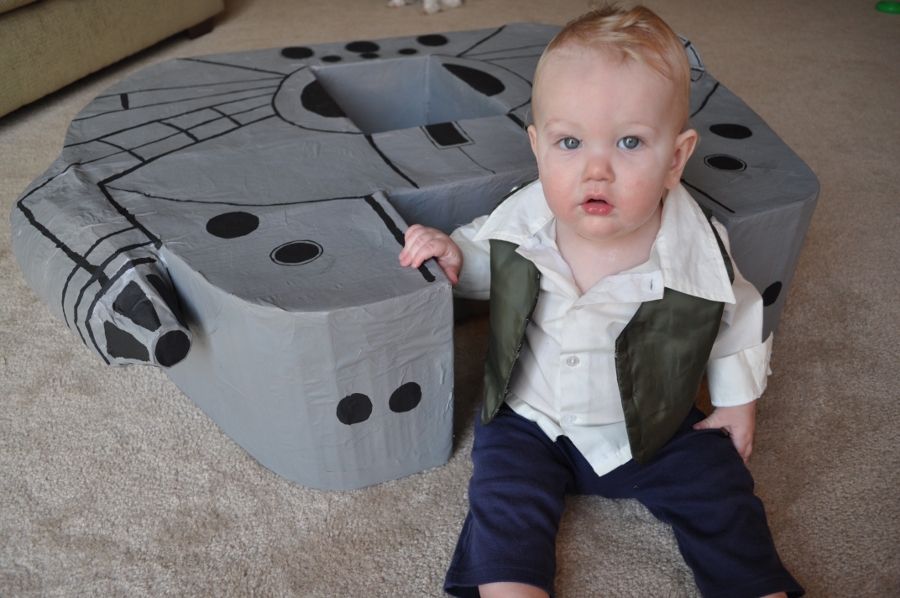
Our geekling turned one this past weekend, can you believe it?! I decided that he would need something extra special to wear as the guest of honor to his birthday party. Liam’s Aunt Lora had given him a cute faux tie onesie 3 months ago that he’s worn into the ground, but it inspired me to make my own version of a faux tie shirt to match the birthday theme. But you know I couldn’t just stop there… naturally, my husband needed one of these shirts so that both father and son would match. (Lucas’ idea, I might add.) And then I might’ve made a little matching tie “shirt” for our schnauzer as well. I threw together some quick instructions and a PDF of the pattern I drew up & used in case you wanted to do something similar for the loves of your life, too! (more…)
New Cthulhu Crochet Patterns Available! Scarf, Bib, Purse
Finally!
People have been asking me about this forever. And ever. AND EVER. There have been a few changes over at The Pink Toque Shop; you’ll notice that some of my creations (Scarfthulhu, Bibthulhu) are now available as PDF patterns (!) instead. I finally put down my Cthulhu scarf and bib patterns on paper and made them available to you right along with my popular Cthulhu Toque pattern.
As for a Cthulhu purse… many MANY of you have emailed me upon seeing Bibthulhu and asking for me to make it into a purse. Really and truly, I don’t think I should charge a separate pattern cost or MAKE a separate pattern to turn the bib into a purse… it could easily be done with just a few modifications to the bib pattern, which I have included in the Bibthulhu PDF, so if you purchase that, it’ll be like getting 2 patterns in one! Hooray!
What are you waiting for? Head on over and snag the new patterns:
The Cthulhu Toque Pattern | Scarfthulhu Cthulhu Scarf Pattern | Bibthulhu Cthulhu Bib & Purse PatternÂ
I’m currently in the middle of getting all of these new patterns up on my designer page over on Ravelry, so if you’d prefer to purchase there, you can find me here: Ravelry: Patterns by The Pink Toque Craft Blog
Don’t forget you can always email me anytime with questions along the way if you have trouble with any of my patterns. I have tested them and feel confident that they are error free, but after staring at my own patterns for a week, I may have missed something. Perhaps the wording or instructions are confusing – please email me right away and let me know so I can help, fix the problem, and/or make the wording more clear for other crocheters. :)
I hope you enjoy all of the new patterns available! I’ve got a few more up my sleeve, I just need to find time to write them down. Â Whew!
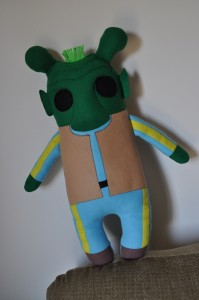
Handmade Plush Greedo Doll
I know, I know. It’s been soap soap soap soap soap for so long that you probably forgot that I got my crafting online start by making plush and purses. (I had almost forgotten, too.) But this past week I went back to my “roots” and the days of crafting plushies in my craft dungeon in Calgary, AB and made something extra special for our son.
I’m a teacher so I don’t normally work in the summer, but my teaching contract has a few summer dates tacked on so that I can run professional development training for other teachers. Since the geekling normally goes to daycare built in to my school district, (which is closed for the summer) we had to find him an alternative daycare to go to for these random days. Every day when I would pick him up at this new place, I’d walk in his classroom and find him loving on this big plush Dora the Explorer doll. He was in love with this thing! He carried Dora everywhere, hugging her tight. It was adorable! Of course, Dora belongs to the daycare, and now that I’m finally off for the summer, that meant no more time with the Dora doll. We could’ve just gone out and bought him his own Dora the Explorer doll, but why buy when you can DIY, amirite?!
So then I started thinking. If I’m going to make my kid a big plush doll… why not give it to him for his upcoming first birthday, which is Star Wars themed? And since the party is Star Wars themed, let’s make the doll a character from Star Wars. Those of you that know me can see why Greedo was my first choice; he’s my favorite Star Wars character. I know, I know, it’s not about me, it’s about the kid. BUT, the geekling is going to be brought up RIGHT and be taught about how Greedo shot first, (George Lucas said so!) so I thought it was a good idea to start with a Greedo plush. Besides… we can then act out fan fiction where Han and Greedo didn’t shoot at each other and instead are BFFs and fly around our living room in the Millennium Falcon we made together. Can you just picture the geekling and his plush Greedo in his Millennium Falcon?! I just melted from the cute.
Anyway, I know it’s been awhile since I’ve gotten out the old sewing machine, but it felt like I had never abandoned it for soap when I got it out this past weekend to stitch together my Greedo doll. Thanks for not holding a grudge, sewing machine. I missed you!
Before I could start sewing, though, I needed a pattern. I tweeted a picture via Instagram two weeks back of a little sketch I did on a scrap of paper as I was formulating my plush plan; it was how I pictured a cute and cuddly Greedo doll to look. After getting the thumbs up from followers, I turned the sketch into a large paper pattern. The kid and I ran out one afternoon and picked up a bunch of fleece and felt, and the rest is history. Greedo came together overnight, and I couldn’t be happier with how he turned out. I love him so much that I’m not sure I want to give him away!
Our finished Greedo plush is 2ft tall (!) and made mostly of super soft fleece with some felt features. Fittingly I left the hole for turning & stuffing in Greedo’s head (hahahaha, see what I did there?) and hand stitched his head closed after stuffing. The nose and eyebrow is all one giant unibrow-nose piece that I sewed separately on the face so that I could lightly stuff it to give his nose and brow a bit of depth. As you can see from the pictures, I cut out the two large full-body shapes completely in the jumpsuit blue fleece and then cut other pieces, like the green head, brown shoes, yellow jumpsuit stripes, and brown vest, and sewed them down to the blue fleece form like pieces of a puzzle in the right spots. Then when I was ready to put Greedo all together, I only had to sew the two large blue jumpsuit pieces, instead of dealing with several different pieces. I hope that made sense. TLDR; I sewed down all of the other parts to the blue body outlines first.
I mentioned pictures – you know I took pictures of the whole process, right? Here they are!
[flickr-gallery mode=”photoset” photoset=”72157630236200242″]
(See the whole set on Flickr)
I seriously cannot wait to gift Greedo to the geekling this next week for his birthday! I hope you like how he turned out as much as I do. :) As a side note, I have lots of Greedo-colored fleece and felt left over, so you never know what other Greedo goodness I may make next! I’m totally thinking hand puppet or a mini lovey blanket…
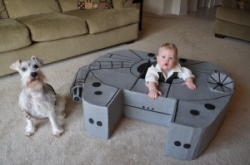
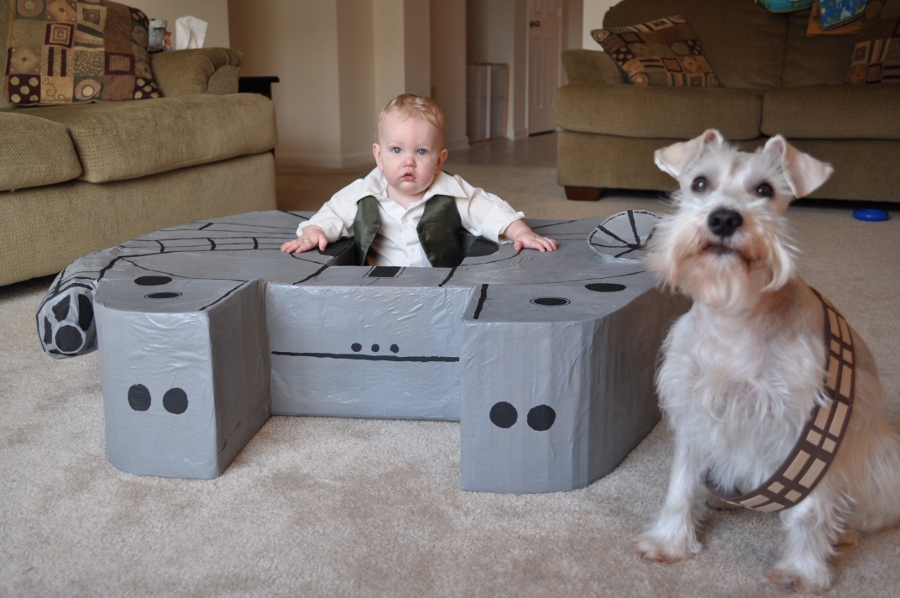
We Made a Millennium Falcon for our 9 Month Old
 Cross post from our family blog:
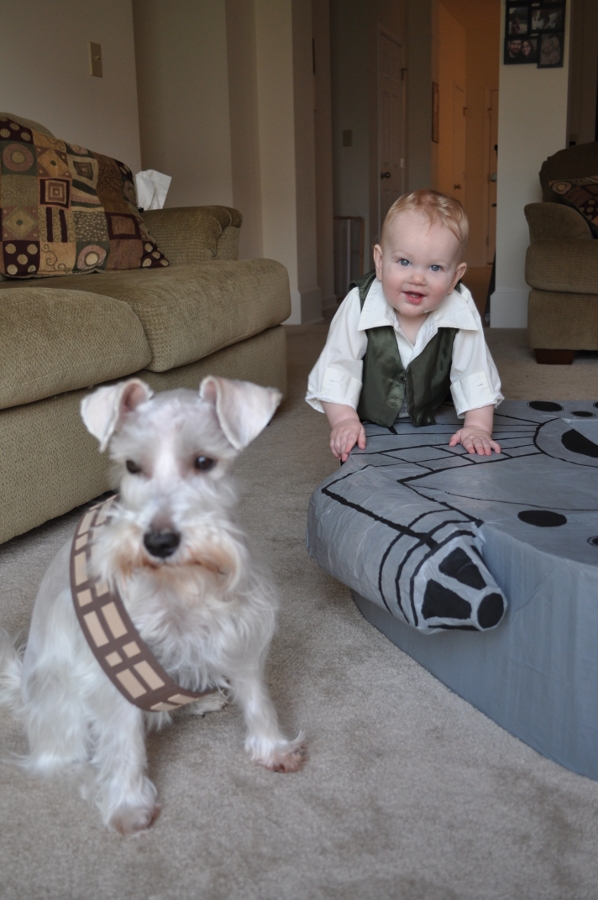
Because what kid DOESN’T need their very own Millennium Falcon?
I rest my case.
I know it’s April, but this project started back in January and it has just taken that long to find the time to finish. We had bought the geekling this exersaucer thing that came in a huge box shortly after Christmas. Per usual, we put it all together and the kid enjoyed climbing in and on the box more than he did playing with the thing that came in it. This caused Lucas and I to do a lot of reminiscing about our own childhoods, and how much fun it was to make believe with boxes. We pulled out a couple more boxes we had lying around for Liam to play with. It took less than 10 seconds for me to make the jump from pretending one of the boxes was a car to, “How cool would it be to have a Millennium Falcon?” … everyone’s other vehicle, of course.
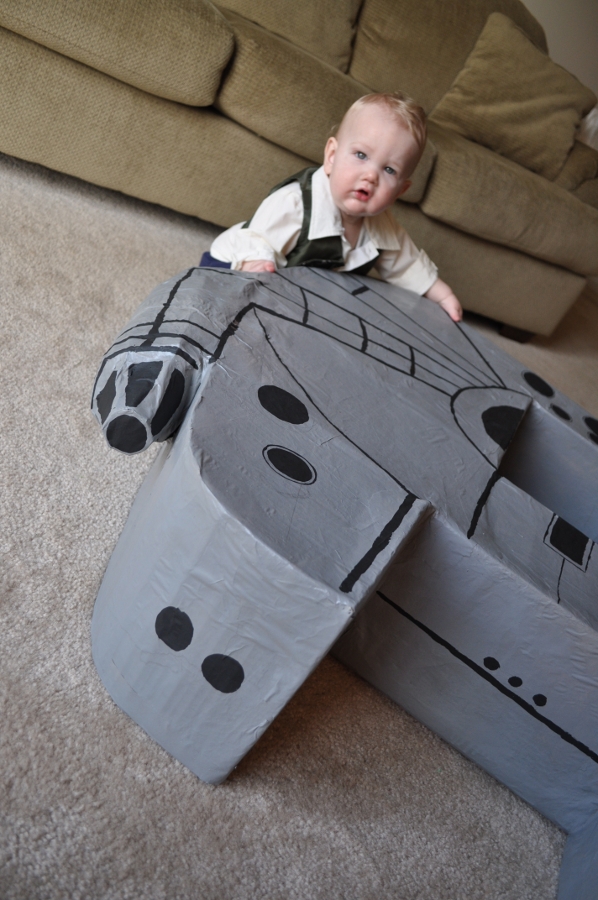
In no time at all I had formed the body of our Millennium Falcon out of cardboard using the exersaucer box and cutting some additional framework from extra boxes we had stored in the garage from our move back in October. I even had the perfect box to form a geekling-sized cockpit to sit in. We used a lot of packing tape to piece it all together. Then all we had to do was wait for decent weather so I could papier-mâché the whole thing out on the driveway. I’m sure our neighbors thought we were crazy. Or cool, maybe? I’m leaning towards crazy, though.
Anyway, fast forward a few more weeks and all of the papier-mâché was thoroughly dry. The Falcon was looking sweet! Then it was time to paint. We picked up some silver spray paint at the hardware store and I then proceeded to destroy the brand new garage floor with it. Hey, at least the paint on the floor is in the shape of the Millennium Falcon, am I right? Besides, that’s what garage floors are for; a constant reminder of how we did stuff in there, plus the shape is like a badge of awesome that makes me smile every time I get out of the car.
Lucas insisted that the Falcon stay out in the garage for awhile after spray painting, and for good reason; it smelled pretty strong. Our little project aired out for over a month. I’d say it was because it needed plenty of time to air out, but in reality, we just got busy. Fast forward now to this week, my spring break. (Perk of being a teacher.) Number two on my Spring Break To Do List was “Finish painting the Millennium Falcon.” Isn’t that on most peoples’ to do lists? Just a typical weeknight for our family. (For those wondering, number one on my Spring Break To Do List was re-hanging 76 pieces of dinosaur artwork in Liam’s nursery. Check!)
Sure, our Millennium Falcon was satisfactorily silver, but it needed some detail work. I admit I scoured the Internet for good reference material, (I also like that when searching for the Millennium Falcon on Google that I get no less than 70 personal results. That’s because we have so many cool friends with similar interests.) but in the end, I took a lot of artistic liberties with my details. I still think it turned out alright.
For those of you that know us, we tend to take a lot of photographs. Of everything. So you won’t be surprised to find that I took photos all along the way, to document our progress and process in making a Millennium Falcon for our 9 month old son. Because really, how many kids can say they have their very own Millennium Falcon? Mine can’t, but that’s only because he can’t talk yet. But when he can… he’ll be one of a very small number of kids that can say they have their own Millennium Falcon.
Over breakfast this morning I threw together a bandolier for the Schnauzer out of craft foam. He makes a pretty convincing albino wookiee sidekick, amirite?
For the full gallery of 47 fun photos including more cuteness than you can stand + all of the process photos, check out our Flickr gallery here: We Made the Millennium Falcon. The photos go in order to show you how the project progressed.
FREE GEEKSOAP at Lexington Comic and Toy Convention this Weekend, Courtesy of Kentucky Geek Girl!

If you’re headed to the Lexington Comic & Toy Convention this weekend, don’t forget that GEEKSOAP and Kentucky Geek Girl have partnered up to bring you some FREE SOAP! All you have to do to snag some GEEKSOAP freebies is to pop by the KGG booth (#109) while you’re there and give ’em the secret password: BUBBLES. Easy, right?!
Lexington Comic & Toy Convention
Saturday, March 24, 2012
10 am – 5 pm
Lexington Center
Admission $9.20 online/ $10 at the door
For all of the sweet geeky details including a map of the convention & booth space, keep your eyes peeled at Kentucky Geek Girl, where Natasha will make sure all of your LexCon bases are covered. Better yet, follow her on Twitter to stay in the know all day Saturday, too! Have fun and enjoy. :)
Psssst remember… BUBBLES!
Contest: Win a Complete Set of Game of Thrones GEEKSOAP!
 Woohoo! Can you believe that Season 2 of HBO’s Game of Thrones is less than two weeks away?! When Season 1 ended, it seemed like spring 2012 was FOREVER away. I devoured all of the books and it STILL felt like there was an eternity to wait. FINALLY… the wait is ALMOST over. I can hardly stand it!
To make your wait easier, I’ve decided to introduce the newest house soap in the Game of Foams GEEKSOAP series: House Targaryen! Â I hand-carved and molded the Targaryen design myself, and am so proud to finally share and release my newest creation. But before the official release of the soap AND Season 2 on April 1, I wanted to personally give away a complete set of the house soaps to make the start of Season 2 that much better. As if you weren’t already excited enough already!
But before I start yammering on about the contest rules and yadda yadda, tell me about the soap?! You’ll receive one each of the three house designs:
Stark -Â Winter is coming… be the one true clean in the north by siding with the Starks.
Sigil: Grey wolf on winter white
Scent: Betrayal. A crisp combination of pine, cedar, and eucalyptus with just a hint of campfire to capture the essence of the wintry north.
Lannister –Â Hear me roar and always pay your debts to cleanliness.
Sigil: Golden lion on crimson
Scent: Pride. A sweet, earthy blend of patchouli, plumeria, and orange; rich and manipulative.
Targaryen (NEW! Not even available for purchase yet in the store!) – Fire and blood cleanses all.
Sigil: Scarlet dragon on pitch black
Scent: Dragon’s blood. A fiery blend of amber, myrrh, sandalwood, and a hint of patchouli. Powerful enough to wake the dragon.
Ok enough already! How do I enter?
The rules are simple; check out the Rafflecopter entry form below to get started. The contest will run from 12:01 am March 19 – 12:01 am March 24. (So Monday – Friday.) One lucky winner will be randomly selected from all entries received, so the more you enter, the better your chances of winning! The winner’s soap will ship out ASAP in an effort to arrive before April 1 so that you have your set in time for the official start of Season 2. Note that you must use the Rafflecopter form below to ensure each of your entries are tracked!
Each method of entry – blog post comments, tweets, “likes” on Facebook, pins on Pinterest, etc. – are worth one entry each. And most methods of entry you can do once per day to give you even more chances to win this awesome set of three hand-carved Game of Thrones soaps! Each house has their own unique scent to carry you away to Westeros and across the Narrow Sea. Got questions? Email me! GOOD LUCK!! <3
Enter Here!
GEEKSOAP Spring Cleaning and NEW STUFF!

swtor soap by geeksoap
With spring just around the corner, it’s time to initiate spring cleaning at GEEKSOAP.net. I’m focusing all of my energy on the most popular designs and making them even better than ever, including better ingredients, better packaging, and tons of NEW stuff!
Firstly, as some of you have noticed, I’m phasing out most of the super clear designs to make way for their re-designs. The most popular of my clear series with inserts will be re-made over the next year; my goal is to re-release one a month starting with the heart emoticon, Zelda Triforce, and Cthulhu. They will be even better than before, now featuring only 100% natural ingredients AND hand-carved raised designs. As always, my soaps will continue to be vegan friendly, always plant-based and never derived from or tested on animals.
NEW SOAP!
- A NEW hand-carved Star Wars: The Old Republic design (releasing end of Feb 2012)
- As promised: Batman soap re-design, BATSCRUB and “baby” Batscrub Guest Soap
- A NEW hand-carved top secret addition to one of my most popular series. Hint: April is coming…
- Re-designs coming soon for my most popular clear soaps
- NEW darker (less pastel!) color options for my famous D20 Soap on a Rope!
- NEW packaging and promotional goodies
That’s not all, but that’s the bulk of what I’m currently working on. New soaps, makeovers for old favorites, and so much more. The store site will also be getting a makeover in the near-ish future. With the new soaps come new promotions and giveaways galore, too! I’ve got some contest ideas up my sleeve and will be featured on a few podcasts in the coming months, who will be the exclusive FIRSTS to have my new designs to give away, so find out how and when by following me on Twitter or Facebook, if you’re not already. Contests and giveaways will always be announced there first!
Are you on Pinterest? I started using Pinterest last year to keep track of ideas for my new geekling (who is 8 months old now, OMG WHERE DID THE TIME GO?!), and it seems like lately it has become THE in thing to do. Everyone I know is on Pinterest now, which is totally exciting! Check out my boards, and watch for more social media connection love on the blog and in the store soon as part of the re-design.
Oh! And GEEKSOAP is partnering up with Kentucky Geek Girl and will be at the Lexington Comic & Toy Con on March 24. Look for more information to come soon at KentuckyGeekGirl.com and the KYGeekGirl’s Facebook page. Get some freebies from Natasha and get a code for getting your hands on more goodies just in time for the release of some new stuff!
Whew! I hope you’re as excited as I am about GEEKSOAP’s spring cleaning! Lots of sudsy fun ahead :)
Tutorial: DIY Comic Book Coasters
 Hey all! It’s been awhile since I’ve put together a fun DIY tutorial over here, so I thought now was as good a time as any, especially with the holidays right around the corner. DIY gifts for everyone on your list this year? SCORE.
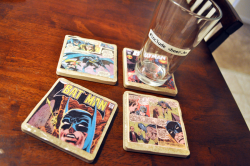
I’ve heard of making coasters from tiles, and I wanted to combine that idea with making something perfect for my BFF who loves Batman. What cooler coasters to have than Batman comic book coasters, amirite? I decided to share how I made my coasters just in case you’re looking for a great last minute Christmas gift for the comic book geek in your life… or anyone in your life, really, since you can make coasters in any theme. Ready? Here we go!
Comic Book Coasters
Materials
- four 4″ x 4″ tiles, found at your local hardware store **
- Mod Podge
- Clear spray acrylic sealer (I grabbed Mod  Podge brand)
- Comic books you don’t mind cutting up, Â or images at least 3.5″ x 3.5″ ***
- scissors
- craft glue – like my fave, good old Aleene’s Tacky Glue (but Elmers would do!)
- a paintbrush
- felt
You may also want to lay some newspaper out to protect your counter or floor surfaces. I also recommend working in a well ventilated area during the spray acrylic part!
 ** For the tiles, I highly recommend ones that have blunt or sanded edges. Sure, there are tiles that are like $0.15, making this an even cheaper project, but trust me when I say that splurging an additional $0.15 per tile to buy $0.30 tiles that have finished edges is much nicer than giving your friends or family a set of coasters with rough, sharp edges. Hello, safety hazard! (Especially if they have children.) This is already a project that costs less than a fancy cup of coffee per person to make, so let’s not skimp on safety. You don’t want them to cut themselves on your gift, right?
*** I actually didn’t use comic books for this project, I looked for pictures scanned from comic book pages up on Google Images and printed them on my color laser printer. If you have comic books lying around that you don’t mind cutting up, go for it! But feel free to use images from other sources, too. And if your friend or family member isn’t into comics, the beauty of this project is that you can use any image. For example, I made a second set of coasters for another friend of mine who is an art teacher, and used images of famous paintings instead. Have you had enough of my babbling yet? Let’s get to the directions already!
Directions
1. Print or acquire the four images you plan to use on your coasters and trim them down to approximately 3.5″ x 3.5″ to fit on your 4″ x 4″ tiles. I picked four images of Batman comic books and comic book pages from Google Images and saved them to my computer. Then I selected them all and right clicked to print them and used the following print layout to get all four pictures on the same piece of paper. Conveniently, this method printed the images at just about 3.5″ wide, so I had very little trimming to do.

2. Cover the backside of your images in craft glue – I like to draw a glue line around the outer edge and then zig zag through the middle, too, so that the image doesn’t warp when you mod podge – and glue your images down well on each of your tiles.

3. (Now’s when you’ll want the well ventilated area and newspaper to cover your work surface.) Using the clear spray acrylic, give each tile a quick spray coat and let dry for 15 minutes. I found after a couple of attempts that the clear acrylic coat I sprayed before I began layering on the mod podge really helped to keep my images nice and smooth and sealed for mod podging. (Can mod podging be a verb? If not, it is now!) For me this step was critical because I printed my images, and just using straight mod podge on them made the colors smudge. I like the word smudge.

4. Using your paintbrush, paint on a thin layer of Mod Podge. Try to coat the tile as evenly as possible. Let dry. Repeat until you’ve painted on three layers of Mod Podge, letting each layer dry thoroughly (until you can no longer see the white of the mod podge) in between layers. Grab a sandwich or clean your bathroom while you wait. Just not at the same time.

5. Spray one final quick coat of the clear acrylic sealer and let dry. (Hey look! You can see that I was making a second set of coasters at the same time! Ooooooooh… ahhhhhhh)

6. Cut four felt squares approximately 3.5″ x 3.5″ (like your images!) each, and use your craft glue and the same gluing method you used with your images to affix one felt square on the backside of each tile. My tiles had a grid on the backside which made it easy for me to evenly apply glue and then press the felt square down. Don’t press TOO hard on the felt or the glue will bleed through; press gently along all of the glued areas and lay the coaster flat to dry on its felt.


And voila! You have beautiful comic book coasters! Not into comic books? You could use scrapbook paper and make coasters to fit the decor of your living room, you could collage pages from a magazine or other book, or even use photographs on your coaster set. No matter what theme or images you use, you’ll end up with the perfect custom gift just in time for the holidays. :)
 Here’s the coaster set of famous paintings I made for my other BFF. Pretty awesome, huh? Happy crafting, and happy holidays! And if you don’t have time to create some coasters, perhaps some of my EPIC geeky soap over at GEEKSOAP.net is more up your alley? Be the friend that gives the most geektastic gifts this year, whether you make it for them or you have me make it! Best wishes <3
xoxo, Lesley
Get My Memories Suite

Use promo code STMMMS21122 to save!
Read my review here!
Check This Out!


D20 Soap On A Rope
Batman Soap Tutorial
Mahjong Tile Set

Digital Scrapping Freebies
knitty.com


Teach yourself to knit!
Get MMS V6 NOW!