My Memories Suite Tutorial 4: Layered Paper Tricks
Finally!! I know it’s been a month since my last tutorial and I meant to get this up a few weeks ago, but as I’m sure you all have experienced… life got busy. Anyway, here is my final tutorial that I have planned for My Memories Suite digital scrapbooking software by Polaroid. I say final only because I can’t think of any other topics to do a tutorial on within the software. If you think of something you’d like me to explain or demonstrate let me know and I’d be happy to make more tutorials :)
This fourth installment of my tutorial series shows you how to achive the layered paper look within the program. Not only does it show you how to layer background papers but it also shows you how you can turn those simple square or rectangular background papers into various shapes, too, when you layer.
If you’d rather watch this on YouTube so you can bookmark it to watch when convenient, head on over to YouTube, where you can also choose to watch in high quality.
Hope you enjoy this latest tutorial and it helps you out. If you have any questions, please don’t hesitate to ask here by replying on the thread or send me an email: craftblog at pinktoque dot com. Oh and special thank to all of you that enjoyed and downloaded my The Road Not Taken quick page on Friday. Glad you liked it! :) Have a great week!
Updated January 28, 2009: I am now part of the affiliate program and can offer readers of my craft blog who enjoyed this tutorial a $10 discount on the My Memories Suite software, plus an additional $10 to spend in the MMS online store! To get the discount, click the banner link in the upper right corner/sidebar of my blog (Where it says “Get My Memories Suite”) or the link below, and use coupon/promo code STMMMS21122. Enjoy! :D
My Memories Suite $10 discount PLUS $10 to spend in the MMS online store, ORDER NOW! (with code STMMMS21122)
My Memories Suite Tutorial 3: Using Quick Pages
My latest tutorial for My Memories Suite is ready to go! Today’s tutorial, the third in the series, teaches you how to use quick pages within the My Memories Suite software. The tutorial assumes that you have already watched tutorial 2 and understand how to add additional content to your program’s directories (which you must do to add quick pages) and then how to physically use quick pages you’ve added within My Memories Suite. It’s a quick and simple video this time (under 8 minutes, whew!), and I’ve put it over at YouTube since YouTube will allow you to watch in high quality and bookmark it for later use.
If you have any questions about the third installment of the My Memories Suite tutorial series I’ve been creating, let me know and I’d be happy to help or explain anything that isn’t clear :)
Need a quick page to use as a test when you follow along with the video? Nab my “Thankful for You” quick page from Sunday — it’s a great way to show off the things you’re thankful for this season :) Happy scrapping!
Updated January 28, 2009: I am now part of the affiliate program and can offer readers of my craft blog who enjoyed this tutorial a $10 discount on the My Memories Suite software, plus an additional $10 to spend in the MMS online store! To get the discount, click the banner link in the upper right corner/sidebar of my blog (Where it says “Get My Memories Suite”) or the link below, and use coupon/promo code STMMMS21122. Enjoy! :D
My Memories Suite $10 discount PLUS $10 to spend in the MMS online store, ORDER NOW! (with code STMMMS21122)
My Memories Suite Tutorial 2: Adding Additional Content
The second installment of the My Memories Suite tutorial series that I’ve been working on is ready for view! This time around I address adding additional content such as freebies or other graphics to the program’s directories for use within the software. This allows you to use digi scrapping freebies (or ANY image files such as clip art from the internet, things you design yourself OR even items you scan!) in My Memories Suite just as if it were pre-loaded content.
The fact that My Memories Suite allows you to use any and all common image files (such as .JPG or .GIF or .PNG) means that your possibilities with the software are endless. While the program comes with tons of pre-loaded backgrounds, embellishments, etc. one day you’ll want to add more, and it’s very easy to do as you can see in Tutorial 2. You’re not just limited to adding just digi scrapping freebies, either. In this tutorial I show you how to add a typical digital scrapbooking freebie kit and how you can scan personal mementos like movie stubs or concert ticket stubs and add them the same way so that you can digitally scrap with physical mementos you’d normally paste in a traditional scrapbook. The sky’s the limit with My Memories Suite, and I’m here to show you how easy it is to make the software your own. Easily add downloaded freebie kits from DigiFree or scan physical objects such as a napkin from your friend’s wedding or a greeting card you’d normally scrap traditionally and use it within My Memories Suite digitally instead!
This is the second tutorial in the My Memories Suite software tutorial series and is roughly 18 minutes total in length. You can check it out over on YouTube where you can bookmark it, download it and save it just in case you don’t have all 18 minutes to spare all at once.  If anything is unclear, just let me know! I have plans for at least 3 other tutorials as well. If you missed the first tutorial, which was an introduction to the software’s basic features and capabilities, click here. Each new tutorial piggybacks off of the previous videos, so you’ll want to watch them all! Stay tuned for more tutorials in the near future, and if you have any suggestions for future tutorials (wondering if My Memories Suite can do this or that? Just ask!) drop me a line and let me know; if it’s not already something I’m planning to do, I’d be happy to make more.
And thanks for the kind comments on yesterday’s Tags and Scraps freebie; I’m glad you enjoy them! :) See you back soon for more goodies. Take care!
Updated January 28, 2009: I am now part of the affiliate program and can offer readers of my craft blog who enjoyed this tutorial a $10 discount on the My Memories Suite software, plus an additional $10 to spend in the MMS online store! To get the discount, click the banner link in the upper right corner/sidebar of my blog (Where it says “Get My Memories Suite”) or the link below, and use coupon/promo code STMMMS21122. Enjoy! :D
My Memories Suite $10 discount PLUS $10 to spend in the MMS online store, ORDER NOW! (with code STMMMS21122)
Updated April 23, 2011: Google Videos is ceasing to exist- you will now find the tutorial above on YouTube, and all links and embeds have been updated to reflect this change :)
Free Pattern: Scalloped Baby Blanket
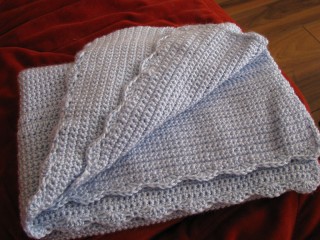
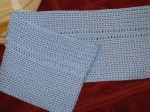
I’ve finally completed it: a scalloped edge baby blanket for our friends Kali and Caley, who are expecting their first baby (a boy) sometime in January. Â I just learned crochet about a month ago, so this was a very ambitious project for me! Â I tried to make everything as simple as possible so I created my own pattern that would be elegant, and yet also allow me to really practice those basic crochet stitches. I added the scalloped border to be “wild” because I was feeling confident. Â Now that I’ve completed a baby blanket, I can do anything! Â It took me a month to do, but I was only putting in a few hours or so here and there (maybe once a week?) and taking my time. Â This could easily be done in a weekend if you are a veteran crocheter. Â So enough jabbering, here’s the pattern! (And please be kind, it’s my first time writing a crochet pattern!)
The Ckalieys’ Scalloped Baby Blanket
Materials
- 3 skeins (1365 yards/15 oz) Bernat Softee Baby Solids in Pale Blue
- US H/8-5.00mm crochet hook
Notes
This blanket is built body first, then the scalloped top and bottom edges are done afterwards. Â The body has a simple pattern that even the newest crocheter can handle!
Stitches/Abbreviations Used
sc = single crochet
dc = double crochet
ch = chain
st = stitch
Shell Stitch (described below)
Instructions
Body
ch 110
row 1: sc in second chain from hook, sc in each st across (109 sts)
rows 2 – 20: ch 1, sc in each st across (109)
[The “decorative pattern”]
row 21: ch 2, dc in each st across (109)
row 22: ch 1, sc in each st across (109)
row 23: ch 2, dc in each st across (109)
You will alternate between doing 20 rows of sc and then the three rows that make up “the decorative pattern” until the blanket is as long as you want it to be.
Basic Pattern Idea
*20 rows of sc
(ch2) 1 row of dc
(ch1) 1 row of sc
(ch2) 1 row of dc*
Repeat from * to * until you reach your desired length. I went around 34″ or so. Since you start with 20 rows of sc, make sure you end with a completion of a group of 20 rows of sc to make it look even. (So don’t end with the dc/sc/dc pattern.)
Border
Once the body of the blanket is the length you want, you’re going to immediately turn your work and do the shell stitch back across that final row.
Shell Stitch
*Skip 2 ch, dc 5 times in the third ch : skip 2 ch, sc in the third ch* across (18 shells)
Once you have completed your last shell stitch, you’ll now turn your work clockwise and slip stitch down the long side of the blanket to get to the opposite end. Â Once you get there, turn your work again clockwise and you’ll see you’re at the opposite long end of the blanket. Â Your first set of shell stitches should be on the furthest end from you. Now shell stitch across this bottom row. You now have shell scallops at the two farthest ends of the blanket. Â Turn your work clockwise one final time and slip stitch up the long side until you reach your initial shell. Â You should have made a complete square trip around the outer edge of your blanket, giving the two furthest ends from each other a pretty scalloped edge and slip stitching the two longest sides.
Fasten off and weave in all ends. Â Tada!
Bernat Softee Baby is machine washable and dryable. Instructions:
Machine Washing and Drying: Wash in water (not exceeding 40°C/104°F) at permanent press setting. Do not bleach. Tumble dry at low heat, at delicate setting. Do not iron or press. Do not dry-clean.
Good luck! :) And if anything is unclear or I’ve made a mistake, please let me know, since as I mentioned, it’s my first time ever writing up a crochet pattern. Â If you make any scalloped edge baby blankets, I’d LOVE to see them! Â Drop me a line at craftblog at pinktoque dot com so I can feature you. :)
My Memories Suite Tutorial 1: Introduction
I’ve received a few emails over the past several months asking me some more specific questions about the digital scrapbooking software I use: My Memories Suite by Polaroid. Â One of the more recent emails I got asked a lot of good questions that I realized isn’t very obvious based on the website ad and video. Â They’re more technical use questions that aren’t modeled on the infomercial or explained on the site for someone who may be trying to check out the program’s capabilities before buying. Â Now that I have been using this amazing software for nearly a year, I felt inspired to create some video tutorials that cover some of the more important aspects of the program and some of the common questions I’ve been asked about it. Â Today I’m releasing my first freebie software tutorial, which is a basic introduction. Â In this video I do a 30 minute walkthrough of the program’s main features and show you the basic capabilities of My Memories Suite. Â The video is embedded below, or you can click here to watch the video over on YouTube, where you can bookmark it and rate it to come back to in case you don’t have 30 minutes all at once to spare.
I hope that the video goes into enough detail to give you a better idea of how powerful My Memories Suite is, and perhaps even encourage you to purchase it for yourself. Â I couldn’t possibly rave more about how much I love it! Â And if you’re a newcomer to the pink toque craft blog, you may wish to read my review of My Memories Suite here. Â Stay tuned, I have FOUR additional tutorial videos planned for this software that I will make and release as soon as I can :) Â And speaking of upcoming things to release, I have so many freebie goodies coming very soon! Â I’ll go ahead and announce that my next freebie will be a 3 day extravaganza starting this Friday (Freebie Friday!) in honour of the start of the new hockey season. Â If you’re a Calgary Flames fan, you won’t want to miss it!
And WOW! Thanks to all of you that downloaded my CU paper edgers freebie the other day — they seem to be quite popular :) And I really appreciate all of the kind comments <3 Â I hope to make some more CU items in the future, too. Â Enjoy the tutorial and I’ll see you back in a few days for the hockey special Freebie Friday!
Updated January 28, 2009: I am now part of the affiliate program and can offer readers of my craft blog who enjoyed this tutorial a $10 discount on the My Memories Suite software, plus an additional $10 to spend in the MMS online store! To get the discount, click the banner link in the upper right corner/sidebar of my blog (Where it says “Get My Memories Suite”) or the link below, and use coupon/promo code STMMMS21122. Enjoy! :D
My Memories Suite $10 discount PLUS $10 to spend in the MMS online store, ORDER NOW! (with code STMMMS21122)
Updated April 23, 2011: Google Videos is ceasing to exist- you will now find the tutorial above on YouTube, and all links and embeds have been updated to reflect this change :)
