Cabled Wine Bottle Bag
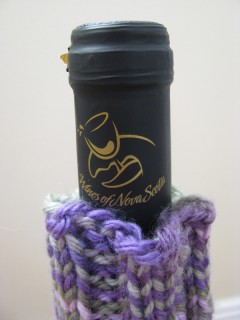
My parents’ anniversary is fast approaching (July 27) and I’ve had it in my head that I would make them something wine-related as they enjoy wine-ing with friends. I know that wine-ing isn’t a true word, but just go with it, ok? While Lucas and I were in Nova Scotia last month we picked up a bottle of local wine for them, keeping in mind that I was going to be knitting them up a wine bag for it later. This was an important choice to ponder as most wine bags are meant for typical shaped bottles of wine while my favorite wine to buy my parents is usually some kind of Canadian ice wine, which likes to come in these super skinny tall bottles instead. I picked out some Kellermeister by Jost Vineyards that has a very normal wine bottle shape. I’d like to be able to say that we’ve tried this wine and can give you an opinion, but we picked up a bottle of something else while we were in Nova Scotia and the name completely escapes me. But I’m sure Kellermeister is good. It’s a 4 out of 5 on the sweetness scale, and my parents enjoy wines on the sweeter side.
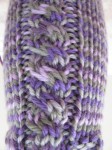
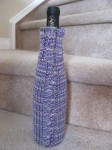
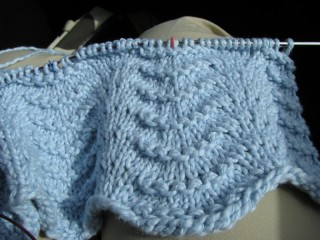
When searching for a pattern I had a few requirements. First of all, I wanted something that could be done in the round from top to bottom; just say no to seaming, folks (if saying no is an option). I also wanted something pretty. My recent interest obsession with cables had me looking for a cabled wine bag, but I wasn’t having much luck. Then I came across the Wine Bottle Cozy pattern by Tara’s Knits — her original bag is fantastically plain and simple, and so I decided I’d be able to modify the stockinette body of the bag by throwing in a cable pattern to spice it up. I’ve done enough cables to have a vaguely accurate idea of how to write up a cabled pattern and so that’s what I did. When it was all said and done I was happy; I think I would’ve liked to have made the cables bigger, but it definitely turned out lovely, don’t you think?
The yarn. Let’s talk about the yarn. Earlier in the new year, signs started cropping up in my local Michaels. “New yarn department coming spring 2009!” they said. I waited. And waited. It was discussed a lot on the Ravelry forums. Michaels finally unveiled their “new yarn department” and at first I was a bit disappointed because it basically just looked like they finally restocked the yarn aisles for a change and added more acrylic yarns to the mix. Like we need more acrylic! I was secretly hoping for a little more wool and other natural fibers, but I have to accept that Michaels is a big-box craft store that hosts thousands of other crafts besides knitting and crochet, so I guess I should be lucky that they’ve stocked so many different kinds and colors of acrylic instead of complaining; it may not be the yarn favorite, but I’m not a yarn snob and can admit openly without shame that acrylic definitely has its place. I have plenty of acrylic in my stash; it’s very multipurpose and washable. As part of the new yarn department unveiling, Michaels came out with their own new brand of acrylic. The brand is called Loops & Threads and the yarn’s name is Impeccable; it comes in ombres (mixed colors) and solids and is fairly soft for being acrylic. I’d been kinda drooling over the way the Seaside ombre colorway looked on a previous trip to the store (It’s gotta be the gorgeous shades of blues and greens that blend together so well. Oops, did I mention my recent infatuation with blue greens again?) and with a wine bag plan in mind, I saw it: the Impeccable colorway that blends violets and lavendars and greens together: Fresh Lilac Ombre. I don’t know, but doesn’t a colorway in grapes and greens seem like the perfect combination for something wine-related? I thought so.
If you’re interested in my modifications of Tara’s pattern to create your own cabled wine bag, all you have to do is sub in my cable pattern repeat (4 rows) in place of the stockinette body of the pattern. I did the ribbed top cuff the same and did the decreases at the end the same; the only thing that changed was instead of knitting row after row around and around for the body in stockinette, I created and followed the 4 row repeat below:
rows 1, 2, & 4: (k6, p1, k4, p1) each needle/repeat until end of round
row 3: (k6, p1, sl2 to cn & hold in front, k2, k2 from cn, p1) each needle/repeat until end of round
And there you have it! I’m thinking if I make another cabled wine bag in the future that I’ll switch the 4 stitches of cable with the 6 stitches of stockinette in between the cables. So I’ll cable for 6 stitches and only have 4 stockinette in between the cables. Does that make sense? I like big cables and I cannot lie… you other knitters can’t deny… ok I’ll stop there.
Craftster Feature and New Scrapbook Pages
I am most honored to be notified that my DIY Batman Soap Tutorial was a Craftster-wide feature recently, AND was also chosen as a featured project for Quarter 2 of 2009 in the Bath & Beauty section. WOW! I really appreciate all of the “this rocks!” votes I received on the tutorial and am glad it’s gone over so well :) Thanks everyone!
This weekend I got around to some much neglected digital scrapbooking. It feels like it’s been forever! Several months ago when I was doing more digi scrapping I had started stockpiling various quick pages that I’d found on DigiFree as I came across them daily. I was just saving them for a rainy day I guess! The weather has definitely been rainy here in Calgary lately, and so on Sunday I went back through the folder and turned around 33 of those quick pages into new pages of my digital scrapbook.
Firstly, I went back through photos I had on my hard drive, which took me all the way back to November. There were a couple of events in the fall and winter that needed to be scrapped, such as Lucas’ birthday party, outings with friends, and Christmas. I also realized that the more digital pages I had in a single scrapbook in My Memories Suite, the slower/longer it took for the program to load the scrapbook when I wanted to work on it. This makes sense since it had to render all of those thumbnail previews along the bottom, and the more elements and extras on a page to render, the longer that would take. Multiply that times 40 odd pages or so, and you can see where I’m coming from. To help with the clutter, I decided to sum up the end of 2008 by adding a few more pages to finish off the year, and then start a whole new, separate album for 2009. So now I have a Family Life 2008 album and I’ve started a Family Life 2009 album that will be ongoing for the rest of 2009.
Family Life 2009 was a fun one to start on and where I had the most catch up to do, because we’re already just over halfway into the year and so much has happened in the first part of 2009! Really the pages just started flowing once I went back through the photos I had stored away in my Pictures directory. I had some great new photos of Oliver and Winston in their Flames gear to scrap and some Calgary Flames quick pages I had created myself last year to use with them. I had quite a few newer photos of Lucas and I together that were begging to be scrapped, and of course a LOT of photos from our recent anniversary trip to Nova Scotia. It was hard to narrow down all of the fantastic photos we’d taken to just a few digital scrapbook pages, but I managed!
Then I scrapped our recent family outdoor activity of choice: rollerblading! Lucas and I have been rollerblading fairly regularly for almost a year now, but just recently (like 2 weeks ago) we decided to start trying to rollerblade with Oliver and Winston, too. This has been ridiculously hilarious and A LOT of fun, and a great form of exercise for the whole family. Oliver could stand to lose a few pounds, tbh. But shhh, we don’t tell him he’s fat. (Ok we do, but it’s mostly hair, right?)
Then of course most recently, as in this past weekend, Lucas and I attended our first Calgary Stampede ever! As I mentioned in my previous post, the Calgary Stampede comes to town for 10 days every July and turns the entire town into a rodeo. Suddenly everyone here thinks they are a cowboy. To be honest, the Stampede was very much like the Indiana State Fair, just with a rodeo attached. It was great fun though, because it’s been years since I’ve been to a state fair of course.
All of this work to catch up my digital scrapbooks inspired me to create something of my own to share, and I played around with some new background papers and a couple of matchy-matchy elements to go with them. Nothing fancy, but I plan to give those away later this week, along with a quick page I made to go along with them. How exciting! Although knitting has dominated my crafting time for the most part the past several months, I don’t plan on letting my digital scrapbook get that far behind again, so hopefully that means more scrapping and more freebie goodies for you, too :)
In creating a 2009 album and leaving it open-ended to add on as life happens, I’ve started fast-forwarding in my mind to imagine what other upcoming pages I’ll need to scrap about. Most exciting is the next chapter in Lucas and I’s lives where we move back to Indiana and roadtrip with Oliver and Winston to get there, along with the birth of my first nephew coming up in October. The 2009 Family Life album sure will be a monumental one!
Delicious Nova Scotia Yarn
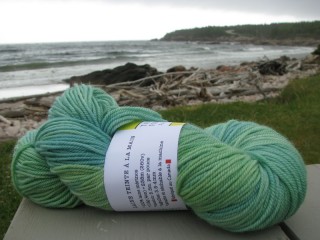
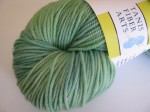
Tanis Fiber Arts yellow label DK weight in Spearmint, photo © Lesley Karpiuk / pinktoque, taken on Cape Breton Island, Nova Scotia on the Cabot Trail.
On the Friday of Lucas and I’s Nova Scotia trip we spent the day being too pumped about exploring downtown Halifax to remember that we’d gotten nearly no sleep on our red eye flight in. We found Halifax to be a really fantastic city; it was a big city with a small town feel, and we really enjoyed it. Of course I had researched ahead of time to find local yarn shops, and on Friday we checked out The Loop Craft Cafe on Barrington Street right in the heart of the city. What a great little place! Lucas insisted that I pick out something to treat myself. I’ve never actually purchased any “fancy” LYS yarn before; only drooled and wondered when my skills would be proficient enough to warrant purchasing something so lovely. I don’t know why, but I don’t feel I’m an incredibly skilled knitter yet so I’ve put off buying expensive yarns because I’m afraid that my mediocrity would just waste it. I realize this is foolish, and so I let Lucas treat me without much of a struggle. We were on vacation, after all! I had a hard time picking out just one thing to treat myself with. I’m thoroughly pleased with my choice, however!
I picked up a hank of Tanis Fiber Art’s yellow label DK weight superwash merino. I own some merino, folks. This is a HUGE deal to me. I chose the Spearmint colorway because I’ve found myself obsessively drawn to gorgeous sea greens and mints lately. Don’t worry, pink, I would never choose a true favorite over you… but sea green is so heavenly. And seemed especially fitting on our seaside trip. I was ecstatic to find that Tanis Fiber Arts has an etsy shop; this means when I run out of Spearmint I know where to get more without having to go back to Halifax… though that would make for a good excuse to get back out to the east coast; I sure did love it out there! This superwash merino is so squishy and soft that no other word but smooshy applies and I finally understand the meaning of such a word. It’s fantastic. I highly recommend checking out Tanis Fiber Arts on Etsy; you’ll love what you find there. I’d love to knit something fabulous in the Jewel colorway for my mom because she’d love the delicious violets and fushias blended together. Yum!
I lovingly toted my new yarn around and later photographed it with the backdrop of a quiet little beach in the Highlands National Park on the Cabot Trail we drove on Sunday. Cape Breton Island is so gorgeous! I haven’t completely decided what I’m going to make from this yarn, but whatever I choose it will definitely be just for me.
Nova Scotia Trip Projects
We’re back! Well, we got back on Monday night but I’ve been so busy this week finishing off the final week of one online course and having a second week-long-only course start up first thing Tuesday that I’ve been reading, reading, reading, and writing several papers. Most of my work (all due tomorrow) is in and done, including my final papers for both classes, so I can finally update you on some Nova Scotia trip crafts!
First of all, Nova Scotia was AMAZING. What a perfect wedding anniversary trip. We saw some of the most beautiful scenery and had some of the most relaxing experiences ever. And we got to do it together. It was utter bliss. Lucas wrote all about it over on our personal blog: Honeyversary? Anniversamoon? Honanniversamoonary?! so be sure to read all of the wonderful details and check out all of the gorgeous photos we took there.
So… as far as crafts go, Lucas and I both took our baby blanket patterns on the plane with us so we’d have a project to keep us busy during downtime. On the Saturday, which was our actual anniversary, we relaxed after the adventures of the day on the balcony of our seaside cottage and knitted while we enjoyed the sound of the Atlantic ocean waves crashing up onto the shore just a few feet in front of us. It was amazing! Knitting together with that kind of relaxing scenery while inhaling fresh ocean air was a moment in time I wish I could’ve preserved forever. I tried to in photos at least:
The blankets are really coming along! I’m about 65% through mine, but I’ve had to take a small break to switch and work on a little dishcloth gift set that I’m making for my boss. As it’s a temporary office job to keep me busy during the summer and Lucas and I are planning to move back to Indiana soon, I know my time there is going to be coming to an end soon and I’d wanted to make something to give to her in thanks for being so awesome. More on that project in another post.
The hearts. Remember in my last post how I’d mentioned a little secret knitted hearts project that I was trying to get done in time for our anniversary trip? Those went over really well :) After felting I sewed them together to create three little plush knitted hearts. I hid those in my purse and took them with us. I distributed the hearts over the course of the weekend in various times/places kind of spontaneously.
The first one I gave to Lucas when we were enjoying the breathtaking views at Peggy’s Cove. It was so peaceful and seemed like the perfect time to give him a token of my love. The second one I gave him the morning of our actual anniversary while he was in the shower. I sneakily placed it next to his wedding ring and glasses — two things he removes when showering. He came out to put them on and found the second heart there with his things. On the third morning it was the same idea, but this was Sunday… Father’s Day… so I placed a knitted heart on the nightstand at our seaside cottage with his glasses and a Father’s Day card that I had also sneakily made and brought without him knowing. The Father’s Day card came from our two dogs, Oliver and Winston. The inside had “Thanks for being a great dad” scrawled in doggie handwriting with pawprints for signatures. It was all very sweet :)
So those are our Nova Scotia trip projects! I’ll post soon about the really pretty cabled wine bottle cozy I finished recently for my parents’ anniversary coming up in July and the dishcloth set I’m making for my boss. First I need to find and settle on a dishcloth pattern I’m happy with! It seems I’ve started this project over more times than I can keep track of now, which is why it’ll be a post for a later time… I don’t have any photos yet because I’ve not gotten further than around 10 rows each time before I frog it back. lol.
More updates to come soon! :) Take care
The Cabled Wristlet That Couldn't.
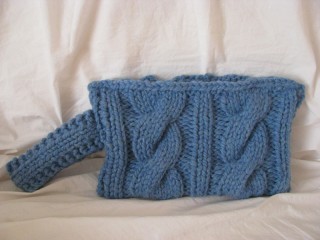
I would be a bad blogger (and a liar) if I said that everything I attempt to make turns out as planned. Or even that I never have a craft failure, cuz’ clearly I have had my share. It’s not really that this cabled wristlet I whipped up didn’t look nice when finished. I mean, it doesn’t look too bad in the pic, right? Its functionality went down the tubes somewhere along the way, though, and that’s what made this project fail on me.
I was so looking forward to this post way back when I was still designing the wristlet. I couldn’t wait to share it, couldn’t wait to finish it in time for an upcoming trip, and couldn’t wait to give you all the pattern and my instructions so you could make something equally beautiful for yourself. In my lack of design experience I missed a few key things, however.
The idea was that I wanted to try cables. I had it in my head that cables were so hard. But then I actually sat down and made myself try them. They were such a piece of cake! And wow, did I ever really love the look of cables. Cables make it seem like I’m so much fancier and so much of a better knitter than I am. They’re easy, but to the untrained or inexperienced eye, they look super intricate and difficult. Add cables to an otherwise boring knit and suddenly it’s magic and you’re a superstar! I still feel that way about cables, which is why I think this wristlet project looks nice, but it just didn’t work out when it came time to use it. I haven’t decided if I’m going to even bring it this weekend on our trip or not.
Oh ya, the trip! That was really what inspired this knit; Lucas and I are celebrating our wedding anniversary and we decided to go somewhere that neither one of us have ever been, but that we’d been wanting to see. As we’re planning to move back to the states in the somewhat near future, we decided to stay within the country and finally make a trip out to the far east coast of Canada. Nova Scotia, to be exact. We’d talked about going out there for our honeymoon last year but never got around to it. So instead we’ve decided to treat ourselves to a 4 day getaway with no real set plans and no family members nearby. We realized recently that we’ve never taken a vacation that didn’t involve visiting family or friends. Every trip we’ve ever taken together has been to visit our family either in British Columbia or Indiana, and while the trips were fantastic and we enjoyed every minute of visiting with family we don’t see very often, we decided it was high time we take a trip for just the two of us. Our plans loosely include flying into Halifax overnight Thursday and staying until late Monday afternoon. No hotels are booked yet; we are renting a car and just driving… just planing to stay wherever we end up. We do know that for Saturday, our actual anniversary date, we want to stay in a really nice bed and breakfast way up on Cape Breton Island and eat somewhere nice. The exact how, when and where is still up in the air, and believe it or not, I rather like it that way.
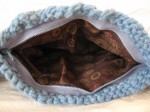
...not horrid but not the best. You can't see the "invisible" stitches, but I promise they're there.
Anyway, back on topic… this beautiful province we’re planning to visit in Latin means “New Scotland.” When the trip was planned (very recently) I realized I had just over 2 weeks to knit something to use/wear on the trip. I’m a slow knitter and have lots of things with a deadline coming up to finish, so I knew it wouldn’t be anything large and most likely I’d not have enough time to knit a shrug, either — though I’m dying to make one. I decided something cabled because for some reason, thick cables and either greens and blues sound like something that would fit in a place called “New Scotland.” Something I am really looking forward to experiencing in Nova Scotia is the Scottish flavor of music and culture that I keep hearing about up in Cape Breton. Cables make me think of (or remind me of) celtic knots in a way, and so a cabled wristlet idea was born, even if that reasoning sounds silly or illogical to anyone else.
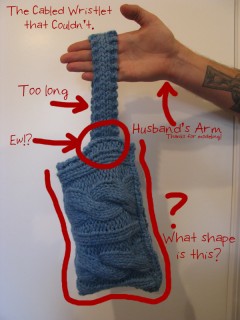
In looking at basic cable patterns I kept seeing the same sorts of variations on a rib/cable pattern; ribbing along the sides and a cable winding up the middle. I stuck with that idea and using chunky yarn in a pretty sky blue, I whipped up a big rectangle. Wtih those cables, gah, it was just SO gorgeous. I was so proud! They looked so fancy! I folded the rectangle in half, and then to form the strap I just did a simple 6-stitches-across and repeated the rows until it was “long enough.” Design problem number one was not thinking ahead as to how that strap would stretch later on. I sewed up the side seams of the rectangle, sticking the ends of the strap inside one side seam. So far so good! I decided to line it and include a zipper, because I coudn’t very well let an open pouch dangle from my arm; all my stuff would fall out! The most secure way would include a zipper so there were no openings for my belongings to fall out through. I guess this is where the rest of the failure continued to go: I had a horrible time lining such a thick knitted pouch. I did the lining fabric pouch separately and used my machine to sew the zipper neatly to the lining. Then all I had to do was hand stitch the zipper neatly inside the knitted pouch. This all went according to plan, but the hand stitching looks awful (I even used invisible thread!) and when it was all finished, I realized how off my proportions were in the design. The handle is too long and stretches a lot, and the bag’s size is a bit big and looks a little awkward. Even with nothing IN the pouch, it’s so heavy and bulky that it makes the handle stretch, which makes the side seam of the pouch stretch in a very unflattering way. The end result really isn’t very flattering at all, to be honest.
I don’t know what I expected, but the vision in my head didn’t match up with the end result, and so to me it’s a failure. Lucas would say I was being too hard on myself, though, so maybe I shouldn’t use the word “failure” … on the bright side, I got in a lot of practice with cabling (which is my new obsession and I love it, which is automatically another ‘plus’ to the project) and so it wasn’t all bad and thus not a total failure. What do you all think? Would you make one for yourself? If so I could throw together the loose outline. Any suggestions on design changes for a future attempt or should I just leave it dead? Is the stretching as bad as I think it is?
Despite this not-so-great result with the wristlet, I did get in some really simple projects over the weekend: some dishcloths and a cabled (I told you I was obsessed) bookmark for a co-worker. More on those (with pics) later this week :)
