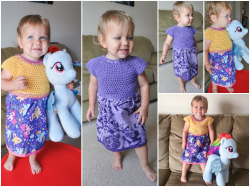
Sew Sweet Crochet Fabric Toddler Dress – FREE PATTERN!
 I laughed when I saw that my most recent post before this one was the baby blanket I was making just before my daughter was born and now I’m updating to share a new free pattern I’ve put together of the toddler dress I just made for her… let’s just say 18 months between posts is a long time! Don’t worry, I’ve still been crafting away all this time, I just haven’t documented it really well. I’m always very busy with my small business, GEEKSOAP, which hit its 5 year anniversary back in February (YAY!) and have made several new designs over there for you to check out.
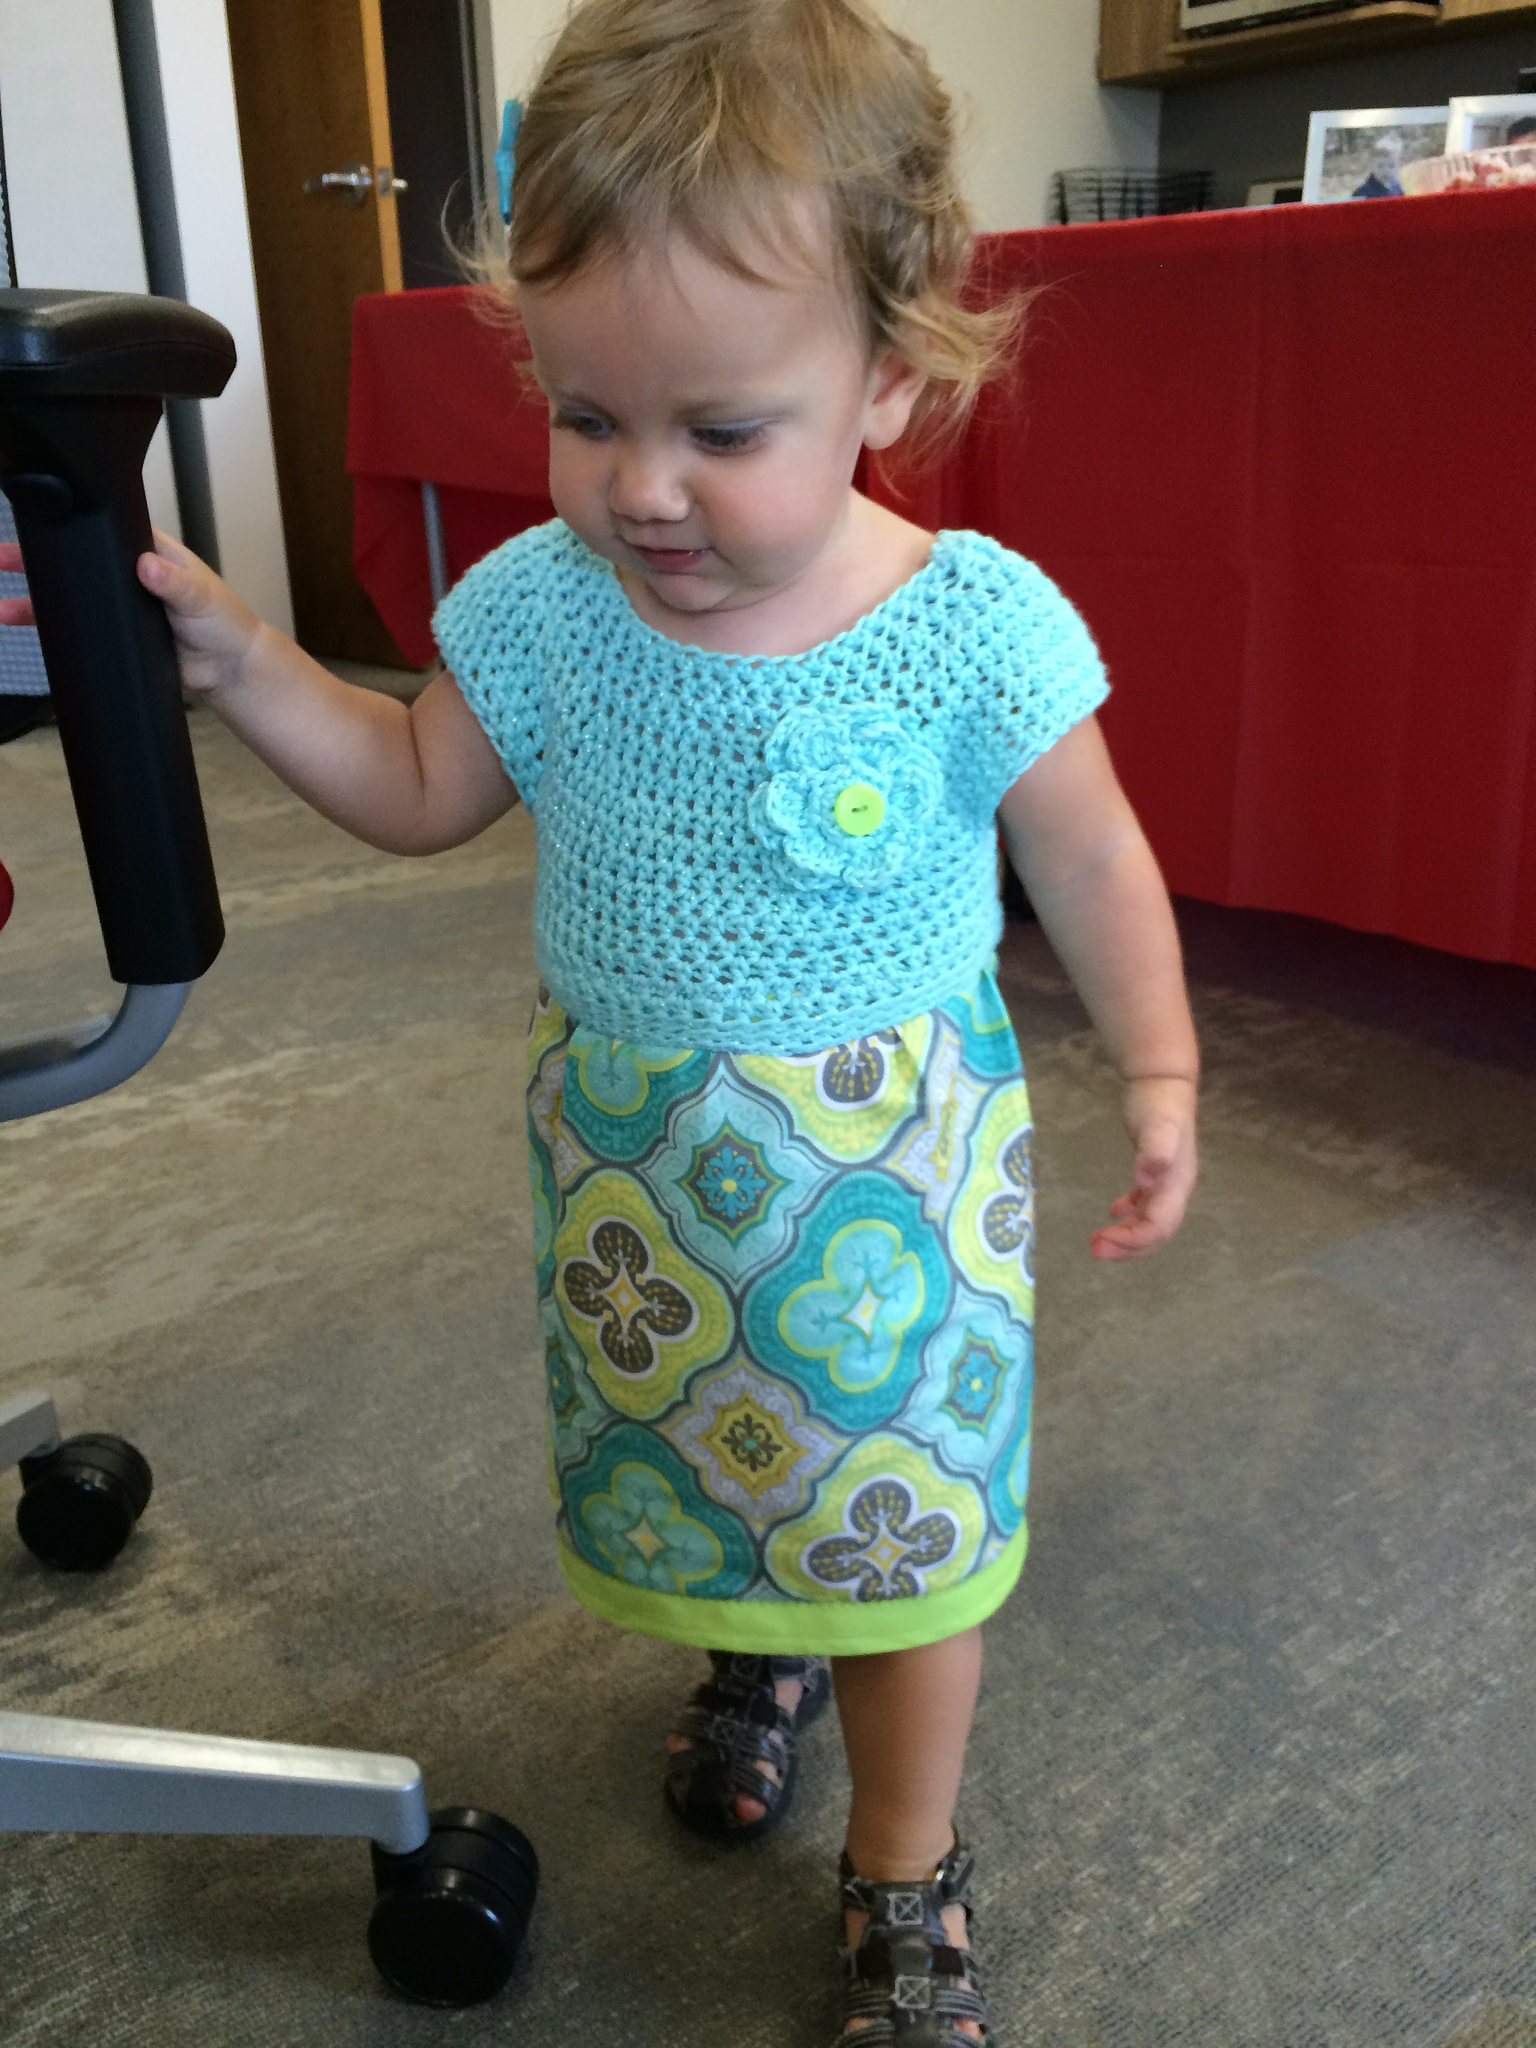
Recently on a 3-hour road trip, I got the itch to knit or crochet something and decided I wanted to make a dress for my now-17-month-old daughter. Back before she was born, I had purchased a newborn pattern that was a crochet top with fabric skirt combined, and I loved the idea. (My sewing machine was collecting dust – I missed it!) but when I looked at the pattern again a few weeks ago, I found that it was only written in a newborn size with no real “recipe” that I felt comfortable modifying to fit my daughter now. It was also very heavy with a lot of puffy crochet stitches, meant for cooler weather, which just wouldn’t work in July! I started researching free crochet dress patterns online to figure out a method for making just a collar or bodice that could be adapted for different sizes. After I made a top that fit, I was hooked! (haha.) I tried again and again with different hooks and things like holding multiple strands together for different effect, and finally loved the end result. After making my first dress – which had a bit of an empire waist – I made some adjustments to have a bit more length. And then I couldn’t stop making dresses…
 I had a lot of people ask me how I did it, so I just threw together all of my notes and tried to create a pattern for others to follow if they also want to make dresses for their little ones. I haven’t personally tested the larger sizes on kids, but I did include notes on suggestions where to make adaptations in order to make the crochet bodice larger for older kids. I would imagine that changing the yarn and hook size could also help you make a smaller size if you wanted, too. You could also adapt the pattern to start with 2 less stitches and adjust the rest of the numbers in the other rounds accordingly to go smaller.
As for the skirt – the pattern includes all of the notes and dimensions I used for making the skirts for my dresses, which includes notes to help you decide what dimensions you need to use when making yours. I’m no seamstress, though, so this isn’t fancy stuff. I just sort of “winged it” from doing past sewing projects and it all worked out just fine!
The pattern is now over on Ravelry as a free download – be sure to grab a copy and give it a try! And if you try some of the larger size adaptations, let me know how it goes. Also don’t hesitate to ask if you have any questions! Hope you enjoy. :)
Pattern specifications:
Materials Needed
• Size I crochet hook, or whatever hook to reach gauge
• Medium weight yarn, like a cotton or acrylic
• At least 1/2 yard of coordinating fabric
• Coordinating thread
• Sewing machine
Optional
• Double folded bias tape
• Buttons
Gauge
13 sts = 4†and 9 rows = 4†in hdc
Bodice Size
This pattern is for size 2 years with a 21†chest. Pattern includes suggestions for adapting to larger sizes: 4, 6, and 8. This theory could be used to go smaller, too. (Or try a smaller hook!)
Stitches Required
Fhdc = foundation half double crochet. This creates a foundation chain and a first row of half double crochet stitches all in one.
sl st = slip stitch
ch = chain
hdc = half double crochet stitch
sc = single crochet stitch
blo = back loops only. Insert your hook into the back loop only instead of both loops of the st.
Pattern also includes 16 different variations and ideas for spicing up your dresses!
Enjoy :)
Free Pattern: Father & Son Matching Star Wars Tie Shirts
This is a cross post from our family blog; family crafts also get posted there under “We Made…”
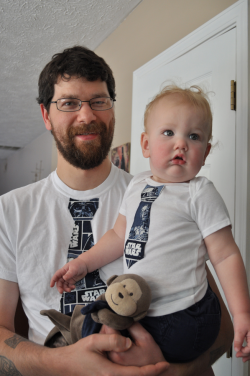
Our geekling turned one this past weekend, can you believe it?! I decided that he would need something extra special to wear as the guest of honor to his birthday party. Liam’s Aunt Lora had given him a cute faux tie onesie 3 months ago that he’s worn into the ground, but it inspired me to make my own version of a faux tie shirt to match the birthday theme. But you know I couldn’t just stop there… naturally, my husband needed one of these shirts so that both father and son would match. (Lucas’ idea, I might add.) And then I might’ve made a little matching tie “shirt” for our schnauzer as well. I threw together some quick instructions and a PDF of the pattern I drew up & used in case you wanted to do something similar for the loves of your life, too! (more…)
Handmade Plush Greedo Doll
I know, I know. It’s been soap soap soap soap soap for so long that you probably forgot that I got my crafting online start by making plush and purses. (I had almost forgotten, too.) But this past week I went back to my “roots” and the days of crafting plushies in my craft dungeon in Calgary, AB and made something extra special for our son.
I’m a teacher so I don’t normally work in the summer, but my teaching contract has a few summer dates tacked on so that I can run professional development training for other teachers. Since the geekling normally goes to daycare built in to my school district, (which is closed for the summer) we had to find him an alternative daycare to go to for these random days. Every day when I would pick him up at this new place, I’d walk in his classroom and find him loving on this big plush Dora the Explorer doll. He was in love with this thing! He carried Dora everywhere, hugging her tight. It was adorable! Of course, Dora belongs to the daycare, and now that I’m finally off for the summer, that meant no more time with the Dora doll. We could’ve just gone out and bought him his own Dora the Explorer doll, but why buy when you can DIY, amirite?!
So then I started thinking. If I’m going to make my kid a big plush doll… why not give it to him for his upcoming first birthday, which is Star Wars themed? And since the party is Star Wars themed, let’s make the doll a character from Star Wars. Those of you that know me can see why Greedo was my first choice; he’s my favorite Star Wars character. I know, I know, it’s not about me, it’s about the kid. BUT, the geekling is going to be brought up RIGHT and be taught about how Greedo shot first, (George Lucas said so!) so I thought it was a good idea to start with a Greedo plush. Besides… we can then act out fan fiction where Han and Greedo didn’t shoot at each other and instead are BFFs and fly around our living room in the Millennium Falcon we made together. Can you just picture the geekling and his plush Greedo in his Millennium Falcon?! I just melted from the cute.
Anyway, I know it’s been awhile since I’ve gotten out the old sewing machine, but it felt like I had never abandoned it for soap when I got it out this past weekend to stitch together my Greedo doll. Thanks for not holding a grudge, sewing machine. I missed you!
Before I could start sewing, though, I needed a pattern. I tweeted a picture via Instagram two weeks back of a little sketch I did on a scrap of paper as I was formulating my plush plan; it was how I pictured a cute and cuddly Greedo doll to look. After getting the thumbs up from followers, I turned the sketch into a large paper pattern. The kid and I ran out one afternoon and picked up a bunch of fleece and felt, and the rest is history. Greedo came together overnight, and I couldn’t be happier with how he turned out. I love him so much that I’m not sure I want to give him away!
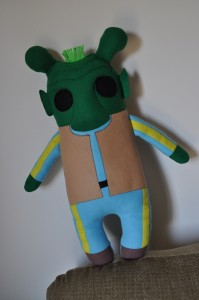
Our finished Greedo plush is 2ft tall (!) and made mostly of super soft fleece with some felt features. Fittingly I left the hole for turning & stuffing in Greedo’s head (hahahaha, see what I did there?) and hand stitched his head closed after stuffing. The nose and eyebrow is all one giant unibrow-nose piece that I sewed separately on the face so that I could lightly stuff it to give his nose and brow a bit of depth. As you can see from the pictures, I cut out the two large full-body shapes completely in the jumpsuit blue fleece and then cut other pieces, like the green head, brown shoes, yellow jumpsuit stripes, and brown vest, and sewed them down to the blue fleece form like pieces of a puzzle in the right spots. Then when I was ready to put Greedo all together, I only had to sew the two large blue jumpsuit pieces, instead of dealing with several different pieces. I hope that made sense. TLDR; I sewed down all of the other parts to the blue body outlines first.
I mentioned pictures – you know I took pictures of the whole process, right? Here they are!
[flickr-gallery mode=”photoset” photoset=”72157630236200242″]
(See the whole set on Flickr)
I seriously cannot wait to gift Greedo to the geekling this next week for his birthday! I hope you like how he turned out as much as I do. :) As a side note, I have lots of Greedo-colored fleece and felt left over, so you never know what other Greedo goodness I may make next! I’m totally thinking hand puppet or a mini lovey blanket…
Sharon's Knitted Duck

Photo copyright to Sharon of Making Stuff http://shazronnie.blogspot.com/
Happy Thursday! It’s been a little quiet around here lately, but today I’ve got an adorable knitted duck to share with you. Behold! Sharon of Making Stuff (Aka Avoidance of Housework) has knitted this super sweet duck from my free Knitted Duck Plush pattern. [also on Ravelry] Didn’t it turn out lovely? I heart Sharon and all of those who share pictures of what they’ve made from my patterns. It gives me such a warm, fuzzy feeling inside! Thanks, Sharon!
Speaking of Sharon’s blog, you just HAVE to check it out. All of her baking (wow, look at her blog banner… it looks good enough to lick the monitor screen!) looks so delicious. I love how beautiful her Battenburg turned out and I am definitely trying out her Fougasse recipe. Yum! Â Plus… she has a PINK kitchen! It doesn’t get any better than that.
Thanks for making my day, Sharon! :)
Forget sock monkeys — YOU need an original Sock-thulhu!

Sock-thulhu © Lesley Karpiuk
Sock monkeys are sooooooo 1930s. What you need is one of my original designs: the Sock-thulhu, a Cthulhu plush design à la sock monkey. Made from soft, fuzzy chenille-style socks and stuffed with polyfil, Sock-thulhus will steal your heart with one look or a beat of their gently reinforced wings. While socks and Cthulhus have gone together before, the Sock-thulhus’ pattern and construction is like no other and produces a one-of-a-kind plushy delight perfect for cuddling.
Sock-thulhus stand around 6 inches tall. You can buy one in my Etsy shop! Currently I only have three: one mint green, one purple, and one orange. I hope to get a blue and pink one up soon and more to come as well.
Hope you have a great week!


Sock-thulhus are a creature and pattern legally registered and © copyright to me, Lesley Karpiuk (pinktoque) of the Pink Toque Craft Blog http://craftblog.pinktoque.com
Cabled Wine Bottle Bag

copyright Lesley Karpiuk / pinktoque
My parents’ anniversary is fast approaching (July 27) and I’ve had it in my head that I would make them something wine-related as they enjoy wine-ing with friends. I know that wine-ing isn’t a true word, but just go with it, ok? While Lucas and I were in Nova Scotia last month we picked up a bottle of local wine for them, keeping in mind that I was going to be knitting them up a wine bag for it later. This was an important choice to ponder as most wine bags are meant for typical shaped bottles of wine while my favorite wine to buy my parents is usually some kind of Canadian ice wine, which likes to come in these super skinny tall bottles instead. I picked out some Kellermeister by Jost Vineyards that has a very normal wine bottle shape. I’d like to be able to say that we’ve tried this wine and can give you an opinion, but we picked up a bottle of something else while we were in Nova Scotia and the name completely escapes me. But I’m sure Kellermeister is good. It’s a 4 out of 5 on the sweetness scale, and my parents enjoy wines on the sweeter side.

copyright Lesley Karpiuk / pinktoque
When searching for a pattern I had a few requirements. First of all, I wanted something that could be done in the round from top to bottom; just say no to seaming, folks (if saying no is an option). I also wanted something pretty. My recent interest obsession with cables had me looking for a cabled wine bag, but I wasn’t having much luck. Then I came across the Wine Bottle Cozy pattern by Tara’s Knits — her original bag is fantastically plain and simple, and so I decided I’d be able to modify the stockinette body of the bag by throwing in a cable pattern to spice it up. I’ve done enough cables to have a vaguely accurate idea of how to write up a cabled pattern and so that’s what I did. When it was all said and done I was happy; I think I would’ve liked to have made the cables bigger, but it definitely turned out lovely, don’t you think?

copyright Lesley Karpiuk / pinktoque
The yarn. Let’s talk about the yarn. Earlier in the new year, signs started cropping up in my local Michaels. “New yarn department coming spring 2009!” they said. I waited. And waited. It was discussed a lot on the Ravelry forums. Michaels finally unveiled their “new yarn department” and at first I was a bit disappointed because it basically just looked like they finally restocked the yarn aisles for a change and added more acrylic yarns to the mix. Like we need more acrylic! I was secretly hoping for a little more wool and other natural fibers, but I have to accept that Michaels is a big-box craft store that hosts thousands of other crafts besides knitting and crochet, so I guess I should be lucky that they’ve stocked so many different kinds and colors of acrylic instead of complaining; it may not be the yarn favorite, but I’m not a yarn snob and can admit openly without shame that acrylic definitely has its place. I have plenty of acrylic in my stash; it’s very multipurpose and washable. As part of the new yarn department unveiling, Michaels came out with their own new brand of acrylic. The brand is called Loops & Threads and the yarn’s name is Impeccable; it comes in ombres (mixed colors) and solids and is fairly soft for being acrylic. I’d been kinda drooling over the way the Seaside ombre colorway looked on a previous trip to the store (It’s gotta be the gorgeous shades of blues and greens that blend together so well. Oops, did I mention my recent infatuation with blue greens again?) and with a wine bag plan in mind, I saw it: the Impeccable colorway that blends violets and lavendars and greens together: Fresh Lilac Ombre. I don’t know, but doesn’t a colorway in grapes and greens seem like the perfect combination for something wine-related? I thought so.

copyright Lesley Karpiuk / pinktoque
If you’re interested in my modifications of Tara’s pattern to create your own cabled wine bag, all you have to do is sub in my cable pattern repeat (4 rows) in place of the stockinette body of the pattern. I did the ribbed top cuff the same and did the decreases at the end the same; the only thing that changed was instead of knitting row after row around and around for the body in stockinette, I created and followed the 4 row repeat below:
rows 1, 2, & 4: (k6, p1, k4, p1) each needle/repeat until end of round
row 3: (k6, p1, sl2 to cn & hold in front, k2, k2 from cn, p1) each needle/repeat until end of round
And there you have it! I’m thinking if I make another cabled wine bag in the future that I’ll switch the 4 stitches of cable with the 6 stitches of stockinette in between the cables. So I’ll cable for 6 stitches and only have 4 stockinette in between the cables. Does that make sense? I like big cables and I cannot lie… you other knitters can’t deny… ok I’ll stop there.
The Cabled Wristlet That Couldn't.

Sure, it looks OK when not in use...
I would be a bad blogger (and a liar) if I said that everything I attempt to make turns out as planned. Or even that I never have a craft failure, cuz’ clearly I have had my share. It’s not really that this cabled wristlet I whipped up didn’t look nice when finished. I mean, it doesn’t look too bad in the pic, right? Its functionality went down the tubes somewhere along the way, though, and that’s what made this project fail on me.
I was so looking forward to this post way back when I was still designing the wristlet. I couldn’t wait to share it, couldn’t wait to finish it in time for an upcoming trip, and couldn’t wait to give you all the pattern and my instructions so you could make something equally beautiful for yourself. In my lack of design experience I missed a few key things, however.
The idea was that I wanted to try cables. I had it in my head that cables were so hard. But then I actually sat down and made myself try them. They were such a piece of cake! And wow, did I ever really love the look of cables. Cables make it seem like I’m so much fancier and so much of a better knitter than I am. They’re easy, but to the untrained or inexperienced eye, they look super intricate and difficult. Add cables to an otherwise boring knit and suddenly it’s magic and you’re a superstar! I still feel that way about cables, which is why I think this wristlet project looks nice, but it just didn’t work out when it came time to use it. I haven’t decided if I’m going to even bring it this weekend on our trip or not.

... still not looking all that bad...
Oh ya, the trip! That was really what inspired this knit; Lucas and I are celebrating our wedding anniversary and we decided to go somewhere that neither one of us have ever been, but that we’d been wanting to see. As we’re planning to move back to the states in the somewhat near future, we decided to stay within the country and finally make a trip out to the far east coast of Canada. Nova Scotia, to be exact. We’d talked about going out there for our honeymoon last year but never got around to it. So instead we’ve decided to treat ourselves to a 4 day getaway with no real set plans and no family members nearby. We realized recently that we’ve never taken a vacation that didn’t involve visiting family or friends. Every trip we’ve ever taken together has been to visit our family either in British Columbia or Indiana, and while the trips were fantastic and we enjoyed every minute of visiting with family we don’t see very often, we decided it was high time we take a trip for just the two of us. Our plans loosely include flying into Halifax overnight Thursday and staying until late Monday afternoon. No hotels are booked yet; we are renting a car and just driving… just planing to stay wherever we end up. We do know that for Saturday, our actual anniversary date, we want to stay in a really nice bed and breakfast way up on Cape Breton Island and eat somewhere nice. The exact how, when and where is still up in the air, and believe it or not, I rather like it that way.

...not horrid but not the best. You can't see the "invisible" stitches, but I promise they're there.
Anyway, back on topic… this beautiful province we’re planning to visit in Latin means “New Scotland.” When the trip was planned (very recently) I realized I had just over 2 weeks to knit something to use/wear on the trip. I’m a slow knitter and have lots of things with a deadline coming up to finish, so I knew it wouldn’t be anything large and most likely I’d not have enough time to knit a shrug, either — though I’m dying to make one. I decided something cabled because for some reason, thick cables and either greens and blues sound like something that would fit in a place called “New Scotland.” Something I am really looking forward to experiencing in Nova Scotia is the Scottish flavor of music and culture that I keep hearing about up in Cape Breton. Cables make me think of (or remind me of) celtic knots in a way, and so a cabled wristlet idea was born, even if that reasoning sounds silly or illogical to anyone else.

What the hell is this? Oh right... my cabled wristlet IN USE. Thanks for modeling, honey.
In looking at basic cable patterns I kept seeing the same sorts of variations on a rib/cable pattern; ribbing along the sides and a cable winding up the middle. I stuck with that idea and using chunky yarn in a pretty sky blue, I whipped up a big rectangle. Wtih those cables, gah, it was just SO gorgeous. I was so proud! They looked so fancy! I folded the rectangle in half, and then to form the strap I just did a simple 6-stitches-across and repeated the rows until it was “long enough.” Design problem number one was not thinking ahead as to how that strap would stretch later on. I sewed up the side seams of the rectangle, sticking the ends of the strap inside one side seam. So far so good! I decided to line it and include a zipper, because I coudn’t very well let an open pouch dangle from my arm; all my stuff would fall out! The most secure way would include a zipper so there were no openings for my belongings to fall out through. I guess this is where the rest of the failure continued to go: I had a horrible time lining such a thick knitted pouch. I did the lining fabric pouch separately and used my machine to sew the zipper neatly to the lining. Then all I had to do was hand stitch the zipper neatly inside the knitted pouch. This all went according to plan, but the hand stitching looks awful (I even used invisible thread!) and when it was all finished, I realized how off my proportions were in the design. The handle is too long and stretches a lot, and the bag’s size is a bit big and looks a little awkward. Even with nothing IN the pouch, it’s so heavy and bulky that it makes the handle stretch, which makes the side seam of the pouch stretch in a very unflattering way. The end result really isn’t very flattering at all, to be honest.
I don’t know what I expected, but the vision in my head didn’t match up with the end result, and so to me it’s a failure. Lucas would say I was being too hard on myself, though, so maybe I shouldn’t use the word “failure” … on the bright side, I got in a lot of practice with cabling (which is my new obsession and I love it, which is automatically another ‘plus’ to the project) and so it wasn’t all bad and thus not a total failure. What do you all think? Would you make one for yourself? If so I could throw together the loose outline. Any suggestions on design changes for a future attempt or should I just leave it dead? Is the stretching as bad as I think it is?
Despite this not-so-great result with the wristlet, I did get in some really simple projects over the weekend: some dishcloths and a cabled (I told you I was obsessed) bookmark for a co-worker. More on those (with pics) later this week :)
Tickled Pink (And Blue and Green)

Photo copyright to Daniella Cortez of DaniDo Crafty! Get your own at http://danidocrafty.etsy.com
I’m just tickled to have been one of the winners of the lovely and talented Daniella of DaniDo Crafty‘s Handmade News scavenger hunt contest last week. I’m tickled pink… and blue… and green… because I chose as my prize some of her absolutely gorgeous Superwash Merino roving. And the colorway? Please Clap Your Hands! (Seen pictured here. Photo copyright to Daniella!) Way too fun! This excites me because I’ve been wanting to spin; if you recall in a previous post, I had purchased a top whorl (and bottom whorl) drop spindle kit that came with some plain white wool roving to work with. I’ve been so busy with Mother’s Day and Father’s Day knitting projects that I haven’t had a chance to sit down and give it a whi(o)rl. (See what I did there?) Then in walks an opportunity to work with Daniella’s beautiful Please Clap Your Hands roving, and I’m inspired to make time for spinning. No more putting it off — once this fabulous merino arrives I’ve got no excuses; I can’t let such beauty go wasted and unused. It will be loved, I tell you, LOVED! And hopefully (*fingers crossed*) spun into something that I can knit into something fantastic. I’m also a little embarrased to admit I’ve never worked with merino before; so even more reason to be excited about such an opportunity to work with something so awesome.
Special thanks to Daniella for the contest and the wonderful prizes. I truly am tickled. You should definitely check out her site, Danido Crafty! as well as her Etsy and Artfire shops. You’ll love the free patterns on her site and all of the beautiful handspun and hand-dyed yarn and roving (among other things) that she has available in her shops. She’s also a writer over on Handmade News and guess what she writes about? Inspiration! Perfect, as her contest to hunt all over Handmade News last week had me finding articles that I may not have otherwise read, and so many great ideas — all very inspiring! Thanks again, Daniella!
Just Ducky!

Photo copyright to Jill D'Aubery
I love, love LOVE when people send me emails, showing off things they’ve knitted from a pattern or made from a tutorial of mine. This week I got a lovely email from Jill D’Aubery who made her own version of my knitted duck plush, [on ravelry as well] making some fabulous adjustments to the wings and beak to suit. She even added a tie! The changes and resulting duck is simply FANTASTIC and Jill has given me permission to share her pattern changes with all of you so that you can follow her method on your own ducks. But first, the back story. Jill writes,
“My brother-in-law, who is in his 60s, is in love with rubber duckies. For years now I have knitted something for his wife, but never for him…until I saw your pattern! I had seen the Lion Brand pattern and felt exactly the same way you did about it. So I tried your pattern and made a couple of changes and the result is in the attachment. It’s adorable!!! I gave the ducky a tie since it’s for a guy and I knitted the tie out of silk embroidery floss with a #1 needle…very difficult but very wonderful.”
“The changes I made were to the wings and beak. I did the wings lengthwise and bound off tightly which give them a little scalloped effect.Â

Photo copyright to Jill D'Aubery
Wings
Cast on 14 st.Â
Knit every row for 10 rows or so…until the wing is the size you want.
Bind off tightly.
Attach to the body at the bound off end/side.Â
The Beak
Cast on 7 st.
Knit in Stockingknit stitch (knit on right side, purl on wrong side) for 6 rows,
k 2tog on each side, purl one row, add 1 stitch on each side and continue for 5 more rows.Â
Bind off.
Attach to body from the slightly narrow middle with the smooth side on the outside.
The beak curls nicely and opens just like a ducky beak! Of course, you can make the beak larger or smaller as you wish. Also, I attached the feet on the narrow end so that they sort of flare out like a duck foot does.”

Picture copyright to Jill D'Aubery
Now don’t you agree, the result is fantastic? Jill’s ducky rocks my socks off, and when I first read her email and saw the little knitted tie on her ducky, I squealed aloud. SO cute. Great job, Jill, and thank you so much for sharing your pattern with us!
Around here it’s almost time for a long weekend, so hope you all have a great weekend. I’ll be back to update you on our Father’s Day sock progress soon!
Cozy Coffee Despite Snow in April

Finishing touch includes buttons
I guess instead of blasting Calgary for this <sarcasm> fabulous </sarcasm> snowy weather I should look at it from a positive point of view: Lucas had a reason to wear the toque and scarf set I crocheted him for his birthday last fall, and I had a reason to wear my handknitted ribbed cuff (pink) toque and my handknitted pink and burgundy boucle scarf… plus it was the first day out in the wild for my crochet felted purse, which I put the finishing touches on last night. The button closure was a breeze, and to shorten the length of the handle I cut out a section and put the two ends back together using two buttons; this looked decorative and it was functional all at the same time. I adore it!
It’s a good thing I didn’t pack those winter accessories away yet, eh? Meh, Calgary.

Coffee Mug Wrap pattern by Danido Crafty!
The cold and the snow meant I was in search of something… well, warm this morning. But of course, as I was at work, it would have to be a small project. Cue my shameless plug for today’s Knitting Under the Desk free pattern suggestion: Danido Crafty’s Coffee Mug Wrap! I think I’m in love. No, scratch that… I know I’m in love. This pattern (and Daniella, the creator) ROCKS! I’m stalking her now, because it seems we have more than just knitting in common… like me, she also enjoys mixing fitness and fun with the Wii AND she and her boyfriend have a white mini schnauzer just like we do! Too freaky!