Adventures in Sock Knitting
So as I’ve mentioned in a few previous posts, my husband Lucas has not only learned how to knit recently, but we’ve both been working together, knitting a pair of socks for each of our dads for Father’s Day. As Father’s Day is coming up very soon, I thought I’d share where we are in the process and how it’s been going.
May 9, 2009: Cast On
Lucas just learned how to knit yesterday. Let me repeat that just in case you missed the significance – he learned how to knit yesterday (May 8) and he is starting his first sock today, May 9. He learned the basic knit and purl stitches and practiced them by making a few swatches. He and I cast on our first sock for this project today — Lucas’ first project ever! I’m very impressed (and proud) that his very first project was something that most don’t attempt for at least a couple dishcloths. I’ve been knitting off and on (definitely, obsessively on recently) for nearly 3 years and I’m just attempting my first real sock that I will see through to completion. (Not counting the practice sock I posted about a few weeks ago.) We are using the free Lion Brand Men’s Grey Socks pattern.
May 22, 2009: Turning the Heel and Picking Up Gusset Stitches
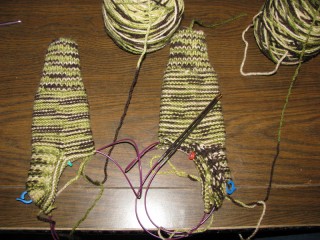
Here’s a picture after we turned our first heel of our first sock together and picked up the gusset stitches and worked them. This was approximately May 22. My sock is on the left, and Lucas’ sock is on the right. Don’t worry that his sock looks a little bigger; Lucas is using a size 5 needle while I use a size 4 needle, so it’s to be expected. We only have one interchangeable set to share, so we’re making due however we can. Although I think using a size smaller needle than the pattern suggests may come back to bite me later. (Ack! See below)
May 31, 2009: I completed my first sock
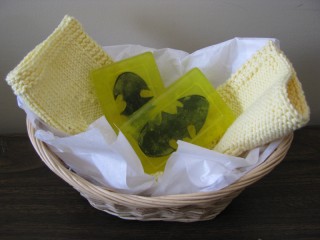
I was so excited when I got down to the end that I just had to try it on, even before I grafted/Kitchener stitched the toe closed. My concern above about how the size 4 needle (when I should be using a 5) may come back to bite me later? Let’s just say the sock fits ME perfectly. Nice and snug. The problem? The sock is supposed to fit MY DAD, who has bigger feet than I. Oops. Maybe when we block them we can stretch them a tiny bit. *crosses fingers* Lucas is currently working the foot and is nearly closing in on finishing the toe. We had another (Our friend Michelle’s birthday) project that we were trying to get done, so after doing that I went ahead and started my second sock and Lucas finished up the birthday gift project before getting back to socks. In fact, you can see the finished products (Batman soap and dishcloths) in the previous post! :) Happy Birthday, Michelle!
June 3, 2009: My pair is complete!
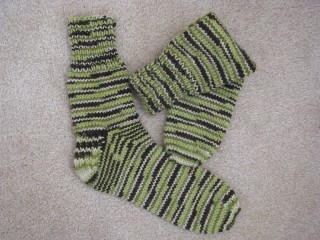
I have completed my second sock and am so excited that I have finished my first pair of socks! I know it seems like I did the second one very quickly in comparison, but to be fair, I had started the second one down to the heel turn already so it finished fast. The problem? I’m still concerned that they won’t fit my dad. Also, I’m a big loser — I did the toe wrong! You can’t tell in this photo, but I did the grafting the wrong direction. So you know how the seam should go lengthwise across your toes, from pinky to big toe? Mine goes perpindicular to that. I guess I didn’t think far enough ahead — I should’ve re-oriented the final 16 stitches on the needles differently before I started grafting in order to get the seam to lay right. This might’ve been due to the fact that the pattern we followed was meant for DPNs and it probably wasn’t mentioned because it would’ve ended up properly if we were doing it on DPNs instead of magic loop, but oh well. Chalk it up to a learning experience I guess! I feel a little silly, but it’s how we learn.
June 7, 2009: Lucas finished his first sock!
It looks fantastic and because of my mistake with the orientation of the toe seam, he is going to ensure he doesn’t follow suit. I don’t have pics of his yet, but we’ll get them up soon :) The great thing is that we’re pretty sure that Lucas’ socks will fit his dad – they almost fit Lucas, and his dad’s feet are smaller than his. Here’s hoping! I am so proud :)
It’s all going really well. I’m a little concerned that we may not finish 100% in time, but we’ll be close and I’m sure our dads will understand. (It’s our faults – though it seems like we’re going really slow on these socks, we’ve not been working on them daily like we should.) I’m a little worried that my socks may be a little small to fit my dad comfortably, too, if he can even get them on his feet. We’ll see. For our first socks, I think we’ve done great and there’s something really amazing about seeing all of the parts — cuff, leg, heel, gussets, foot and toe — all come together to form something so simple and normal that we wear every day. I don’t think I’ll ever look at another sock the same way again. I also know I didn’t want to take the sock off when I tried it on. There really is something magical about handmade socks. I think a pair for myself is in order soon, don’t you think? (With proper toe seams, LOL)
DIY: Batman Soap Tutorial
I realize that crafting Batman soap does not seem like something you’d find at The Pink Toque craft blog, but rest assured you’re still at the right blog, and today we’re going to do something ‘different’. Soapmaking is a lot of fun – I spent a brief period back at Indiana University playing with the very basics of making handmade soap. When I was trying to come up with a great gift idea for my good friend Michelle (whose birthday is coming up on Monday) I immediately thought of knitting her something, since of course that’s the craft I’ve been doing a lot of lately. I should also mention that Michelle loves Batman. (That’s kinda an important point to this story.) So then I was thinking knitting + Batman. (Awwe, knitting + Batman forever!) I came up with the idea of knitted washcloths with the Batman logo on them. (Side note: I was unable to find a pattern for this already, but the Batty Dishcloth by BlackRayne is pretty close and looks good in yellow cotton!) And then I remembered how I made basic soaps back in university and envisioned a way to incorporate the Batman logo into the project so that I could create a Batman cloth and soap set for Michelle. So now you have the backstory, and now I can get on to the DIY part!
Materials:
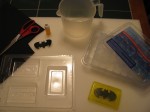
First of all, let’s talk about materials. I mentioned that this is very basic soapmaking. It is. It’s very easy. We’re talking about melt, pour and voila here, people. I made my first Batman soap last night in about 15-20 minutes, including prep time. Head on over to Michaels (or your local craft store) and find the soapmaking aisle and pick up the following items:
1. Glycerin – “bricks” of clear or creamy white glycerin is sold usually in 2lb plastic containers like you see in the materials photo. (Click here to see what mine looks like.) Pick up some of the clear, since you want to be able to see the Batman logo when you’re done.
2. Soap coloring – this is packaged similarly to food coloring and the little bottles of color look just like it. It says it’s specially formulated for soap making, though, and since food coloring stains my hands and I’m not sure if the color will stain your skin when you use the soap, I go ahead and pick up specially made/packaged soap coloring instead of risking food coloring, just in case. Grab a little bottle of yellow. You’ll only be using a few drops per bar, so this stuff will last a long, long time.
3. Soap mold – there are likely several various plastic soap molds there in the soapmaking aisle – I just chose a plain and basic rectangular soap mold shape; approximately 4 inches wide by 2.5
4. Black foam – in the kids craft aisle I found a single sheet of black craft foam. It’s around the thickness of a piece of posterboard, maybe a little thicker, for $0.99. This is what we’ll make the logo out of.
That’s all you need from the store. You most likely already have a computer at home to grab the logo template with for printing, scissors for cutting out the logo, and a small container or liquid measuring cup to microwave and stir hot liquid soap in. It’s also recommended to grab a little spray bottle with rubbing alcohol in it. These spritzer bottles can be recycled from an old one you have at home (make sure it’s been thoroughly cleaned!) or you can get a cheap one in the travel aisle of your local grocery store or Wal-Mart, for example. Rubbing alcohol can be found in the beauty/pharmacy department of your local store, too. It’s commonly found with peroxide. Ok now let’s get started!
Directions:
1. Print off the logo template I’ve made onto regular paper. I made my logo to be around 3 inches wide x 1 inch tall so that it will fit nicely in the center of my rectangle of soap.
2. Cut out the logo carefully. Lay it on the black craft foam and trace with a pencil. It may seem like you won’t be able to see the pencil lines, but trust me – you will.
3. Cut out the logo shape from the black craft foam. This is getting very Batman very quickly.
4. Open your brick of clear glycerin. It’s usually scored for you so you can cut off even sized chunks. I found that one complete slice along the short side of the brick was the perfect amount for one bar of soap. See the materials picture to see where I cut mine if I don’t make sense. Using a butter knife (this is where kids will need help if kids are involved!) slice off a chunk of glycerin.
5. Microwave your chunk of glycerin in a small microwaveable bowl OR liquid measuring cup. I recommend using something like your Pyrex or plastic liquid measuring cup since it has a lip that will make pouring the hot liquid soap later much easier. For the amount I sliced off, this only took around 30 seconds on high. You will have hot liquid soap in no time! Do a little Batman jig while you wait. I’m not sure what a Batman jig would look like, but if you do one, please be sure to YouTube it.
6. Squeeze 5 drops of yellow soap coloring into the liquid soap and stir. I found 5 drops to be adequate to get the color I was looking for, but feel free to use more or less as desired.
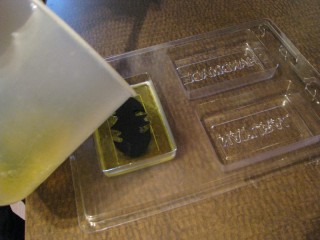
7. Now pour (see why using a liquid measuring cup was recommended?) your yellow liquid soap into the soap mold BUT ONLY FILL IT HALFWAY. Reserve the remainder of the yellow liquid soap and set it aside. If you see any air bubbles in your mold, gently use a toothpick or the end of the knife you used to cut the glycerin with to swirl them out. You can also use the spray bottle of rubbing alcohol and lightly mist the surface of the soap to remove air bubbles.
8. Wait 10 minutes. You could put the mold in the fridge while you’re waiting if you’d like, but it’s not necessary. You’d be surprised at how fast this stuff hardens! This is also an excellent time to upload that YouTube vid of you doing the Batman jig from earlier.
9. The soap in the mold should be solidified enough for the next step at this point. If the reserve liquid soap has hardened during the 10 minutes (which it will have), pop it back in the microwave to re-liquify it for 15 seconds or so. Now we’re going to add the logo. A note on that:
Basically what you’re doing is layering; creating two layers of soap and placing the foam Batman logo in between the two. You let the first layer harden enough to add the logo, then pour the remainder of the liquid soap on top and let the whole thing harden so that your logo is “trapped” between the two soap layers and therefore in the middle of the soap.
**FIRST** Using your mini spray bottle of rubbing alcohol, gently spritz the hardened surface of hardened layer one. This will ensure the two layers don’t separate later. OK now on with the show…
10. Pour a DROP of hot liquid soap in the center of your mold, on top of the hardened first layer. This drop of liquid soap will act like “glue” to hold your logo in place. Gently place your logo on top of the first layer, pressing on it gently so the liquid soap spreads out and helps the logo stick to that first layer. Now gently pour the remainder of the hot liquid soap on top of the logo to fill up the mold and create the second layer. Again, if there are any air bubbles on the surface, swirl them out with a toothpick or something so that the soap hardens as smooth as possible. And again, you can also use the spray bottle of rubbing alcohol and lightly mist the surface of the soap to remove air bubbles.
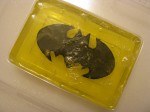
Let your soap sit overnight to completely cool and harden. In the morning you will be delighted to see your finished soap! Turn the mold over and gently pop it out. Voila! You now have awesome Batman soap.
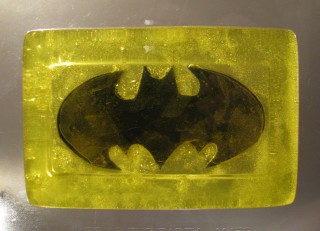
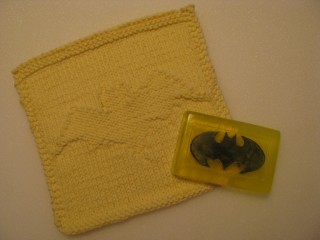
This method would work for lots of things, so use your imagination! I hope you enjoyed the tutorial :) And I hope Michelle loves her handcrafted Batman soap! I took a picture of the first bar alongside the first knitted Batman cloth. Lucas is making a second cloth and we’ll make a second bar of Batman soap to go with it. This gift will truly be completely handmade from both of us :)
Tutorial edited 6/6/09 to add in information about using a spray bottle of rubbing alcohol to help with air bubbles in the soap and in between the layers, thanks to comments below from Gina and suggestions on Craftster, where this tutorial was also posted. Thanks! :)
Tickled Pink (And Blue and Green)
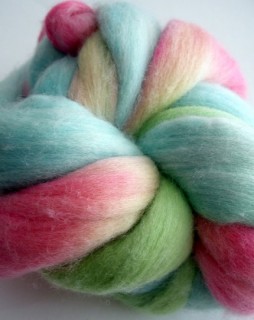
I’m just tickled to have been one of the winners of the lovely and talented Daniella of DaniDo Crafty‘s Handmade News scavenger hunt contest last week. I’m tickled pink… and blue… and green… because I chose as my prize some of her absolutely gorgeous Superwash Merino roving. And the colorway? Please Clap Your Hands! (Seen pictured here. Photo copyright to Daniella!) Way too fun! This excites me because I’ve been wanting to spin; if you recall in a previous post, I had purchased a top whorl (and bottom whorl) drop spindle kit that came with some plain white wool roving to work with. I’ve been so busy with Mother’s Day and Father’s Day knitting projects that I haven’t had a chance to sit down and give it a whi(o)rl. (See what I did there?) Then in walks an opportunity to work with Daniella’s beautiful Please Clap Your Hands roving, and I’m inspired to make time for spinning. No more putting it off — once this fabulous merino arrives I’ve got no excuses; I can’t let such beauty go wasted and unused. It will be loved, I tell you, LOVED! And hopefully (*fingers crossed*) spun into something that I can knit into something fantastic. I’m also a little embarrased to admit I’ve never worked with merino before; so even more reason to be excited about such an opportunity to work with something so awesome.
Special thanks to Daniella for the contest and the wonderful prizes. I truly am tickled. You should definitely check out her site, Danido Crafty! as well as her Etsy and Artfire shops. You’ll love the free patterns on her site and all of the beautiful handspun and hand-dyed yarn and roving (among other things) that she has available in her shops. She’s also a writer over on Handmade News and guess what she writes about? Inspiration! Perfect, as her contest to hunt all over Handmade News last week had me finding articles that I may not have otherwise read, and so many great ideas — all very inspiring! Thanks again, Daniella!
Homemade Hilarity
Podcast Haiku
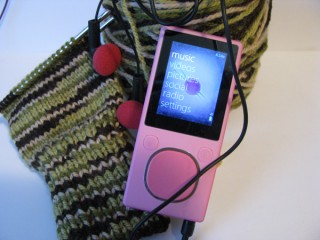
As I mentioned in a previous post, I recently acquired my first real MP3 player. I’ll mostly spare you from the horrid details of my problems with the Zune MP3 player that I purchased first… let’s just say the Microsoft proprietary software you are forced to use to sync your files with the player has a long way to go to reach a level of acceptable user friendliness. I took it back and picked up an 8GB Sony (Walkman) MP3 player; the same brand and type my husband has.  And now, a haiku, to express my love for this new gadget.
Ode to my Sony MP3 Player
Thanks Sony player
Music, podcasts, video
Doesn’t suck like Zune
And now, I want to point out the highlighted word in my haiku that inspired today’s post. Podcasts. This is a fairly new concept for me; digital media in a series, web syndicated.  Like a radio show, but broadcasted online for you to download and put on your MP3 player and listen on the go. And when I started looking around for knitting related podcasts, I was overwhelmed by just how many podcasts there are out there for just about anything and everything you can imagine. Some series are updated weekly, monthly, and in each little segment or show, there’s obviously a main topic related to the subject of the podcast that gets discussed. I don’t know why it never really occured to me to listen to podcasts before; perhaps it has to do with the fact I’ve never owned a portable media device before. I know that’s not a requirement since you can just listen on the web, but using a portable digital media device is where it’s at. I can take the Cast On podcast (knitting) or Epic Dolls podcast (gaming) with me wherever I go and get updated on new segments in the series just like I do with bloggers out there like the Yarn Harlot or KnitPurlGurl that I follow with Google Reader, for example. KnitPurlGurl has her own mom and fiber podcast, too. I find this whole thing fascinating. And I also feel a little noobish that I’m so late to the game on this.
Check out what I’m listening to and see my subscriptions, add me as a friend, or suggest podcasts you think I’d be interested in over at Podcast.com! I don’t use iTunes, as much as it’s promoted and hyped up, because when I tried to browse podcasts there it wanted me to download and install the iTunes app to use like a “store’ to shop for things instead. I don’t want to add more proprietary software to my computer; that was my main problem with the Microsoft Zune. If I can’t browse and download your selections online (via website, and not an additional required application that connects to a website) to then just drag and drop onto my MP3 player, I’m not interested. I don’t need another media player on my computer and I don’t have an actual iPod to sync, so it’s all pointless to me. But I digress.
If you have any podcast goodness you think I should be listening to, let me know! :)
PATTERN FOR SALE: Cthulhu Toque
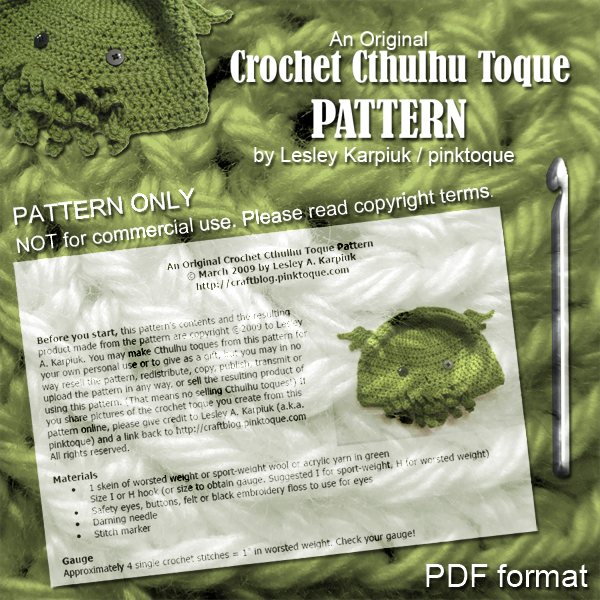
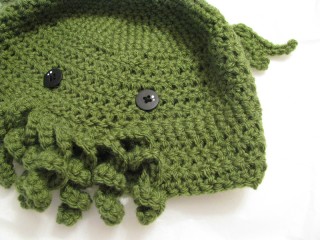
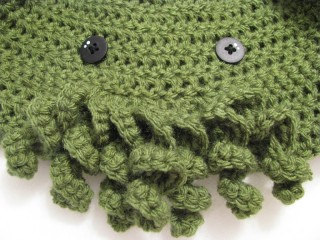
That’s right, my Cthulhu Toque pattern is FOR SALE! :D It’s available for the low price of just $3.00 now, so if you’ve been wanting to make one of your very own, now is the time. I promise it’s easy, even for a beginner, and you’ll love the super cute results.
Where Can I Buy the Pattern?
You can purchase from whichever site is easiest and most convenient for you :) You’ll love the way Cthulhu looks innocently over the top of your head as he noms on you. I cannot be held responsible for any problems resulting from your new abundance of coolness and popularity once you go strolling down the block wearing one of these on your head. Note: If you purchase from Ravelry you will be able to instantly download the PDF pattern from the site after purchase; If you purchase from the Pink Toque Shop, you will receive your PDF pattern via email within 24 hours of purchase via email.
All the Details
Materials
* 1 skein of worsted weight or sport-weight wool or acrylic, green
* Size I or H hook (or size to obtain gauge. Size I for sport-weight, H for worsted)
* Safety eyes, buttons, felt or black embroidery floss for eyes
* Darning needle
* Stitch marker
Gauge
Approximately 4 single crochet stitches = 1″ in worsted weight.
Stitches and Terms Used
* chain (ch)
* single crochet (sc)
* double crochet (dc)
* slip stitch (sl st)
* half double crochet (hdc)
See how easy it can be to sport your very own crochet Cthulhu toque? But Lesley, I don’t know how to crochet! Well that’s easy – you can also purchase a completed toque, already handmade by yours truly in case you don’t have the skills to make one for yourself. It’s never been easier to get your hands on a one-of-a-kind creation that will make you the talk of the neighborhood. For serious.
I have another pattern I’d like to complete and release sometime next week, but until then enjoy your Cthulhu toques and thanks for your business :) Have a great weekend! Updates coming soon on Lucas and I’s Father’s Day sock projects…
More Cthulhu Toques
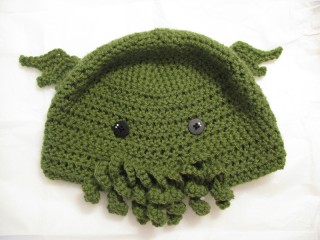
I had an order for one of my Cthulhu crochet toques to fill this week and whipped up a new one to ship off yesterday. I’m really proud of how well it turned out, and especially how well the pictures turned out. So another shameless plug… check out the cute new pics:
Want to buy a handmade Cthulhu toque? Check out my shop! But wait, do you already possess the skills to crochet yourself? Then just buy the pattern ;)
In the (Knitting) Zone
This weekend I got my hands on my very first real MP3 player. We’re talking a decent amount of space, not one you spend $10 on that will hold 30-40 songs and run through a pair of AA batteries 5 minutes after you turn it on; no, I purchased a real 8gb Zune that will allow me to listen to all of my favorite music, podcasts, and even watch videos. (Knitting technique video clips on me wherever I go? Priceless.) While I’m not thrilled that it’s a Microsoft product considering 90% of the computers in the house are currently Linux, (That was an arbitrary percentage to indicate that most computers are Linux, with one or two that can dual boot into either Windows or Linux, OR run a virtual Win box within Linux) it does fit my needs without breaking the bank. Score. (EDIT: Or so I thought. I had some major issues with the Microsoft proprietary software that I was forced to use with this thing, [big surprise! It’s Microsoft; I should’ve known better] and after my 5th day having it, I’d had enough. It shouldn’t have been this fiddly or stressful! I returned the Zune to get the same 8gb Sony Walkman brand my husband uses, with the same features! Hurrah! Unfortunately it’s not pink, but oh well. The brand of 8gb music/video player doesn’t matter to the rest of the post, however, so keep on reading!)
The morning and afternoon commute consists of my husband and I sharing a seat on the Calgary CTrain, aka public transit. We’re on the train for around a half hour each way to get into downtown for work. I always carry some knitting and he usually reads the free morning paper on the way in. I enjoy using public transit; there are lots of interesting people on the train and I don’t have to deal with traffic. Unfortunately, that also means I (along with everyone else) am usually subjected to random idiocy, such as Loud-Talking-People who simply MUST have that private conversation about their recent medical exam or issue with “that horrible girl from accounting” as loudly as possible on their cell phones. They do realize that they are on public transit, right? Their conversations are aired out to the world and most of the time they don’t even realize they are forcing everyone else on the train to listen in on their private lives. It’s annoying. I don’t care that you split your pants at work, nor do I want to hear how you just can’t stand so-n-so or “Like, omg you should’ve heard what she said to me!” drama.  No thanks.
Suddenly with an MP3 player, my issues seem to be solved. I get on the train, snuggle next to Lucas as he reads his paper, and get lost in my knitting zone. It’s zen: my favorite music is playing — quietly enough to not disturb those around me or kill my ear drum, but also at a level where most everyone else is tuned out — and I knit. And I knit. And before you know it, I hear the signal that I’m a stop or two away from where we get off for work and I put my things away and smile happily; a happy sigh that can only be achieved by pure bliss. Sure I still have to smell some of the other passengers, but not being forced to listen to the ones that talk so loudly about things no one wants to hear while still getting to enjoy hubby and my knitting for a full half hour (twice a day!) is fantastic. I have found my knitting zen.
Now I just gotta be sure to not turn into one of *those* mp3 listeners — it’s been hard to keep myself from breaking into song occasionally (music will do that to you), and I do find myself gently tapping my foot or getting my knitting into the rhythm of whatever song is playing. As long as I can keep it confined to my hands and my knitting instead of singing aloud, it’ll be all good. Because trust me… no one wants to hear that.
Just Ducky!
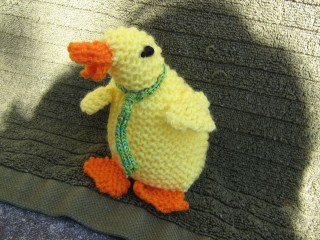
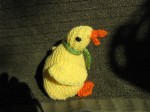
I love, love LOVE when people send me emails, showing off things they’ve knitted from a pattern or made from a tutorial of mine. This week I got a lovely email from Jill D’Aubery who made her own version of my knitted duck plush, [on ravelry as well] making some fabulous adjustments to the wings and beak to suit. She even added a tie! The changes and resulting duck is simply FANTASTIC and Jill has given me permission to share her pattern changes with all of you so that you can follow her method on your own ducks. But first, the back story. Jill writes,
“My brother-in-law, who is in his 60s, is in love with rubber duckies. For years now I have knitted something for his wife, but never for him…until I saw your pattern! I had seen the Lion Brand pattern and felt exactly the same way you did about it. So I tried your pattern and made a couple of changes and the result is in the attachment. It’s adorable!!! I gave the ducky a tie since it’s for a guy and I knitted the tie out of silk embroidery floss with a #1 needle…very difficult but very wonderful.”
“The changes I made were to the wings and beak. I did the wings lengthwise and bound off tightly which give them a little scalloped effect.Â
Wings
Cast on 14 st.Â
Knit every row for 10 rows or so…until the wing is the size you want.
Bind off tightly.
Attach to the body at the bound off end/side.Â
The Beak
Cast on 7 st.
Knit in Stockingknit stitch (knit on right side, purl on wrong side) for 6 rows,
k 2tog on each side, purl one row, add 1 stitch on each side and continue for 5 more rows.Â
Bind off.
Attach to body from the slightly narrow middle with the smooth side on the outside.
The beak curls nicely and opens just like a ducky beak! Of course, you can make the beak larger or smaller as you wish. Also, I attached the feet on the narrow end so that they sort of flare out like a duck foot does.”
Now don’t you agree, the result is fantastic? Jill’s ducky rocks my socks off, and when I first read her email and saw the little knitted tie on her ducky, I squealed aloud. SO cute. Great job, Jill, and thank you so much for sharing your pattern with us!
Around here it’s almost time for a long weekend, so hope you all have a great weekend. I’ll be back to update you on our Father’s Day sock progress soon!
Purls of Wisdom
The Boston Globe published a very interesting article that will cause knitters all over the world to smile: Purls of Wisdom. The author, Irene Sege, explains how she took up knitting for the good of her brain. It’s one of the activities recommended by doctors to potentially help keep your brain healthy, active and sharp in the prevention of Alzheimer’s Disease. Knitting, as Irene’s doctor pointed out, could “open new neural pathways that Sudoku and crossword puzzles couldn’t” and the article delves into the ways that knitting helps to strengthen your focus and concentration skills. As one commenter on the article pointed out, learning *new* things and using *new* skills is what counts to open new pathways in your brain to keep it healthy, though I truly feel knitting still fits the bill as you learn and grow with it because there is SO much to learn in the realm of knitting and other fiber arts. I know it will be a very long time before I learn everything there is to know about knitting and it will take years to learn all the techniques. Each new technique and skill that I learn over time is a chance to open those pathways. And as I work to design my own patterns down the road, I am creating more growth, too. It’s a really great read!
