I'm a Craftster Best of 2009 Winner!
Â

I’m a Craftster Best of 2009 Winner!
Wow, I am so completely honored: I am a Craftster “Best of 2009” winner! Back in February 2009 I was featured on Craftster for my handpainted custom Mah’jong set that I made for Lucas. As amazing as that felt, I never dreamed it would also make a Best of 2009 winner list, too! I’m blushing and beaming all at the same time, if that’s possible. Thank you so much to those that made it happen.
To determine winners, Craftster picked the top 10 projects posted in each crafty category in 2009 that got the most replies and views and then whittled those 10 down to their favorite top 5. Each crafty category has 5 winners to represent the best of that category’s 2009 projects. Be sure to click the image above to see ALL of the absolutely fantastic winners in all of the Craftster crafty categories. You’ll find my Mah’jong set in the last category listed under Toys & Games.
Thanks for alerting me to this feature, Craftzine! :) I am so blessed.
Free Knitting Pattern: Cousteau Cowl
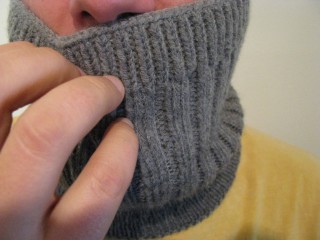 It has been a busy week in the Karpiuk household – Lucas finally arrived home from Montreal where he attended his U.S. immigration interview, and the good news is that he is officially a U.S. Permanent Resident now. The bad news is… well, there is no bad news. It’s all good! So we’re excited to have him home finally and for this big immigration process to be behind us. While he was gone, I decided to knit something for him because it helped to pass the time. For Christmas I had knit Lucas the Jacques Cousteau Hat pattern by Typy [On Ravelry], and after seeing how much he enjoyed the idea of my cowl, I thought I’d try to fashion a matching cowl that would look good with his toque so that he could have a matching set, too.
And that’s where the free pattern comes in. I used the same flavor of basic ribbing to create a cowl that has the same look and feel to it and wrote down my notes so I could share it with others in case they wanted to knit up a matching masterpiece to their Cousteau Hat. I must say, the combination is very fetching, don’t you think? The boys and I presented it to Lucas when he got home on Tuesday and he loved it.
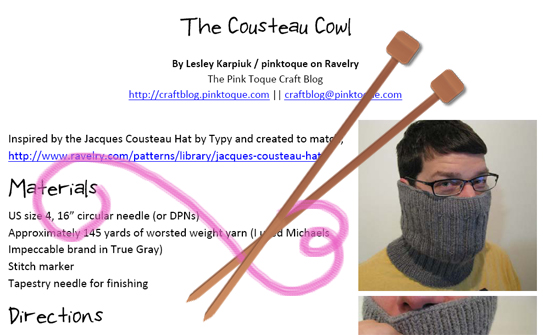
What You’ll Need
US size 4, 16″ circular needles or DPNs for working in the round
1 skein of worsted weight yarn (approximately 145 yards), I used Michaels Loops & Threads Impeccable brand in the color True Gray
stitch marker
tapestry needle for finishing
Download my free Cousteau Cowl pattern below on Ravelry!
I hope you enjoy the simple and free Cousteau Cowl :) Thanks for stopping by, and happy knitting!
My Memories Suite Tutorial 5: Version 2 Features
 Happy Sunday, and have I got a treat for you… introducing My Memories Suite VERSION 2! That’s right, you heard me correctly. Not only is there a new version to My Memories Suite with all new features, I created a video tutorial to explain it all and show those new features off!
Last month, StoryRock unveiled an all new version 2 of its famous and very popular digital scrapbooking software, My Memories Suite. Version 2 is packed with all new goodies and awesome new features that we were dying for in Version 1. It’s like StoryRock read all of the feedback of features and ideas that its users over the years have been wanting out of the software and put it in one neat little package that will make digital scrapbookers the world over very happy.
If you’ve been to the Pink Toque Craft Blog before, you know I am an avid user of My Memories Suite. I got the software over 3 years ago when it first came out, and I have been in love ever since. I don’t want to babble on forever (because the new Version 2 goodies are exciting!) but if this is your first visit to my blog and you’re wondering what all of the excitement is about and why I love this software so much, be sure to go and read my review. My Memories Suite has been the best digital scrapbooking program to ever come along and with Version 2, it just got better.
Version 2 includes 1500 new background papers, 1300 new embellishments and 20 new layouts that come built into the software for your use right out of the box. On top of that, new features such as the zoom ability, Resource Gallery, and WordArt Designer make creating beautiful digital scrapbooking pages even easier. My favorite new feature is that your text can now be curved and follow shapes. This was not something you could do in Version 1, and I love that I can create text in beautiful circular shapes or to follow the edges of a photograph right on the page. It was probably the most requested feature and question I got from readers of my blog. Before I had to tell people they could only do something like that in Photoshop, but now My Memories Suite allows you to edit curved and rounded text on the fly right in the program instead. Hooray!
My Memories Suite Tutorial 5: Version 2 Features – Part 1 of 2
Another highly-sought-after feature that a lot of people asked me about was how to view pages side-by-side so they could build double page spread layouts. Unfortunately, this was not something you could do in Version 1, but now in Version 2 it’s easy. You can also now share your digital scrapbook in a wider variety of ways, including trading cards or calendars. They’ve also streamlined the Photobook process to make it easier to create beautiful photobooks of your finished albums. You’ll also love that you can click and rotate your pictures right on the page.
I received Version 2 last month and have been trying hard to squeeze in some digital scrapping time with it so that I could show off the new features here on my blog. I finally got around to it today, and created a new video tutorial that highlights all of the major new features available to you in Version 2. I walk you through the new things and how to use them, and it makes it easy for Version 1 users to pick right up where they left off in the old version, or for new users to My Memories Suite to see just how awesome the software really is so they can get it for themselves.
My Memories Suite Tutorial 5: Version 2 Features – Part 2 of 2
Version 1 users will love that all of the photo albums and pages they’ve created in Version 1 will be converted for them into Version 2 compatibility and that the transition will be seamless. You won’t lose anything and all of your old albums will be right there for you in Version 2, ready to go and waiting for you to use the new tools and features to enhance them even further. When you’re adding embellishments or papers, you’ll be able to easily see what items are new to Version 2, and all of the old embellishments and papers from Version 1 are collected together in a folder labeled as Version 1, so you can quickly find all of your old favorites or check out the new stuff.
Speaking of Favorites, another new feature that I just love is that I can “bookmark” the embellishments and papers that I use most often and mark it as a favorite. This means that it’s added to a special “favorites” folder so I can access those favorite items quickly anytime I want to without having to search for them every time I want to use them on my digital scrapbook page designs. I show how this works in the video tutorial.
The WordArt Designer allows you to create fun and professional looking word art for your pages easily, and is built right in to the side tab of My Memories Suite now. Type in the text you want to create into word art, select the font and sizing, line spacing, colors, fill, stroke, etc. You can add shadows or a bevel and design the perfect word art accompaniment to any page you’re working on. I also demonstrate this in the video tutorial!
I don’t know if you’ve noticed or not, but I’m really excited about the new features in My Memories Suite Version 2! I just recently finished up Family Life 2009 digital scrapbook and am eagerly looking forward to working with all new designs, layouts, and features with Version 2 in 2010. If you want more details about what Version 2 has to offer, check out the info on mymemoriessuite.com. Original users of Version 1 will be able to upgrade for a nominal fee to get all of the new features, papers, embellishments, and layouts that come packaged with Version 2 and brand new My Memories Suite users can get on board and pick up Version 2 for themselves. If you’d like to save a little money on your purchase of My Memories Suite Version 2, be sure to click HERE: readers of the Pink Toque Craft Blog can get $10 off Version 2 PLUS get $10 of free downloads at the online MMS shop! (use promo code STMMMS21122 at the link!)
I’ve spent most of the afternoon recording the latest tutorial and getting it uploaded for viewing. It ended up being 18 minutes long! Since YouTube only allows videos up to 10 minutes each, I split the tutorial into 2 parts:
* My Memories Suite Tutorial 5: Version 2 Features – Part 1 of 2
* My Memories Suite Tutorial 5: Version 2 Features – Part 2 of 2
Enjoy! Be sure to let me know if you have any questions or comments on the new video tutorials or you need help with My Memories Suite Version 2. Hope you’ve had a great weekend :) Happy scrapping!
Merry Christmas FOs
Merry Christmas! I hope you and yours had a wonderful holiday. I’m excited to finally be able to share the goodies that I knit up for family and friends this season.
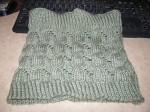
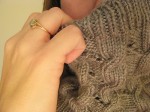
First on my list is to share what my husband knit for me. Yes, you read that right! It was Lucas’ mom that taught me to knit in the first place, over 3 years ago. Last May when I was trying to figure out what to knit for our dads for Father’s Day, Lucas asked me to teach him to knit so that we could both knit socks for our dads together. What a keeper! For Christmas this year, he knit me a beautiful, beautiful cables and eyelets cowl. It’s the same pattern I used to make a cowl for my step-MIL this year, too. I remarked about how much I loved it and he knit me one. When he gave it to me, he said, “Thanks for teaching me to knit.” Awwwe, what more could a girl ask for?! I am a lucky, lucky girl indeed. I plan to knit a matching toque on our little road trip to Toronto tomorrow.
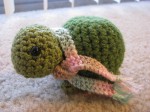
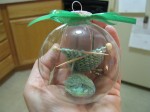
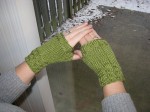
At work this year I participated in a Secret Santa drawing, and I loved it! I got the art teacher, who is a friend and fellow knitter. She and I and the home ec teacher together created a knit/crochet group for other teachers in our building. It was so much fun having a knitter for a Secret Santa! I made her a tiny crochet turtle one of the days because she loves turtles (complete with a tiny knitted scarf!) and a knitter’s ornament on another day, and then her final gift was a set of Fetching — fingerless mitts. It was my first attempt ever at doing gloves/fingerless mittens and I had so much fun! They worked up quickly and beautifully. I need a little practice on picking up stitches, though, because I felt my thumbs were a bit messy, but overall I was really pleased. And the recipient loved them, too.
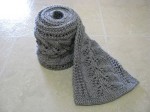 For my mom, I knit a gorgeous Column of Leaves scarf. It took me nearly a month to do, but that was because I kept putting it aside to finish gifts for out-of-town family that had to be shipped first. The pattern repeats were simple and I was able to get into a groove with it. I would knit the 8 row pattern repeat 5 times a day for around a week to get the finished length of around 56″. It was well received, and the first non-boring garter stitch scarf I’ve made my mom. I like that I feel like I’m becoming more of an intermediate knitter this year and attempting to tackle (and complete) more advanced projects that include (gulp) lace! It’s really not as hard as I thought it would be.
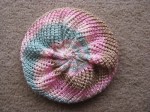
Speaking of moms, I knit a Cable & Eyelet Cowl for my step-MIL and a slouchy beret-style hat for my mother-in-law this year. I was really proud of the turn out for both of them. It was my first cowl, and suddenly I wondered why I had never knit one before; so much more interesting than a scarf, I think. (Watch out mom, you may get a cowl instead of a scarf next year!) I enjoy knitting in the round and I love knitting toques, so a cowl was like knitting a toque without the decreases at the end, and I was in heaven. I’m weird I know. The slouchy toque was my first attempt at such a design and while I don’t think the style fits me, I think it will be absolutely lovely on my mother-in-law. I wish I could pull off the beret style! Lucas helped me to pick out the colors I used and I think she’ll be really happy with it.
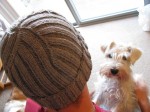 For Lucas I knit up a new toque. I had crocheted him a toque and scarf set last year, but I wanted something that was a little more stylish than a simple single crochet beanie. (Not that there’s anything wrong with a single crochet beanie!) When I saw the pattern of the Jacques Cousteau hat, I knew it was the one. It was a really simple rib the entire length of the toque, which is easier said than done; my poor fingers were so sore afterwards! I’m sure it had more to do with how I gripped the knitting to try and keep even tension when switching so often between knit and purl stitches, but still. It was totally worth it, though! I loved the look of the decreases at the crown.
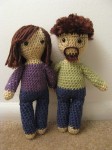 As most of you know, Lucas and I were living up in Canada until the end of July when we moved back to the states. We left behind a lot of good friends that we miss a lot. One of my best friends in particular, Michelle, is very much missed and we know she misses us, too. I decided to make her a set of Lucas and Lesley Dolls. Which is just what it sounds like; little crocheted amigurumi dolls that look like Lucas and I. I am so incredibly proud of how these turned out — I love them so much that it was hard to ship them because I wanted to keep them for myself! Lucas’ little glasses and my little bangs are just super cute. I just want to squeeze them! I think they turned out well, and I can’t wait for Michelle to get them. (The post office is going a bit slower than usual at this time of the year.)
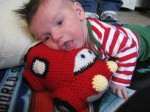 And last but not least by any means is the gift I made for my brand new nephew, William. My brother and sister-in-law love all of the Disney Cars themed stuff for him (my brother is a mechanic, I predict Will loving cars just as much as his daddy does!) and so I purchased this fantastic Little Car pattern from Delicious Crochet on Etsy and created a stuffed amigurumi car for Will. Isn’t it adorable?! It was so much fun to make and he was so cute with it on Christmas morning.
Whew! It was a busy, busy holiday season. Now Lucas and I are off to Toronto and I can relax with a little knitting for myself on the drive there and back. I received the fantastic Harmony wood interchangeable set from KnitPicks from my parents to go along with my nickel-plated set, and I can’t wait to take them for a spin. :) Happy Holidays!
Cutout Painting (with Tutorial)
I’ve recently finished a Christmas gift for my brother and sister-in-law, and since I know they don’t read my blog, I figured it would be safe to share it. Mostly because I’m very proud of it, and can’t wait to show it off some!
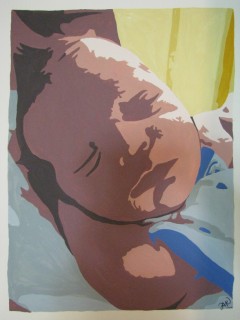
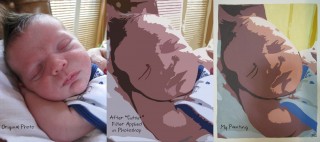
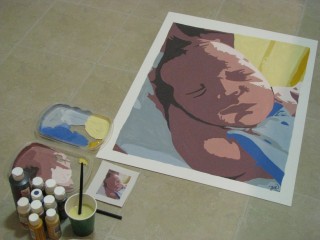
Behold, a painting I did of their new baby, my new nephew, William. William was born at the end of October and is just the cutest little thing ever. He’s the spitting image of my little brother, and I’m so proud of both Herman and Holly on their gorgeous firstborn. I thought something to help preserve this special time and the precious memory of their son being so young and new to the world would be a great Christmas gift. I wanted to paint them something, but realistic paintings of humans just isn’t one of my strongest skills. Instead, while playing around in Photoshop with about a dozen of the 239835893467379845 pictures I’ve taken of Will lately, I came across a filter that produced a really great “cut out” abstract shape version of the photo, and I realized… I can paint this. And you know what? You can do it, too!
First, you’ll want to open up an image in Photoshop. Under the Filter menu at the top, select “Artistic”, and under the Artistic menu options, choose “Cutout.” This will turn your image into a collection that rolls solid shapes and shading all into one. It’s kinda abstract-ish yet you’re still able to tell what’s going on. Try this with several different pictures because depending on the lighting and shading of the photo you’ve chosen, some will turn out better than others when filtered.
Next I printed a copy of the Cutout photo. I used a tiny art projector I got at Michaels a few years back; it’s more meant for kids or small artwork and nothing professional. It still did the job, however! I projected the image onto a large blank wall in my home and traced the outlines of the shapes gently with pencil onto a large art board. It looked a little funny, but I could see the painting taking shape! (See what I did there?)
Now it was time to paint. I spread out on the kitchen floor with my art board and some cheap craft acrylics. We’re talking the $0.99 craft acrylics you can buy at Wal-Mart, nothing fancy. Next I simply used the printed photo as a guide and filled in the shapes I’d outlined with solid color. I didn’t have to worry about shading or anything complicated; it was all simple shapes. The more color I got filled in, the more the painting came alive. All in all, from filtering the photograph and tracing it on the art board against my wall, to filling in the final stroke of color with my paintbrush, the portrait took me 5 hours.
The completed painting is around 2 feet wide by 2.5 feet tall and I’ve framed it in a nice dark wooden frame to gift to my brother and sister-in-law. I’m thinking it will look lovely on a wall in the baby’s room or even in the living room of their home. It was super easy to put together, and even if you have no artistic abilities, you’ll be surprised at how much easier this project is to complete if you think of it as simply filling in shapes instead of creating a portrait. If you can color in the lines, you can do this!
Also, can you believe that Christmas is just around the corner? Sometimes I think these holidays purposefully blindside you to keep you on your toes and make sure you were paying attention. While I’m not 100% finished with all of the gifts I’m creating for friends and family this season, I can see the light at the end of the tunnel. Christmas cards will be going out soon and I can’t wait to share them here because the family photo used is really adorable. :) Best of luck with your Christmas crafting!
Happy Thanksgiving!
Hope everyone had a wonderful Thanksgiving filled with friends and family and other goodies to be thankful for. Lucas and I baked some fantastic pumpkin pies (If I do say so myself) to take over to my parents’ house and we celebrated our first Thanksgiving back in the states in three years.
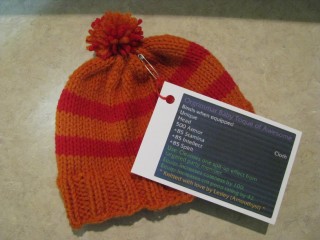
This, unfortunately, is the time of year that’s not a lot of fun posting-wise on my craft blog. Mostly because I’m hard at work on gifts for family and friends and… well… I can’t post some of them because I know that they will or might read my blog and then their gift is no longer a surprise. It’s hard because I get so excited when I finish a project and can’t wait to show it off, but alas… I must refrain. For example… today while hanging out with family I managed to finish another baby hat. This one was not for my nephew, however, and instead for some friends that play World of Warcraft, and who are about to have their first child any day now. They’re both awesome, and I wanted to make them a little something.
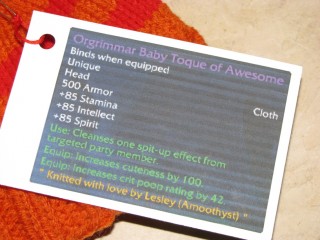
It’s nothing fancy — just a two-color striped baby toque with a ribbed trim, but it’s the tag I created to go along with it that’s more fun. Firstly, I used orange and red, which the mom-to-be told me were “Orgrimmar colors.” (Excuse me while I geek out a little bit.) These colors were sure to make any orc parent proud! ;) The tag explains the toque’s beneficial stat boosts when worn by the little recipient. I thought it was clever. I even called it the Orgrimmar Baby Toque of Awesome. If I were a better knitter who wasn’t afraid to try fair isle/stranding methods for doing multiple colorwork, I’d have knitted a Horde logo on there instead, but… ya. Still on my to-do list. Do you like the handmade tag? :)
Wait, I said gifts completed that I can’t share on my blog, right? Whoops. Ok so the baby toque I could share because it wasn’t a surprise, but then later this evening after we got home from Thanksgiving festivities, I completed the gift I’ve been knitting for Lucas for Christmas. And THAT gift I can’t share here… yet. Just know that I’m soooo stoked that it turned out and proud of all the work that went into it that is now complete. And it looks fabulous. I’ll definitely share it after it’s gifted, though!
The rest of this holiday weekend will be spent trying to trim down my Christmas gift making to-do list by casting on a project that will be gifted to my mom, and actually pulling out some paint for a gift for my brother and sister-in-law. Stay tuned! Enjoy your holiday :)
Introducing the BABY Cthulhu Toque!
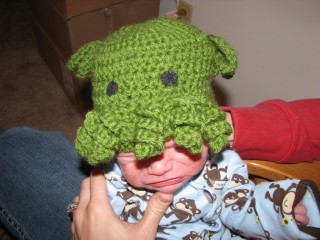
Newborn nephew Will sporting one of my ultra cool new baby Cthulhu Toques!
It was only a matter of time before my crochet Cthulhu toques spawned pint-sized versions for children. Due to many requests, I finally sat down and put together the youth version of my pattern. I’m now selling child-sized Cthulhu toques in my shop AND am offering the youth pattern included in the same PDF as my original adult sized version… at no additional cost for the pattern! Now my Cthulhu toque pattern is like having 2 patterns in 1!  You can either buy the pattern, which includes adult and child instructions OR you can purchase adult or child-sized Cthulhu toques already handmade by me at The Pink Toque Shop. Just in time for the holidays!
The new youth sizes includes instructions for creating a newborn, toddler, and child sized version of the Cthulhu toque. Now you and the child or children in your life can be in matching style together! The model in my picture is my brand new 2 week old nephew, and he’s sporting the toddler version, which is why it’s a bit big. But aren’t they both adorable?! As I said, I’m selling the child-sized toques individually in my shop, so if you love the Cthulhu toques but don’t have the crochet know-how, I can make one for you :)
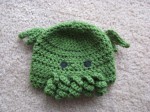
The new baby version of my Cthulhu Toque. Get yours now!
As of the time of this writing, I’ve sent out a mass email to everyone who has purchased the Cthulhu toque pattern from me in the past via Etsy or Artfire and sent them a complimentary copy of the youth sized pattern update. Going forward, new purchases of the pattern from Etsy or Artfire will receive the updated PDF that includes both adult and youth pattern instructions. I also uploaded the new PDF to Ravelry and sent out a mass message to those who had purchased it via Ravelry to get them the new copy. If I somehow missed you, please contact me immediately with your name and email so I can ensure you get the updated version!
Adding youth sizing to my pattern is not the only update that I’ve made to my most recent version; I also updated the pattern to include tips and blocking instructions specific to the design to help you get the most out of the pattern and get it to look just right.
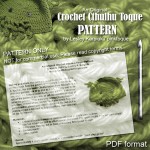
New and Improved pattern now available! Includes both adult and child versions plus blocking instructions
Want to buy the new and improved Cthulhu toque crochet pattern? Check it out in my Etsy shop! Want to buy pre-made Cthulhu toques already crocheted by me for yourself or a loved one? Get thee to the shop!
Enjoy! And thanks for your business :) Hope you had a great weekend!
He's Here!
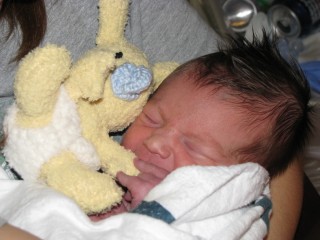
Will with his hand knitted bunny from Auntie Lesley
My baby nephew is finally here! Little William was born last night at 11:14pm and weighed 7lbs, 15oz and was 22 inches long. He is the spitting image of my little brother, and so beautiful. I am so proud of my brother and sister-in-law, and everyone is healthy and doing well. All I have for you with this announcement post is a precious, precious photo of Will hugging his first stuffed animal… a knitted bunny made by his Aunt Lesley :) Lucas also gave Will the wonderfully soft blanket that his uncle knitted just for him. Warning: these photos are full of cuteness. Don’t say I didn’t warn you.
Welcome to the world, little nephew. I can’t wait to spoil you!
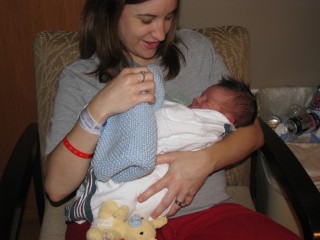
Uncle Lucas' hand knitted blanket
A Little of This, A Little of That
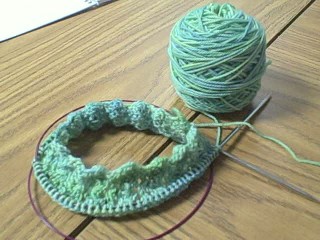
I’m here for just a quick drive-by (or surf-by?) post to show off what I’m currently working on! On the needles today is a lovely lace-edged toque with my even more lovely Nova Scotia yarn that I purchased over the summer when I was in Halifax with Lucas celebrating our anniversary. I know this picture doesn’t do the yarn or the pattern justice (and I’m quickly learning that lace doesn’t look quite right until after it’s blocked) because I took it at work instead of at home with my good digital camera, but I think you get the idea. I’m finding the yarn to be just delicious — if you don’t remember, it’s the Tanis Fiber Arts yellow label DK weight yarn in Spearmint, and I purchased it at the Loop Craft Cafe in downtown Halifax. The color is gorgeous and the yarn is so nice to work with. It was my first hand-dyed hank of yarn and I don’t own a swift so Lucas and I did our best — it turned into a huge pile of mangled mess, but in the end we managed to get it wound into a cake. Whew! It was totally worth it.
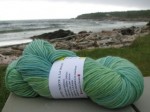
Tanis Fiber Arts yellow label DK weight in Spearmint, photo © Lesley Karpiuk / pinktoque, taken on Cape Breton Island, Nova Scotia on the Cabot Trail.
The pattern is the Lace-Edged Hat from Julie M. Hentz at Head Huggers, and I really think it’s turning out pretty. I featured it over on the Knitting Under the Desk blog last week, and my favorite part of the hat is that there’s enough excitement with the simple lacework for a brim instead of the typical ribbed brim to make the hat interesting, but enough stockinette to keep me in my comfort zone, too. The best part is that once you do all of the lacework, you’re home free, since it starts from the brim and works to the crown. I highly recommend it! I can’t wait to finish it and post a better photo of me wearing it.
Also recently I’ve been working on a pattern en masse as Christmas presents for family and friends. Remember all of the jam? I’m also knitting Christmas ornaments to go along with the jam packages, so photos of that will be coming shortly. I’m nearly halfway finished on the lot!
In RL news, my baby nephew is due any day now and Lucas and I are moving into a new place this weekend, so it’s a busy week! I can’t wait to meet my nephew and snap some photos of the baby things I’ve knitted for him over the last several months. You can be sure photos will follow :) Take care!
My Memories Suite Halloween Deal!
Hey readers!
You all know how much I love Polariod’s My Memories Suite digital scrapbooking software. I just wanted to let you know about their great deal for Halloween; check it out!
If you’ve been waiting to purchase My Memories Suite, now is the time to grab it at a fantastic price just in time to scrap those precious Halloween memories. Need some guidance along the way?
- Check out all of the tutorials I’ve created (videos!) on using My Memories Suite along with tips and tricks
- Get even more support from the Facebook Fan Page for My Memories Suite where they share ideas and show off scrapbooking pages and have contests!
Don’t wait! Check out My Memories Suite today; I know you’ll love scrapping memories with it as much as I do :) Happy Halloween!

