Cutout Painting (with Tutorial)
I’ve recently finished a Christmas gift for my brother and sister-in-law, and since I know they don’t read my blog, I figured it would be safe to share it. Mostly because I’m very proud of it, and can’t wait to show it off some!
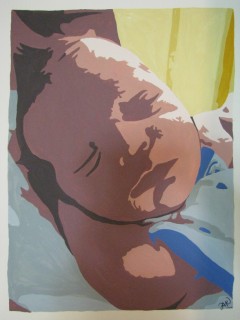
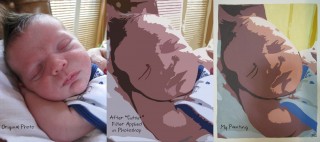
Behold, a painting I did of their new baby, my new nephew, William. William was born at the end of October and is just the cutest little thing ever. He’s the spitting image of my little brother, and I’m so proud of both Herman and Holly on their gorgeous firstborn. I thought something to help preserve this special time and the precious memory of their son being so young and new to the world would be a great Christmas gift. I wanted to paint them something, but realistic paintings of humans just isn’t one of my strongest skills. Instead, while playing around in Photoshop with about a dozen of the 239835893467379845 pictures I’ve taken of Will lately, I came across a filter that produced a really great “cut out” abstract shape version of the photo, and I realized… I can paint this. And you know what? You can do it, too!
First, you’ll want to open up an image in Photoshop. Under the Filter menu at the top, select “Artistic”, and under the Artistic menu options, choose “Cutout.” This will turn your image into a collection that rolls solid shapes and shading all into one. It’s kinda abstract-ish yet you’re still able to tell what’s going on. Try this with several different pictures because depending on the lighting and shading of the photo you’ve chosen, some will turn out better than others when filtered.
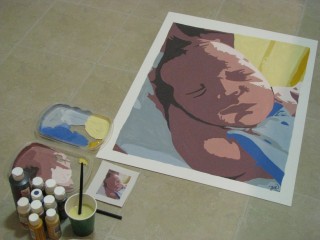
Next I printed a copy of the Cutout photo. I used a tiny art projector I got at Michaels a few years back; it’s more meant for kids or small artwork and nothing professional. It still did the job, however! I projected the image onto a large blank wall in my home and traced the outlines of the shapes gently with pencil onto a large art board. It looked a little funny, but I could see the painting taking shape! (See what I did there?)
Now it was time to paint. I spread out on the kitchen floor with my art board and some cheap craft acrylics. We’re talking the $0.99 craft acrylics you can buy at Wal-Mart, nothing fancy. Next I simply used the printed photo as a guide and filled in the shapes I’d outlined with solid color. I didn’t have to worry about shading or anything complicated; it was all simple shapes. The more color I got filled in, the more the painting came alive. All in all, from filtering the photograph and tracing it on the art board against my wall, to filling in the final stroke of color with my paintbrush, the portrait took me 5 hours.
The completed painting is around 2 feet wide by 2.5 feet tall and I’ve framed it in a nice dark wooden frame to gift to my brother and sister-in-law. I’m thinking it will look lovely on a wall in the baby’s room or even in the living room of their home. It was super easy to put together, and even if you have no artistic abilities, you’ll be surprised at how much easier this project is to complete if you think of it as simply filling in shapes instead of creating a portrait. If you can color in the lines, you can do this!
Also, can you believe that Christmas is just around the corner? Sometimes I think these holidays purposefully blindside you to keep you on your toes and make sure you were paying attention. While I’m not 100% finished with all of the gifts I’m creating for friends and family this season, I can see the light at the end of the tunnel. Christmas cards will be going out soon and I can’t wait to share them here because the family photo used is really adorable. :) Best of luck with your Christmas crafting!


How cute is this!
That’s brilliant! I think I’m going to use it to make a painting of a my dad’s schnauzers… Its beautiful and I bet they adore it!
I looooove schnauzers! I should do a picture of our two dogs for my husband. We’ve got a little white schnauzer :) Thanks for your comment and good luck! Let me know if you do a schnauzer painting- I’d love to see it!
Wow! This looks like something I could totally do! My sister has always been the painter of the family, but I’m excited to do a portrait of her little boy. I found your blog when I was looking for My Memories Suite tutorials and those have helped me a ton. I’ve been impressed since then with all your other things. THANKS!
A portrait of your nephew would be awesome! You can totally do it – it really was easy! I’m also glad you’ve found the My Memories Suite tutorials to be helpful – you’re so welcome! :) Thanks for your kind comments and good luck – be sure to send me a picture if you do the painting. :)