Tutorial: DIY Comic Book Coasters
 Hey all! It’s been awhile since I’ve put together a fun DIY tutorial over here, so I thought now was as good a time as any, especially with the holidays right around the corner. DIY gifts for everyone on your list this year? SCORE.
I’ve heard of making coasters from tiles, and I wanted to combine that idea with making something perfect for my BFF who loves Batman. What cooler coasters to have than Batman comic book coasters, amirite? I decided to share how I made my coasters just in case you’re looking for a great last minute Christmas gift for the comic book geek in your life… or anyone in your life, really, since you can make coasters in any theme. Ready? Here we go!
Comic Book Coasters
Materials
- four 4″ x 4″ tiles, found at your local hardware store **
- Mod Podge
- Clear spray acrylic sealer (I grabbed Mod  Podge brand)
- Comic books you don’t mind cutting up, Â or images at least 3.5″ x 3.5″ ***
- scissors
- craft glue – like my fave, good old Aleene’s Tacky Glue (but Elmers would do!)
- a paintbrush
- felt
You may also want to lay some newspaper out to protect your counter or floor surfaces. I also recommend working in a well ventilated area during the spray acrylic part!
 ** For the tiles, I highly recommend ones that have blunt or sanded edges. Sure, there are tiles that are like $0.15, making this an even cheaper project, but trust me when I say that splurging an additional $0.15 per tile to buy $0.30 tiles that have finished edges is much nicer than giving your friends or family a set of coasters with rough, sharp edges. Hello, safety hazard! (Especially if they have children.) This is already a project that costs less than a fancy cup of coffee per person to make, so let’s not skimp on safety. You don’t want them to cut themselves on your gift, right?
*** I actually didn’t use comic books for this project, I looked for pictures scanned from comic book pages up on Google Images and printed them on my color laser printer. If you have comic books lying around that you don’t mind cutting up, go for it! But feel free to use images from other sources, too. And if your friend or family member isn’t into comics, the beauty of this project is that you can use any image. For example, I made a second set of coasters for another friend of mine who is an art teacher, and used images of famous paintings instead. Have you had enough of my babbling yet? Let’s get to the directions already!
Directions
1. Print or acquire the four images you plan to use on your coasters and trim them down to approximately 3.5″ x 3.5″ to fit on your 4″ x 4″ tiles. I picked four images of Batman comic books and comic book pages from Google Images and saved them to my computer. Then I selected them all and right clicked to print them and used the following print layout to get all four pictures on the same piece of paper. Conveniently, this method printed the images at just about 3.5″ wide, so I had very little trimming to do.

2. Cover the backside of your images in craft glue – I like to draw a glue line around the outer edge and then zig zag through the middle, too, so that the image doesn’t warp when you mod podge – and glue your images down well on each of your tiles.

3. (Now’s when you’ll want the well ventilated area and newspaper to cover your work surface.) Using the clear spray acrylic, give each tile a quick spray coat and let dry for 15 minutes. I found after a couple of attempts that the clear acrylic coat I sprayed before I began layering on the mod podge really helped to keep my images nice and smooth and sealed for mod podging. (Can mod podging be a verb? If not, it is now!) For me this step was critical because I printed my images, and just using straight mod podge on them made the colors smudge. I like the word smudge.

4. Using your paintbrush, paint on a thin layer of Mod Podge. Try to coat the tile as evenly as possible. Let dry. Repeat until you’ve painted on three layers of Mod Podge, letting each layer dry thoroughly (until you can no longer see the white of the mod podge) in between layers. Grab a sandwich or clean your bathroom while you wait. Just not at the same time.

5. Spray one final quick coat of the clear acrylic sealer and let dry. (Hey look! You can see that I was making a second set of coasters at the same time! Ooooooooh… ahhhhhhh)

6. Cut four felt squares approximately 3.5″ x 3.5″ (like your images!) each, and use your craft glue and the same gluing method you used with your images to affix one felt square on the backside of each tile. My tiles had a grid on the backside which made it easy for me to evenly apply glue and then press the felt square down. Don’t press TOO hard on the felt or the glue will bleed through; press gently along all of the glued areas and lay the coaster flat to dry on its felt.


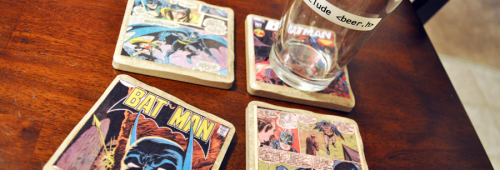
And voila! You have beautiful comic book coasters! Not into comic books? You could use scrapbook paper and make coasters to fit the decor of your living room, you could collage pages from a magazine or other book, or even use photographs on your coaster set. No matter what theme or images you use, you’ll end up with the perfect custom gift just in time for the holidays. :)
 Here’s the coaster set of famous paintings I made for my other BFF. Pretty awesome, huh? Happy crafting, and happy holidays! And if you don’t have time to create some coasters, perhaps some of my EPIC geeky soap over at GEEKSOAP.net is more up your alley? Be the friend that gives the most geektastic gifts this year, whether you make it for them or you have me make it! Best wishes <3
xoxo, Lesley
2 Responses to “Tutorial: DIY Comic Book Coasters”
Get My Memories Suite
Use promo code STMMMS21122 to save!
Read my review here!
Check This Out!


D20 Soap On A Rope
Batman Soap Tutorial
Mahjong Tile Set

Digital Scrapping Freebies
knitty.com


Teach yourself to knit!
Get MMS V6 NOW!
[…] DIY Comic Book Coasters: Here’s another nerd-cool gift. Coasters get a fun makeover with comic book graphics and a […]
[…] 7. DIY Comic Book Coasters […]