Celebrate Valentine's Day With Crafts!
 Hope everyone had a wonderful Valentine’s Day! Lucas and I went out to breakfast at the Pfanntastic Pannekoek Haus, a dutch pancake house here in town that we love, despite the nasty cold I have. We spent the day lounging and I even completed a last minute craft for him. (See below.) … this evening I baked him my “famous” lasagna and we watched the hockey game. Go Flames, go!
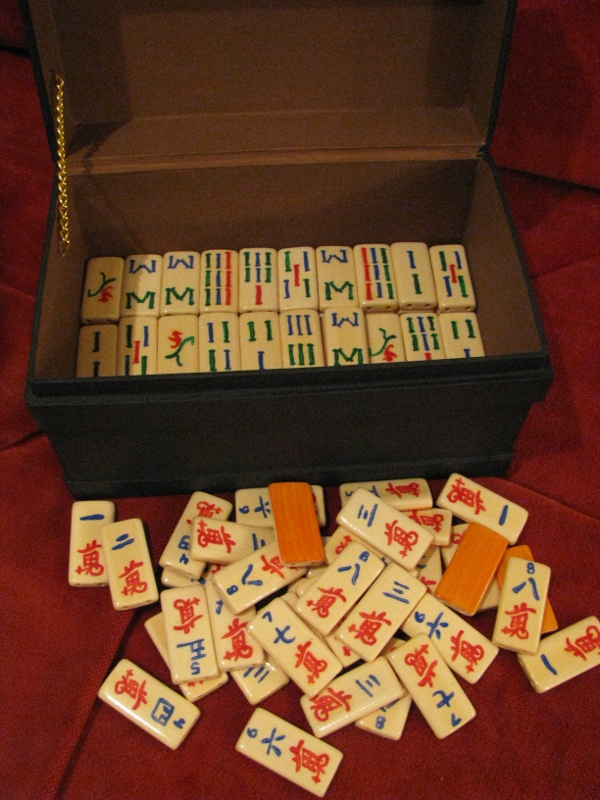
So… now that I’ve given my Valentine’s Day present to Lucas, I can reveal all of my crafty goodness here to you! First on the list is the big one… a completely handpainted, custom Mahjong game/tile set!
A little backstory: a few months back, some friends of ours, Caley and Kali, (the Ckalieys) had us over for dinner and game night. They had recently been taught how to play Mahjong, and they were eager to share it with us. It was somewhat of a learning process for all of us because they were a bit rusty and hadn’t had much practice, and it was fun! They had bought a Mahjong set and taught us to play that night. We enjoyed Mahjong a lot and look forward to playing more with them. Lucas has even been playing Mahjong online lately. That’s when the idea for this present hit me.
 It took a lot of searching … I was unable to find blank actual Mahjong-type tiles or anything quite the same. However, I did find that there were people out there selling blank domino tiles with holes drilled into them lengthwise to be used as “beads” for designing jewellery and such. So I bought a large lot set of 350 of these blank wooden domino beads from a seller on eBay.
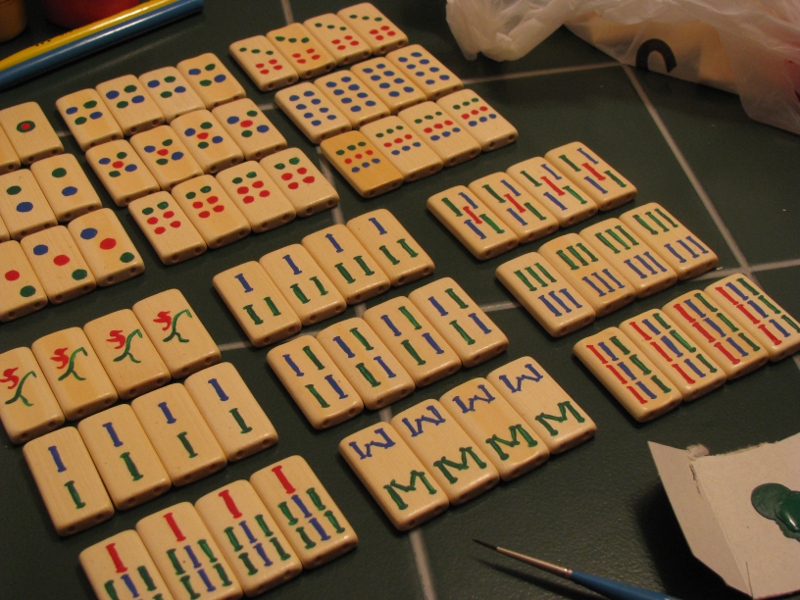
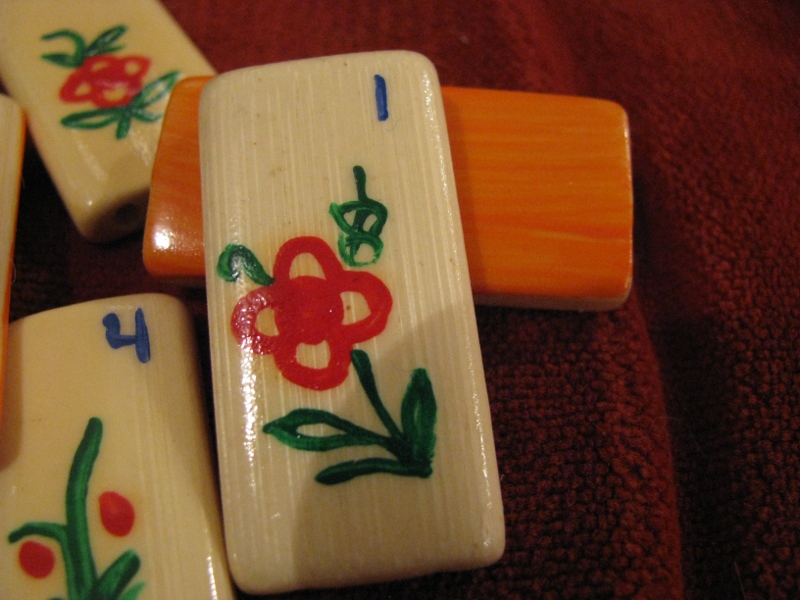
Once they arrived, I sorted through and picked out 145 tiles. The version of Mahjong we play is a 144 tile set with 1 extra tile to be used as the Prevailing Wind Marker. Then I set to work handpainting all 145 tiles myself, with Wikipedia’s page on Mahjong with little images of the tiles as my guide. I know my characters aren’t perfect, but I am really proud of the turnout. Once the faces of the dominoes were dry, I turned each tile over and then painted the backside of each orange… Lucas’s favourite colour. If this was to be Lucas’ custom handmade Mahjong set, I wanted it to be tailored to his likes.
 Anyway, once I was done with the painting part, then I had to spend a few days using spray sealant/clear coat to give each tile a bit of extra durability and shine. The fronts and the backs, of course. Then we found this great paper-mache box at Michaels craft store (Lucas didn’t know what it was for) and I painted it black on the outside and brown on the inside to be used as the storage container for all 145 completed tiles.
I still need to print off the custom instructions I put together based on Wikipedia’s info, but the gift was very well liked, and I can’t wait to use it the next time we play Mahjong.
There are a TON of photos — I took lots along the way as I worked on this. To see them all, check out the photobucket album here… there you’ll be able to see close up photos of the different suit sets and all of the tiles, as well as “in-progress” photos. I posted this one to Craftster and my deviantART account as well.
 Today while trying to get some rest and get over this cold, I worked on a little crochet Valentine’s project… a penguin stuffie. I chose to make him as Tux the (Valentine’s) Linux Penguin in honour of Lucas and I both completely making the switch to Ubuntu (Linux) on all of our machines… even mine! Here is a picture of my Tux sitting with my Ubuntu netbook. It’s hard to tell due to the flash, but Tux is holding a little light pink heart in his left wing there. This gift was well received, and he was a quick and cute project. :)
So that’s it for now! Check back with me later in the week, as I have some Huugs to finish up and share :) It’s Family Day on Monday, so that means a long weekend for us — yay! It’s a good thing, too, as I think I’ll need the extra day to get over what’s ailing me. :( Hope everyone had a wonderful Valentine’s Day! Thanks for stopping by.
Papier-Mache (Part 1) and a Crochet Huug©
 This weekend I found a little time to get some crafting done. Mostly because one of my projects I started is also kinda school/work related, so anytime you can combine your hobbies with work it’s a good thing.
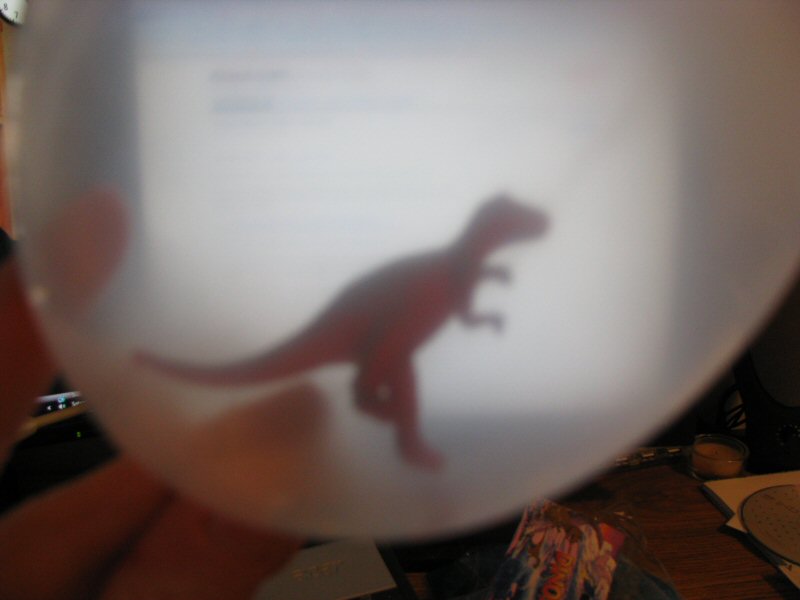
My students are going to have dinosaur week the week after next, and I’m prepping ahead of time to have some really cool things available to them. I decided to start out this papier-mache dinosaur egg project over the weekend because it would need around a week’s worth of time for preparation to ensure they were ready for the kids.
So how do you make dinosaur eggs? Well, I bought a package of 24 transparent balloons (any balloon colour would work) and two 12-piece packages of tiny little plastic dinosaurs. Both of these things I found at Dollarama by our house, so it was an even better score! To make dinosaur eggs, you first put one dino inside each balloon and then blow the balloons up to around “dinosaur egg size” (whatever that is!) and voila! You have a plastic dino inside of a balloon. Why do I want a dino in a balloon? Well, the balloon is a vehicle for papier-mache really. Later this week I’ll get to the messy part 2 and papier-mache over these balloons to create a nice firm egg, leaving a little opening around where the tie off for the balloon is for later. Once the papier-mache dries I can pop the balloon and discard it from within the egg, then add a little layer or two of papier-mache over the opening to seal up the egg for good. I suppose if you would rather add the dino then, as opposed to earlier you could, as long as you leave a large enough opening to fit the dinosaurs. I plan to take the hardened eggs into the classroom and distribute them to my students. After explaining that I found some dino eggs we can speculate what dinosaur eggs looked like and they can have fun painting the eggs however they want :) The next day when the paint has dried they can “hatch” their eggs and receive the little dino inside as a keepsake of the project. I’ll post about part 2 later this week :)
Now normally I would prefer the students make the papier-mache and do everything themselves, but our school has a policy about using balloons with the younger kids and I’d rather not risk it. Not to mention kiddos trying to fit dinos into balloons could be a bit of a challenge. Instead I really like the idea of sparking their imagination when I come in with a bunch of dinosaur eggs I “found” and letting them run wild when they get to paint them. I also like the element of surprise that comes with them having no idea what dinosaur is inside or what they’ll get when their egg hatches. All while they are painting their egg they will be able to hear their dinosaur rattling around inside but they won’t know for sure what it looks like or what kind it is until hatching day. I’m hoping this will be a memorable project for them — and hey, they’ll love being able to take something home with them as a result of the lesson.
 As for crochet this weekend, I finished my crochet version of Huug the Hug Monster© — a character I dreamed up one day on the way to work. I originally created Huug a year ago and knitted the prototype Huug, but this weekend I decided to make Huug in crochet form. I think the newest one turned out pretty well! He is part of my recent retail plans, as I hope to be able to sell him in a boutique-y shop or two locally. I officially copyrighted the character and his knit/crochet patterns this weekend as well, dating back to last year, for the sole purpose of having that all registered officially on paper and all. Wish me (and Huug) luck!
Belated Freebie Friday: CU Crochet Paper Overlays
![]()

CU Crochet Paper Freebie
Happy Belated Freebie Friday! Sorry I missed getting this posted yesterday. It’s just a quickie freebie, and this time it’s even commercial use friendly! Today’s download includes a set of CU crochet paper overlays. Add them on top of colours or embellishment/paper shapes or layer colours on top of them and play with the various blending modes to achieve the crochet paper look that suits your fancy :)
Four overlays included, photographed by moi. Please don’t forget to read the CU TOU included with the download. Enjoy! I’d love to see some crochet papers you create with this one. This week’s set was inspired by my recent crochet projects as I try to get gifts done in time for the holidays.
Download my CU Crochet Paper Overlays HERE!
My husband Lucas turned 30 a few weeks back and his birthday wish was for me to make him a matching toque and scarf. I finished the toque on time but just recently finished the scarf over last weekend’s disappointing Chicago Bears loss to the Packers. (*grumbles*). He loves the set so much that he even blogged about it. I’m so happy that I’ve made something he really enjoys and uses daily now that our Canadian weather is getting colder. It’s nothing fancy, but he loves it and that’s all that matters!

Lucas modeling his matching toque and scarf set
Have a fabulous weekend :)
Some Finished Projects

Finished Froggie Beanie
A few days ago I showed off a few crochet projects I had been working on. Last night I finished a couple of them! The crochet handbag take 2 is still in progress, but I finished the froggie beanie and even had time to squeeze in a little doggie sweater for Winston.

Finished Froggie Beanie
Somer’s froggie beanie turned out pretty well! I took a few pictures to show it off, thanks to my fantastic models Lucas and Oliver. They were very helpful in photographing the froggie details! I think Somer will like it and can’t wait to get it shipped off to her. Ribbit!

Finished Froggie Beanie

Winston
Winston loves his very first official sweater. I made it in Chicago Bears navy and orange colours of course and plan to make a matching sweater in XL for Oliver. I ran out of orange yarn so Oliver will have his as soon as I replenish my supply. It took two takes to get the sweater sizing just right for Winston… the first time around because he’s so tiny to me (in comparison to Oliver I guess) I made a small size. The general sizing info seemed like it would fit, but the small turned out to fit him too snugly. I made another one and this time in a medium size, and it turned out so cute! It’s a tiny bit big on him and hangs a bit in the tummy area, but I’m sure he’ll grow into it. Isn’t he cute? I can’t wait to make Oliver’s now. I used the Lion Brand free crochet striped sweater pattern by Shiri Mor.

Winston and the Cone Collar
And speaking of Winston, he endured his neutering surgery like a champ. The vet called fairly early on Friday afternoon to let me know that everything went well and that he’d be ready to pick up around dinnertime. We were warned that he’d be a bit groggy due to pain meds and that he’d probably not be very active. When he came out and saw Lucas and I were there to get him, it was the exact opposite; he was SO excited to see us and SO ready to go home. He has been taking it easy, though, and unfortunately has to wear the cone collar when we’re gone or at bedtime to make sure he doesn’t lick the incision site. Doesn’t he look like the saddest little schnauzer you ever did see when he’s wearing it? He’s doing very well, though, and should be all healed up in a week or so. :)
So hopefully I’ll line the crochet handbag later today between football games and finish it off so I can get it off my WIP list. I feel like I should have a lot more to do but really I’ve made a huge dent in my Christmas crafting list. Hooray! Happy Sunday, and GO BEARS!
Current Crochet Projects
So in the background this past week I’ve been hard at work on three crochet projects: take 2 on the crochet handbag I tried at the end of August, a hat for Somer for her birthday coming up in November, and a small crochet pumpkin.

Work in Progress - Crochet Handbag Take 2
The second try on the crochet handbag is going… ok. If you remember, I had followed a great pattern for the first take but the finished result seemed to be a bit too wide and not quite tall enough for my purse needs. I decided I’d make a second handbag, adjusting a few lines of the pattern to make the overall bag not as wide and a bit taller. I am not sure now that the purse will be big enough just in general now that it’s not as wide. But I didn’t like the awkward space in the corners of the bag when I made it as wide as the pattern called for; at least for my personal preference. Maybe if I had just changed the height to be taller, the width would’ve balanced itself out? I am not quite finished with take 2, but it already sounds like attempt 3 is taking shape. We’ll see how it turns out after I add a closure, line it, and add the handles.

Work in Progress - Froggie Beanie
The beanie is something I’m pretty excited about. I hope Somer doesn’t read my blog before her birthday next month, but I just can’t not post about it. It’s a frog hat, and I’m nearly finished with it; it’s from a pattern here by Crochetroo, and is so darn cute! :) It’s basically a double crochet beanie hat done in green (I chose Vanna’s Choice in Kelly Green, my first time using Vanna’s Choice. I really like working with it and will be using it again on other projects that call for a simple worsted weight yarn.) and then there are two double crochet eye “bulbs” that you attach on top. The pattern calls for googly-eyes (which in general I despise) but I think they’re a perfect fit for this project and will give it just the right finishing touch when I hot glue them to the center of each eye bulb. I just have to go out and purchase some googly-eyes! It’s a quick crochet and I started it Tuesday evening before House came on and then finished up the beanie portion last night in no time. Today I plan to do the band and then work on the eyes. Even though it’s spanning over 3 days, the amount of time I spent each day was very small and this could easily be done in one evening I think. It gives me ideas for making a teddy bear beanie, using the same pattern just in brown and not adding googly-eyes at the end (so the eye bulbs of the frog would be teddy bear ears.) Not that I have time to add more things to my queue for Christmas projects, but oh well. Love the pattern!

Finished - Small Crochet Pumpkin
And the small crochet pumpkin is one of my favourite finished objects right now. It turned out so cute! :) I followed the YouTube tutorial by Teresa, who is tjw1963 on Ravelry, and she is the founder of the Video Crochet group there which has been immensely helpful in my learn-to-crochet endeavour. She has some amazing videos on YouTube for all kinds of projects and demonstrating a huge variety of crochet stitches. Her blog accompanies her video tutorials in case you want written instructions for each pattern to follow along with, too. As most of you know, this past week was Canadian Thanksgiving, and my husband and I were invited to my friend Michelle’s mom’s house for dinner. It meant a lot to us, because Michelle’s mom and grandma treated us like family, and we really felt special being invited to their family Thanksgiving dinner. I made this little crochet pumpkin and attached a thank you tag to it and mailed it off today to thank Michelle’s mom for including us. We plan to return the favour and have their family over for American Thanksgiving next month :) Michelle is such a good friend; how nice it was to feel like family, too.
So that’s what I’ve been up to in the fibrearts world! Once I finish Somer’s froggie beanie I plan to get started right away on matching doggie sweaters for Oliver and Winston. I can’t wait! They’ll be done in Bears colours, of course: a beautiful navy blue and pumpkin orange. :love: Little Winston goes for his neutering appointment tomorrow morning first thing, so keep him in your thoughts! It sounds like he’ll have to wear a cone for a bit until the incision heals, which will make for some admittingly hilarious photos. Am I evil for thinking that? lol :lol:
See you tomorrow for Freebie Friday!
Free Pattern: Scalloped Baby Blanket

My Scalloped Baby Blanket for the Ckalieys
I’ve finally completed it: a scalloped edge baby blanket for our friends Kali and Caley, who are expecting their first baby (a boy) sometime in January. Â I just learned crochet about a month ago, so this was a very ambitious project for me! Â I tried to make everything as simple as possible so I created my own pattern that would be elegant, and yet also allow me to really practice those basic crochet stitches. I added the scalloped border to be “wild” because I was feeling confident. Â Now that I’ve completed a baby blanket, I can do anything! Â It took me a month to do, but I was only putting in a few hours or so here and there (maybe once a week?) and taking my time. Â This could easily be done in a weekend if you are a veteran crocheter. Â So enough jabbering, here’s the pattern! (And please be kind, it’s my first time writing a crochet pattern!)
The Ckalieys’ Scalloped Baby Blanket
Materials
- 3 skeins (1365 yards/15 oz) Bernat Softee Baby Solids in Pale Blue
- US H/8-5.00mm crochet hook
Notes
This blanket is built body first, then the scalloped top and bottom edges are done afterwards. Â The body has a simple pattern that even the newest crocheter can handle!
Stitches/Abbreviations Used
sc = single crochet
dc = double crochet
ch = chain
st = stitch
Shell Stitch (described below)
Instructions
Body
ch 110
row 1: sc in second chain from hook, sc in each st across (109 sts)
rows 2 – 20: ch 1, sc in each st across (109)

Close up of the pattern
[The “decorative pattern”]
row 21: ch 2, dc in each st across (109)
row 22: ch 1, sc in each st across (109)
row 23: ch 2, dc in each st across (109)
You will alternate between doing 20 rows of sc and then the three rows that make up “the decorative pattern” until the blanket is as long as you want it to be.
Basic Pattern Idea
*20 rows of sc
(ch2) 1 row of dc
(ch1) 1 row of sc
(ch2) 1 row of dc*
Repeat from * to * until you reach your desired length. I went around 34″ or so. Since you start with 20 rows of sc, make sure you end with a completion of a group of 20 rows of sc to make it look even. (So don’t end with the dc/sc/dc pattern.)
Border
Once the body of the blanket is the length you want, you’re going to immediately turn your work and do the shell stitch back across that final row.
Shell Stitch
*Skip 2 ch, dc 5 times in the third ch : skip 2 ch, sc in the third ch* across (18 shells)
Once you have completed your last shell stitch, you’ll now turn your work clockwise and slip stitch down the long side of the blanket to get to the opposite end. Â Once you get there, turn your work again clockwise and you’ll see you’re at the opposite long end of the blanket. Â Your first set of shell stitches should be on the furthest end from you. Now shell stitch across this bottom row. You now have shell scallops at the two farthest ends of the blanket. Â Turn your work clockwise one final time and slip stitch up the long side until you reach your initial shell. Â You should have made a complete square trip around the outer edge of your blanket, giving the two furthest ends from each other a pretty scalloped edge and slip stitching the two longest sides.
Fasten off and weave in all ends. Â Tada!
Bernat Softee Baby is machine washable and dryable. Instructions:
Machine Washing and Drying: Wash in water (not exceeding 40°C/104°F) at permanent press setting. Do not bleach. Tumble dry at low heat, at delicate setting. Do not iron or press. Do not dry-clean.
Good luck! :) And if anything is unclear or I’ve made a mistake, please let me know, since as I mentioned, it’s my first time ever writing up a crochet pattern. Â If you make any scalloped edge baby blankets, I’d LOVE to see them! Â Drop me a line at craftblog at pinktoque dot com so I can feature you. :)
Score!

My new knitting tote
Last week I received an email from Michaels with a make-your-own-50%-off-sale coupon (as did everyone else on their mailing list) and Lucas treated me to a shopping spree on Saturday. Wow am I a lucky girl! I used the 50% off coupon on something I’ve needed for a long time … a knitting bag. I’ve been pining for one of the Ravelry totes but it’s on my Christmas list. The fact that I needed something useful for carrying my WIPs around became very apparent this past Thursday when the first official meeting of the SE Calgary Knit & Crochet group took place. We organized on Ravelry. It started with me looking on the Calgary discussion board for any groups that were already meeting way down in the SE. It turned out that there weren’t any, so once it became apparent that there were several showing real interest in the idea, we just decided to make our own. We met at a local Starbucks and it was really great! There were four of us total with one other confirmed to be there next month along with a possible sixth member, too. It was a great way to meet and get to know

luscious yarn!
each other. As I was getting ready for my first knit-and-crochet-in-public social event, I realized I was carrying my current WIP (a baby blanket for the Ckalieys) around in a Safeway bag. Sad. I managed to scrounge up something for Thursday but I was elated to pick up a real knitting travel bag at Michaels with my coupon and it’s so handy! Just look how pretty!
And that’s not all I got at Michaels. I’ve been carrying around a tattered yarn wish (read: need) list in my purse for all the yarn required to make the Christmas gift items on my to do list this season. Most of it was on sale and so I picked up more yarn in that one trip than I’ve bought over the last several months combined. Needless to say, it was an exciting day :) Just look at all of that luscious yarn!

screenie of My Memories Suite in action
I’ve got several digital scrapping freebies ready to give away (I’m glad everyone liked the CU paper edgers from yesterday!) but also on the horizon are some tutorials for working with the My Memories Suite digital scrapbooking software I use. I’ve gotten a few emails lately from users asking about its features after they read my review, and now that I’ve had the software for nearly a year and have been using it extensively, I think some tutorials would be a great idea. Inspired by an email I got today, I’m already working on a basic features intro and a tips and tricks for layering paper tutorial. I know it won’t be of much use to those of you who don’t use My Memories Suite, but perhaps the free videos will inspire you and get you excited enough about the software that you’ll want to pick it up for yourself! :) I really can’t rave enough about it.
So that’s what’s new on the crafting front. See you back here soon for more freebies later in the week and some software tutorials. And with all of that great yarn I just got, you can be sure there will be some more WIPs to share in the very near future :) Have a great week! :heart:
Tyney123's Featured Huugs©
 Happy Saturday :)
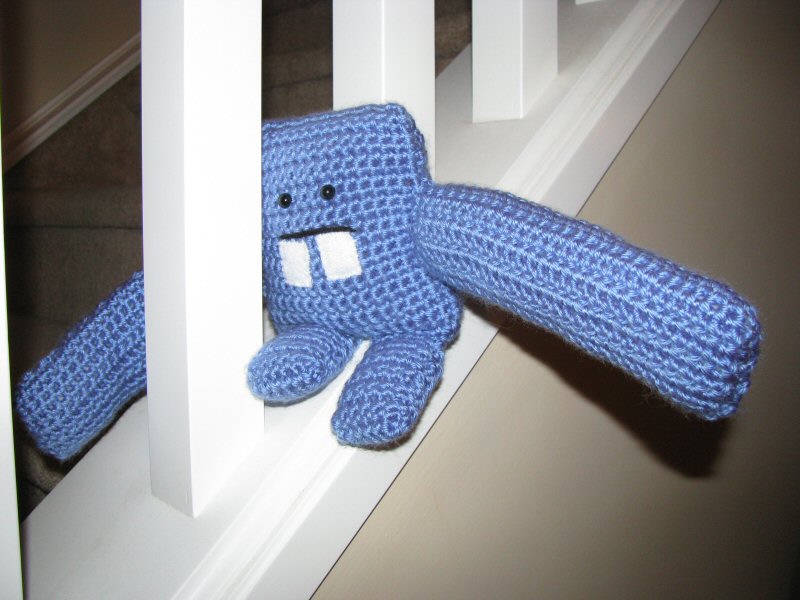
I just wanted to take a moment to feature a wonderful knitter named Tyney123 who sent me a fabulous photo of not one, not two… but THREE Huug the Hug Monsters© that she has knitted using my free pattern. Aren’t they adorable?! The blue one was made first and belongs to Tyney while the other two are destined to be Christmas presents. How sweet! I absolutely love the expressive faces on these Huugs. Makes me want to cuddle them! This picture is property and copyright to Tyney123 and was posted with permission.
If you want to make your very own Huug the Hug Monster©, check out the free pattern! And special thanks to Tyney for sharing :)
My First Crochet Handbag
 So I found a great pattern on the Lion Brand website for a Crochet Handbag, by Drew Emborsky. It’s such a gorgeous shape — I love the pleats! I decided since I had a bunch of off-white yarn hanging around that I would give it a go and see if I was a.] capable of following the pattern, and b.] I liked the end result. In the end, I love the look when it’s lying flat, but prefer it was a bit taller/deeper than the finished result, and maybe not quite as wide at the base… at least for my personal usability preferences. In my opinion the dimensions looked great flat but made for some strange interior space when the purse was in use. Full it looked a little funny but flat it looks fab! But maybe that’s just me. Check out a “full” pic below and compare it to this flat one, maybe you’ll see what I mean.
The pattern itself was super easy — all single crochet with ONE pesky row ( row 15) where I had to follow the written instructions to form a pleat. And not just one pleat, but six total in that row! And then you had to do row 15 twice, because you had to make two side pieces to form the bag body. I got some help from fellow ravelers to interpret the instructions and I finally managed to get the hang of the pleat :) Yay! Beyond row 15, the rest of the pattern was super simple. My seaming isn’t all that great, but I’m learning. I’ve made some modifications that I plan to use on my next try and I hope it turns out the way I invision the perfect version of this handbag to be. Once I pick out some delicious brown yarn (after all, you can’t wear white after Labour Day, and with that coming up tomorrow, I only have one day to use this purse, LOL) for a more season-appropriate look, I’ll
 give the modified version a go. If that works out I’d love to post the mods for anyone else who might be interested :) As you can see, I didn’t make the little flaps (mostly because I had different handles than what the pattern called for) and I decided to add little crochet flowers as an accent. All part of the modifications, I tell ya. In the end it was a great project. I can’t wait to make another! :)
This little crochet handbag will be off to the bowling alley with us this evening for some dinner and fun with friends. Enjoy your holiday weekend!
Recent Craftings
 I don’t know if “craftings” is a real word (And based on Firefox’s built-in spell checker, it isn’t.) but for today and for my blog post title, it is a word. This week I’ve finished two projects: a purple bouclé scarf for my mom for Christmas (Yes, I am ahead of the game) and a little tiny
  turtle for Somer. The scarf was knitted from a beautiful skein of Bernat Soft Bouclé that I picked up while in Penticton a few weeks back, in a colour called The Big Purple. What a fun name, huh? It’s 65 inches long and really soft and pretty, at least I think so. I hope my mom does, too! There’s no real pattern involved with this bad boy — I co’d 15 sts on big size US 15 / 10.0 mm needles and knit until the scarf reached my desired length of around 65 inches. I love the big loopy look to it.
The tiny turtle is from a pattern called Tiny Striped Turtle by KristieMN. It was surprisingly easy and quick to make up, and I think it turned out so cute! Somer likes turtles and she’s had a rough month or two so I thought I’d surprise her and send a tiny turtle her way to say hello. Don’t tell her yet, though… he’s so cute I haven’t mailed him off just yet hehe. I think my favourite part is his wee little tail poking out. And you probably noticed mine doesn’t have a striped shell. Well, crochet is fairly new for me and the idea of switching yarn so often on such a small item kinda intimidated me since I’m not really all that familiar with how changing yarn colour works. Instead I crocheted the entire shell one colour. I’m still on the hunt for safety eyes (Who seem to be hiding from me at Michaels.) so I cut small round eyes out of black felt and hand stitched them on with thread afterwards. He’s a cutie!
I’ve been rather busy this week and doing a little crochet in my spare time (I started on a crochet blanket last night… BIG endeavor for a newbie!) but I’ll have a digital scrapping freebie, Part 2 of 2 of the “Healthy Balance” mini kit, for you on Friday. I’ve also got a few other digi scrap items in the works, they’re just not finished and ready yet. Soon! Hope you have a great week :)