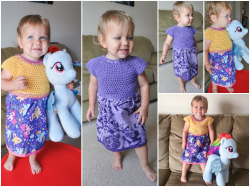
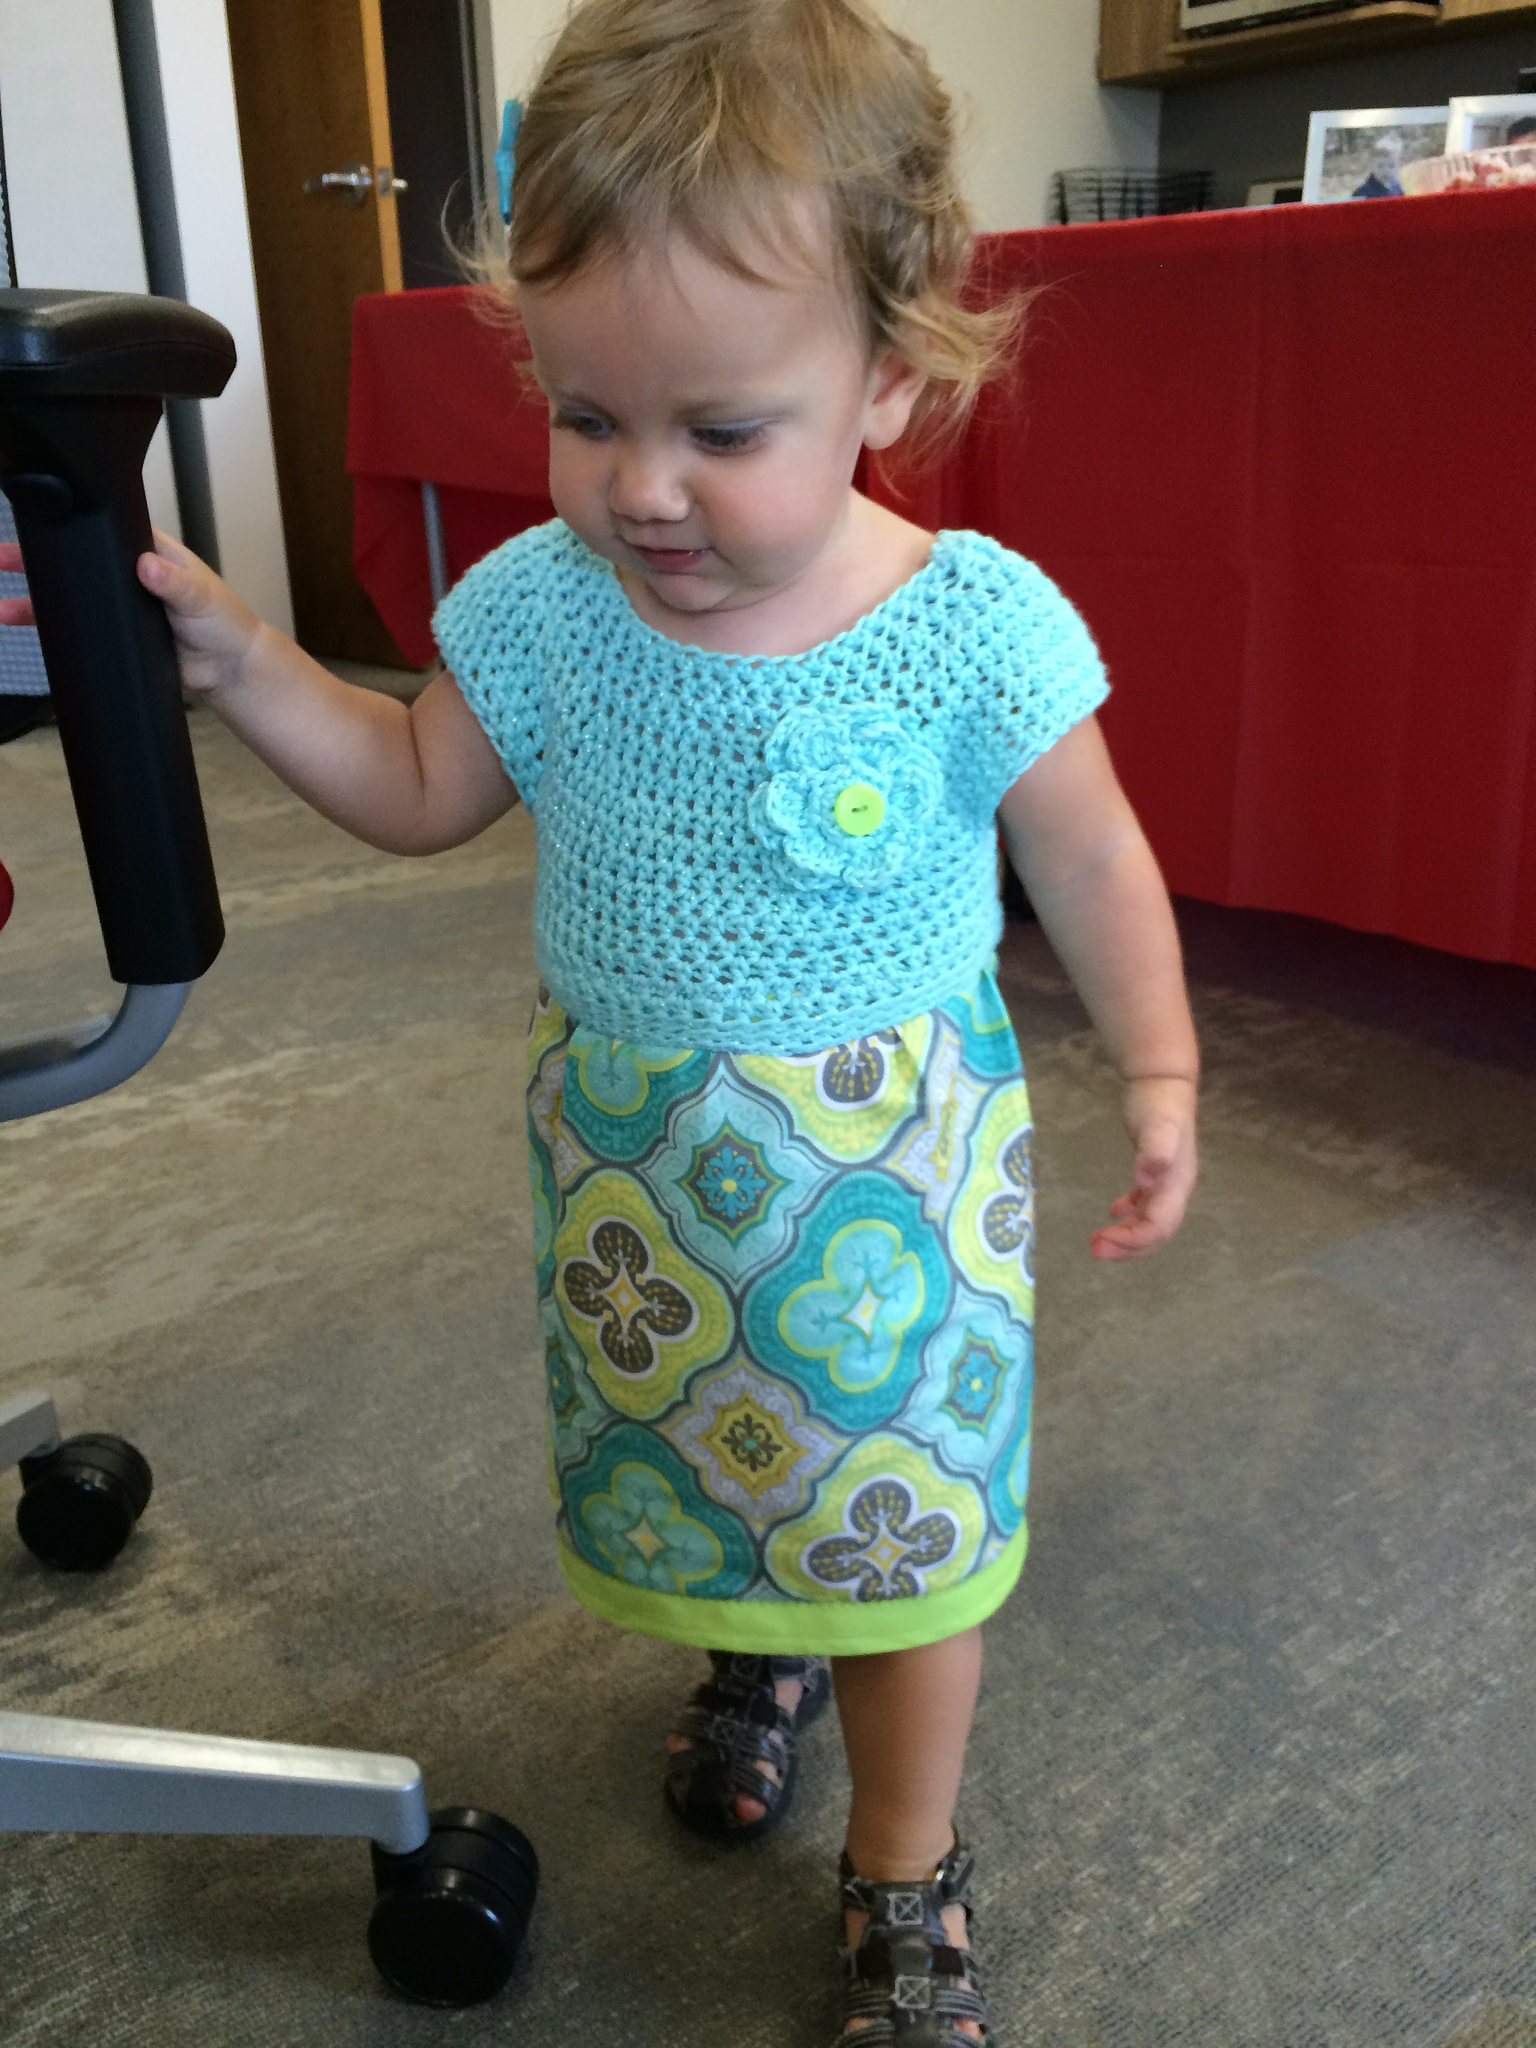
Sew Sweet Crochet Fabric Toddler Dress – FREE PATTERN!
 I laughed when I saw that my most recent post before this one was the baby blanket I was making just before my daughter was born and now I’m updating to share a new free pattern I’ve put together of the toddler dress I just made for her… let’s just say 18 months between posts is a long time! Don’t worry, I’ve still been crafting away all this time, I just haven’t documented it really well. I’m always very busy with my small business, GEEKSOAP, which hit its 5 year anniversary back in February (YAY!) and have made several new designs over there for you to check out.
Recently on a 3-hour road trip, I got the itch to knit or crochet something and decided I wanted to make a dress for my now-17-month-old daughter. Back before she was born, I had purchased a newborn pattern that was a crochet top with fabric skirt combined, and I loved the idea. (My sewing machine was collecting dust – I missed it!) but when I looked at the pattern again a few weeks ago, I found that it was only written in a newborn size with no real “recipe” that I felt comfortable modifying to fit my daughter now. It was also very heavy with a lot of puffy crochet stitches, meant for cooler weather, which just wouldn’t work in July! I started researching free crochet dress patterns online to figure out a method for making just a collar or bodice that could be adapted for different sizes. After I made a top that fit, I was hooked! (haha.) I tried again and again with different hooks and things like holding multiple strands together for different effect, and finally loved the end result. After making my first dress – which had a bit of an empire waist – I made some adjustments to have a bit more length. And then I couldn’t stop making dresses…
 I had a lot of people ask me how I did it, so I just threw together all of my notes and tried to create a pattern for others to follow if they also want to make dresses for their little ones. I haven’t personally tested the larger sizes on kids, but I did include notes on suggestions where to make adaptations in order to make the crochet bodice larger for older kids. I would imagine that changing the yarn and hook size could also help you make a smaller size if you wanted, too. You could also adapt the pattern to start with 2 less stitches and adjust the rest of the numbers in the other rounds accordingly to go smaller.
As for the skirt – the pattern includes all of the notes and dimensions I used for making the skirts for my dresses, which includes notes to help you decide what dimensions you need to use when making yours. I’m no seamstress, though, so this isn’t fancy stuff. I just sort of “winged it” from doing past sewing projects and it all worked out just fine!
The pattern is now over on Ravelry as a free download – be sure to grab a copy and give it a try! And if you try some of the larger size adaptations, let me know how it goes. Also don’t hesitate to ask if you have any questions! Hope you enjoy. :)
Pattern specifications:
Materials Needed
• Size I crochet hook, or whatever hook to reach gauge
• Medium weight yarn, like a cotton or acrylic
• At least 1/2 yard of coordinating fabric
• Coordinating thread
• Sewing machine
Optional
• Double folded bias tape
• Buttons
Gauge
13 sts = 4†and 9 rows = 4†in hdc
Bodice Size
This pattern is for size 2 years with a 21†chest. Pattern includes suggestions for adapting to larger sizes: 4, 6, and 8. This theory could be used to go smaller, too. (Or try a smaller hook!)
Stitches Required
Fhdc = foundation half double crochet. This creates a foundation chain and a first row of half double crochet stitches all in one.
sl st = slip stitch
ch = chain
hdc = half double crochet stitch
sc = single crochet stitch
blo = back loops only. Insert your hook into the back loop only instead of both loops of the st.
Pattern also includes 16 different variations and ideas for spicing up your dresses!
Enjoy :)
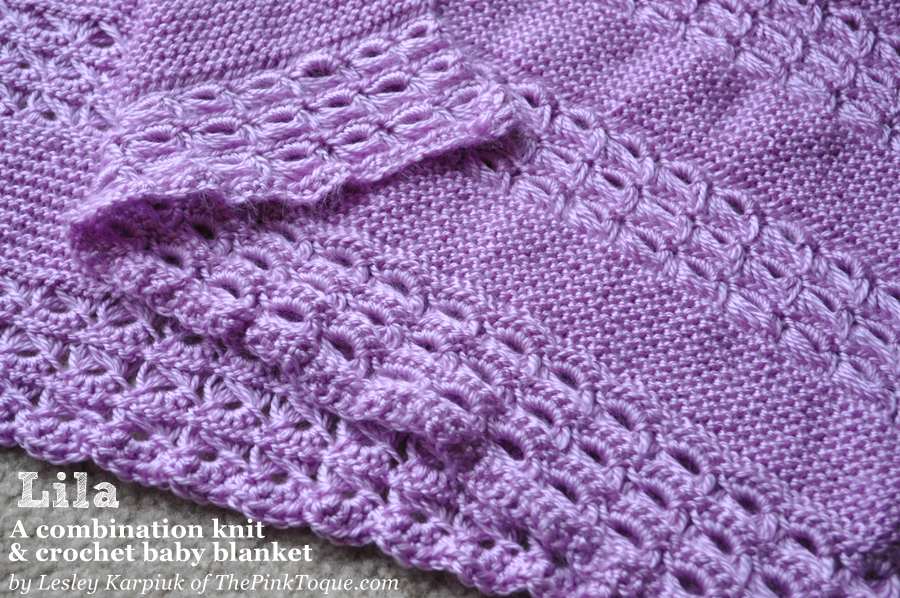
Lila: A Combination Knit & Crochet Baby Blanket – FREE Pattern!
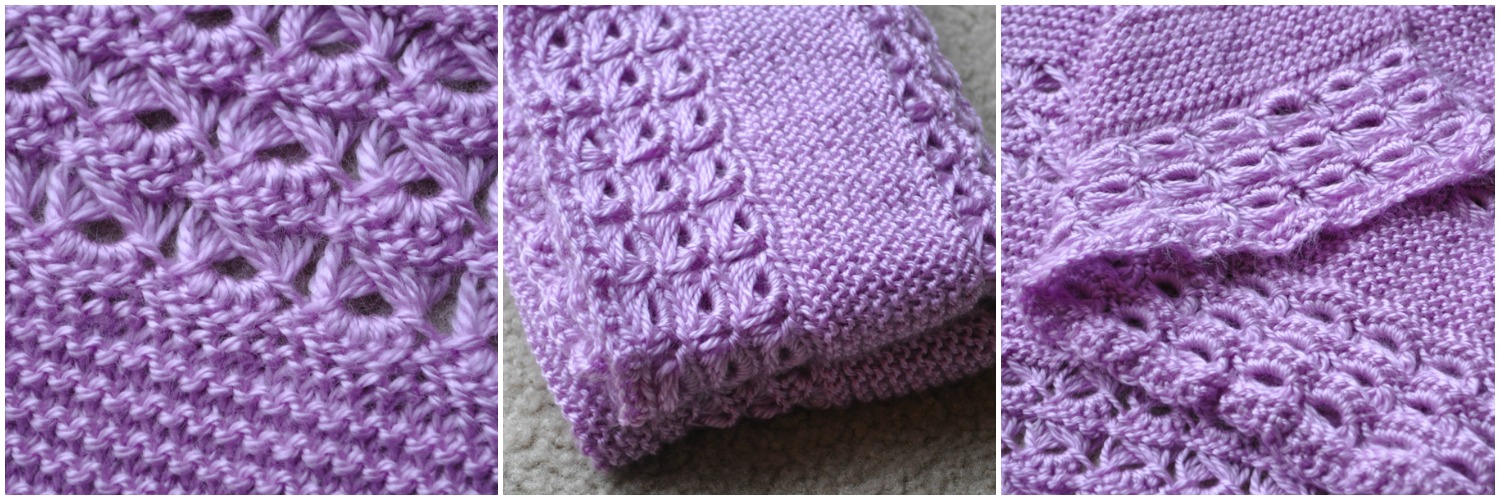
 With our second baby, Lila, on the way (I can’t believe she’s due next month!) I of course had to whip up a baby blanket. I didn’t want to use the same pattern that I used for Liam just to mix things up a bit, and spent days going through patterns on Ravelry to find just the right blanket but couldn’t decide. I was torn on whether I wanted to knit or crochet; I prefer the look of knit, but crochet is so much quicker for me. What’s an indecisive pregnant mama to do?! I stumbled upon a Lion Brand pattern that both my husband and I liked the concept of, but I wasn’t super fond of the look of the particular lace it used, nor the fact that it was knit from the corner and increased from there. It got me thinking of doing something similar with alternating lace and garter panels, but with “prettier” lace. And knit flat across, back and forth, instead of increased from the corner.
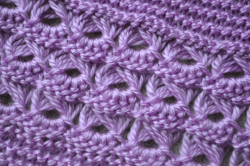
I somewhat recently learned broomstick lace crochet, and I remember thinking it could easily transition to knitting needles to do a combo project, and the idea was born to make a baby blanket from alternating broomstick lace crochet and garter knit stitch panels. I couldn’t find anything like it, so I just decided to take notes and possibly write up the pattern to share later. I finished the blanket about a week before Christmas, but just got around to formatting the pattern to share publicly this weekend.
I don’t go into detail on how to do broomstick lace in the pattern, so it assumes you are familiar with the technique ahead of time. However, I did add two links in the pattern to the resources I used to teach myself:
Video Tutorial (4 mins)
And as I’ve mentioned that it’s a combination of crochet (broomstick lace) and knit (garter stitch), you need to be able to do these two different techniques to be successful with following the blanket pattern, but I promise it’s super easy otherwise. I also included a quick video clip I took of myself transferring the stitches from the knitting needles after doing a garter panel back to do another broomstick crochet panel, so I think that will help. Of course, if you have any questions, don’t hesitate to let me know either in the comments or via email.
Materials Needed for the Lila Baby Blanket
Size J crochet hook
Worsted weight yarn (I used Hobby Lobby Yarn Secret in Lilac, 2 skeins)
Size 8 knitting needles on 32″ cable (You’ll knit back and forth like on straights)
Size 35 or 50 knitting needle, or broomstick (I literally took the plastic broomstick off of my toddler’s play broom and used that!), referred to as broomstick throughout the pattern
GRAB THE PATTERN ON RAVELRY HERE!
I really love how the blanket turned out! Mine ended up being 20″ x 30″ unblocked. I really need to block it, because in my test swatch, blocking really made the broomstick lace panels pop beautifully. I’m sure I’ll get that done before Lila arrives next month, right?
Happy knit/crochet! Hope you enjoy the pattern.
Free Pattern: Father & Son Matching Star Wars Tie Shirts
This is a cross post from our family blog; family crafts also get posted there under “We Made…”
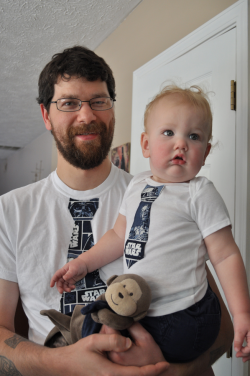
Our geekling turned one this past weekend, can you believe it?! I decided that he would need something extra special to wear as the guest of honor to his birthday party. Liam’s Aunt Lora had given him a cute faux tie onesie 3 months ago that he’s worn into the ground, but it inspired me to make my own version of a faux tie shirt to match the birthday theme. But you know I couldn’t just stop there… naturally, my husband needed one of these shirts so that both father and son would match. (Lucas’ idea, I might add.) And then I might’ve made a little matching tie “shirt” for our schnauzer as well. I threw together some quick instructions and a PDF of the pattern I drew up & used in case you wanted to do something similar for the loves of your life, too! (more…)
Tutorial: DIY Comic Book Coasters
 Hey all! It’s been awhile since I’ve put together a fun DIY tutorial over here, so I thought now was as good a time as any, especially with the holidays right around the corner. DIY gifts for everyone on your list this year? SCORE.
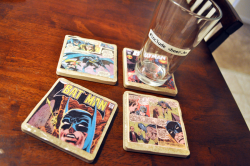
I’ve heard of making coasters from tiles, and I wanted to combine that idea with making something perfect for my BFF who loves Batman. What cooler coasters to have than Batman comic book coasters, amirite? I decided to share how I made my coasters just in case you’re looking for a great last minute Christmas gift for the comic book geek in your life… or anyone in your life, really, since you can make coasters in any theme. Ready? Here we go!
Comic Book Coasters
Materials
- four 4″ x 4″ tiles, found at your local hardware store **
- Mod Podge
- Clear spray acrylic sealer (I grabbed Mod  Podge brand)
- Comic books you don’t mind cutting up, Â or images at least 3.5″ x 3.5″ ***
- scissors
- craft glue – like my fave, good old Aleene’s Tacky Glue (but Elmers would do!)
- a paintbrush
- felt
You may also want to lay some newspaper out to protect your counter or floor surfaces. I also recommend working in a well ventilated area during the spray acrylic part!
 ** For the tiles, I highly recommend ones that have blunt or sanded edges. Sure, there are tiles that are like $0.15, making this an even cheaper project, but trust me when I say that splurging an additional $0.15 per tile to buy $0.30 tiles that have finished edges is much nicer than giving your friends or family a set of coasters with rough, sharp edges. Hello, safety hazard! (Especially if they have children.) This is already a project that costs less than a fancy cup of coffee per person to make, so let’s not skimp on safety. You don’t want them to cut themselves on your gift, right?
*** I actually didn’t use comic books for this project, I looked for pictures scanned from comic book pages up on Google Images and printed them on my color laser printer. If you have comic books lying around that you don’t mind cutting up, go for it! But feel free to use images from other sources, too. And if your friend or family member isn’t into comics, the beauty of this project is that you can use any image. For example, I made a second set of coasters for another friend of mine who is an art teacher, and used images of famous paintings instead. Have you had enough of my babbling yet? Let’s get to the directions already!
Directions
1. Print or acquire the four images you plan to use on your coasters and trim them down to approximately 3.5″ x 3.5″ to fit on your 4″ x 4″ tiles. I picked four images of Batman comic books and comic book pages from Google Images and saved them to my computer. Then I selected them all and right clicked to print them and used the following print layout to get all four pictures on the same piece of paper. Conveniently, this method printed the images at just about 3.5″ wide, so I had very little trimming to do.

2. Cover the backside of your images in craft glue – I like to draw a glue line around the outer edge and then zig zag through the middle, too, so that the image doesn’t warp when you mod podge – and glue your images down well on each of your tiles.

3. (Now’s when you’ll want the well ventilated area and newspaper to cover your work surface.) Using the clear spray acrylic, give each tile a quick spray coat and let dry for 15 minutes. I found after a couple of attempts that the clear acrylic coat I sprayed before I began layering on the mod podge really helped to keep my images nice and smooth and sealed for mod podging. (Can mod podging be a verb? If not, it is now!) For me this step was critical because I printed my images, and just using straight mod podge on them made the colors smudge. I like the word smudge.

4. Using your paintbrush, paint on a thin layer of Mod Podge. Try to coat the tile as evenly as possible. Let dry. Repeat until you’ve painted on three layers of Mod Podge, letting each layer dry thoroughly (until you can no longer see the white of the mod podge) in between layers. Grab a sandwich or clean your bathroom while you wait. Just not at the same time.

5. Spray one final quick coat of the clear acrylic sealer and let dry. (Hey look! You can see that I was making a second set of coasters at the same time! Ooooooooh… ahhhhhhh)

6. Cut four felt squares approximately 3.5″ x 3.5″ (like your images!) each, and use your craft glue and the same gluing method you used with your images to affix one felt square on the backside of each tile. My tiles had a grid on the backside which made it easy for me to evenly apply glue and then press the felt square down. Don’t press TOO hard on the felt or the glue will bleed through; press gently along all of the glued areas and lay the coaster flat to dry on its felt.


And voila! You have beautiful comic book coasters! Not into comic books? You could use scrapbook paper and make coasters to fit the decor of your living room, you could collage pages from a magazine or other book, or even use photographs on your coaster set. No matter what theme or images you use, you’ll end up with the perfect custom gift just in time for the holidays. :)
 Here’s the coaster set of famous paintings I made for my other BFF. Pretty awesome, huh? Happy crafting, and happy holidays! And if you don’t have time to create some coasters, perhaps some of my EPIC geeky soap over at GEEKSOAP.net is more up your alley? Be the friend that gives the most geektastic gifts this year, whether you make it for them or you have me make it! Best wishes <3
xoxo, Lesley
Free Knitting Pattern: Cousteau Cowl
 It has been a busy week in the Karpiuk household – Lucas finally arrived home from Montreal where he attended his U.S. immigration interview, and the good news is that he is officially a U.S. Permanent Resident now. The bad news is… well, there is no bad news. It’s all good! So we’re excited to have him home finally and for this big immigration process to be behind us. While he was gone, I decided to knit something for him because it helped to pass the time. For Christmas I had knit Lucas the Jacques Cousteau Hat pattern by Typy [On Ravelry], and after seeing how much he enjoyed the idea of my cowl, I thought I’d try to fashion a matching cowl that would look good with his toque so that he could have a matching set, too.
And that’s where the free pattern comes in. I used the same flavor of basic ribbing to create a cowl that has the same look and feel to it and wrote down my notes so I could share it with others in case they wanted to knit up a matching masterpiece to their Cousteau Hat. I must say, the combination is very fetching, don’t you think? The boys and I presented it to Lucas when he got home on Tuesday and he loved it.
What You’ll Need
US size 4, 16″ circular needles or DPNs for working in the round
1 skein of worsted weight yarn (approximately 145 yards), I used Michaels Loops & Threads Impeccable brand in the color True Gray
stitch marker
tapestry needle for finishing
Download my free Cousteau Cowl pattern below on Ravelry!

I hope you enjoy the simple and free Cousteau Cowl :) Thanks for stopping by, and happy knitting!
My Memories Suite Tutorial 5: Version 2 Features
 Happy Sunday, and have I got a treat for you… introducing My Memories Suite VERSION 2! That’s right, you heard me correctly. Not only is there a new version to My Memories Suite with all new features, I created a video tutorial to explain it all and show those new features off!
Last month, StoryRock unveiled an all new version 2 of its famous and very popular digital scrapbooking software, My Memories Suite. Version 2 is packed with all new goodies and awesome new features that we were dying for in Version 1. It’s like StoryRock read all of the feedback of features and ideas that its users over the years have been wanting out of the software and put it in one neat little package that will make digital scrapbookers the world over very happy.
If you’ve been to the Pink Toque Craft Blog before, you know I am an avid user of My Memories Suite. I got the software over 3 years ago when it first came out, and I have been in love ever since. I don’t want to babble on forever (because the new Version 2 goodies are exciting!) but if this is your first visit to my blog and you’re wondering what all of the excitement is about and why I love this software so much, be sure to go and read my review. My Memories Suite has been the best digital scrapbooking program to ever come along and with Version 2, it just got better.
Version 2 includes 1500 new background papers, 1300 new embellishments and 20 new layouts that come built into the software for your use right out of the box. On top of that, new features such as the zoom ability, Resource Gallery, and WordArt Designer make creating beautiful digital scrapbooking pages even easier. My favorite new feature is that your text can now be curved and follow shapes. This was not something you could do in Version 1, and I love that I can create text in beautiful circular shapes or to follow the edges of a photograph right on the page. It was probably the most requested feature and question I got from readers of my blog. Before I had to tell people they could only do something like that in Photoshop, but now My Memories Suite allows you to edit curved and rounded text on the fly right in the program instead. Hooray!
My Memories Suite Tutorial 5: Version 2 Features – Part 1 of 2
Another highly-sought-after feature that a lot of people asked me about was how to view pages side-by-side so they could build double page spread layouts. Unfortunately, this was not something you could do in Version 1, but now in Version 2 it’s easy. You can also now share your digital scrapbook in a wider variety of ways, including trading cards or calendars. They’ve also streamlined the Photobook process to make it easier to create beautiful photobooks of your finished albums. You’ll also love that you can click and rotate your pictures right on the page.
I received Version 2 last month and have been trying hard to squeeze in some digital scrapping time with it so that I could show off the new features here on my blog. I finally got around to it today, and created a new video tutorial that highlights all of the major new features available to you in Version 2. I walk you through the new things and how to use them, and it makes it easy for Version 1 users to pick right up where they left off in the old version, or for new users to My Memories Suite to see just how awesome the software really is so they can get it for themselves.
My Memories Suite Tutorial 5: Version 2 Features – Part 2 of 2
Version 1 users will love that all of the photo albums and pages they’ve created in Version 1 will be converted for them into Version 2 compatibility and that the transition will be seamless. You won’t lose anything and all of your old albums will be right there for you in Version 2, ready to go and waiting for you to use the new tools and features to enhance them even further. When you’re adding embellishments or papers, you’ll be able to easily see what items are new to Version 2, and all of the old embellishments and papers from Version 1 are collected together in a folder labeled as Version 1, so you can quickly find all of your old favorites or check out the new stuff.
Speaking of Favorites, another new feature that I just love is that I can “bookmark” the embellishments and papers that I use most often and mark it as a favorite. This means that it’s added to a special “favorites” folder so I can access those favorite items quickly anytime I want to without having to search for them every time I want to use them on my digital scrapbook page designs. I show how this works in the video tutorial.
The WordArt Designer allows you to create fun and professional looking word art for your pages easily, and is built right in to the side tab of My Memories Suite now. Type in the text you want to create into word art, select the font and sizing, line spacing, colors, fill, stroke, etc. You can add shadows or a bevel and design the perfect word art accompaniment to any page you’re working on. I also demonstrate this in the video tutorial!
I don’t know if you’ve noticed or not, but I’m really excited about the new features in My Memories Suite Version 2! I just recently finished up Family Life 2009 digital scrapbook and am eagerly looking forward to working with all new designs, layouts, and features with Version 2 in 2010. If you want more details about what Version 2 has to offer, check out the info on mymemoriessuite.com. Original users of Version 1 will be able to upgrade for a nominal fee to get all of the new features, papers, embellishments, and layouts that come packaged with Version 2 and brand new My Memories Suite users can get on board and pick up Version 2 for themselves. If you’d like to save a little money on your purchase of My Memories Suite Version 2, be sure to click HERE: readers of the Pink Toque Craft Blog can get $10 off Version 2 PLUS get $10 of free downloads at the online MMS shop! (use promo code STMMMS21122 at the link!)

I’ve spent most of the afternoon recording the latest tutorial and getting it uploaded for viewing. It ended up being 18 minutes long! Since YouTube only allows videos up to 10 minutes each, I split the tutorial into 2 parts:
* My Memories Suite Tutorial 5: Version 2 Features – Part 1 of 2
* My Memories Suite Tutorial 5: Version 2 Features – Part 2 of 2
Enjoy! Be sure to let me know if you have any questions or comments on the new video tutorials or you need help with My Memories Suite Version 2. Hope you’ve had a great weekend :) Happy scrapping!
Cutout Painting (with Tutorial)

photo copyright to Lesley Karpiuk
I’ve recently finished a Christmas gift for my brother and sister-in-law, and since I know they don’t read my blog, I figured it would be safe to share it. Mostly because I’m very proud of it, and can’t wait to show it off some!
Behold, a painting I did of their new baby, my new nephew, William. William was born at the end of October and is just the cutest little thing ever. He’s the spitting image of my little brother, and I’m so proud of both Herman and Holly on their gorgeous firstborn. I thought something to help preserve this special time and the precious memory of their son being so young and new to the world would be a great Christmas gift. I wanted to paint them something, but realistic paintings of humans just isn’t one of my strongest skills. Instead, while playing around in Photoshop with about a dozen of the 239835893467379845 pictures I’ve taken of Will lately, I came across a filter that produced a really great “cut out” abstract shape version of the photo, and I realized… I can paint this. And you know what? You can do it, too!
First, you’ll want to open up an image in Photoshop. Under the Filter menu at the top, select “Artistic”, and under the Artistic menu options, choose “Cutout.” This will turn your image into a collection that rolls solid shapes and shading all into one. It’s kinda abstract-ish yet you’re still able to tell what’s going on. Try this with several different pictures because depending on the lighting and shading of the photo you’ve chosen, some will turn out better than others when filtered.

comparison - original -> cutout -> painting
Next I printed a copy of the Cutout photo. I used a tiny art projector I got at Michaels a few years back; it’s more meant for kids or small artwork and nothing professional. It still did the job, however! I projected the image onto a large blank wall in my home and traced the outlines of the shapes gently with pencil onto a large art board. It looked a little funny, but I could see the painting taking shape! (See what I did there?)

photo copyright Lesley Karpiuk
Now it was time to paint. I spread out on the kitchen floor with my art board and some cheap craft acrylics. We’re talking the $0.99 craft acrylics you can buy at Wal-Mart, nothing fancy. Next I simply used the printed photo as a guide and filled in the shapes I’d outlined with solid color. I didn’t have to worry about shading or anything complicated; it was all simple shapes. The more color I got filled in, the more the painting came alive. All in all, from filtering the photograph and tracing it on the art board against my wall, to filling in the final stroke of color with my paintbrush, the portrait took me 5 hours.
The completed painting is around 2 feet wide by 2.5 feet tall and I’ve framed it in a nice dark wooden frame to gift to my brother and sister-in-law. I’m thinking it will look lovely on a wall in the baby’s room or even in the living room of their home. It was super easy to put together, and even if you have no artistic abilities, you’ll be surprised at how much easier this project is to complete if you think of it as simply filling in shapes instead of creating a portrait. If you can color in the lines, you can do this!
Also, can you believe that Christmas is just around the corner? Sometimes I think these holidays purposefully blindside you to keep you on your toes and make sure you were paying attention. While I’m not 100% finished with all of the gifts I’m creating for friends and family this season, I can see the light at the end of the tunnel. Christmas cards will be going out soon and I can’t wait to share them here because the family photo used is really adorable. :) Best of luck with your Christmas crafting!
We Be Jammin'

canning concord grape jam
Finally, an update! A few weeks ago, my grandma convinced Lucas and I that we needed to try canning. Her grapes ripened well and yesterday afternoon we went over and took a nice hefty load of concords off her hands. She ensured us that it would be easy, and after a little pre-canning prep reading online, the whole process really was easy. And dare I say… fun? Looks like we’ll be gifting some jam this holiday season.
With a diabetic father and sister-in-law, a lot of us in the family watch our sugar intake. My grandma makes jam complete with sugar, but I was determined to make some lower sugar jam so that more of the family could enjoy it. I picked up some SUREJELL brand for Less or No Sugar Needed recipes pectin at Meijer and started looking around for a good recipe. Most recipes required a lot of sugar, and I found out quickly that low or no sugar recipes require some changes to the basic jam recipe. After all of my research on which recipe to use, I felt pretty confident with what we put together; a combination of several low sugar jam recipes to align with the instructions that came with the pectin. Here’s what we came up with:
 Lucas and Lesley’s Low Sugar Concord Grape Jam Recipe
Ingredients
7 cups prepared fruit (buy about 5 lb. fully ripe Concord grapes)
1 cup no sugar added white grape juice
1/4 cup Splenda
1 box SUREJELL For Less or No Sugar Needed Recipes Premium Fruit Pectin
8-12 (8 oz.) canning jars with accompanying 2-piece lids*
*note: if re-using jars from previous canning sessions, it’s recommended to always buy brand new lids. (Just the flat lid part only, not the screw bands.) You can easily purchase these separately at most grocery stores or other big box stores like Meijer or Wal-Mart.

slipping the skins
Directions
Throw your jars and 2-part lids into the dishwasher to wash them thoroughly. Be sure to turn on a sani-dry or drying process to the cycle; this ensures the jars are nice and hot and dry at the end, which is suitable for hot jam. The jars need to be hot when you pour the hot jam into them so that they don’t break from the temperature difference. Using your dishwasher (if you have one) eliminates the need for hot water to keep the jars warm in while you prepare the jam. Alternately you can wash the jars and lids by hand with soap and water and then keep them in warm (not boiling) water until you’re ready to fill them. While you should keep the jars and flat lids warm until use, keep the screw bands separate and cool to make closing up your hot jars later a little easier. You don’t want the water to boil because boiling the flat lid before using it to create a seal may warp them and not allow them to seal properly later.

separating the seeds
Slip the skins from the grapes, separating the pulp from the skins. Toss the skins into a food processor and blend; set aside. Combine grape pulp and white grape juice in a saucepan and bring to boil; cover and simmer for 5 minutes. Toss the cooked pulp through a Foley press or run through a sieve to remove the seeds. Now combine the skins and pulp in a big bowl; this is considered “prepared fruit.” Measure exactly 7 cups of prepared fruit into a large 8 quart saucepot and put it back on the heat.
Mix the 1/4 cup of Splenda and pectin in a small bowl. Add it to the fruit in saucepot; stir to mix well. OPTIONALLY you can add 1/2 tsp. of butter to reduce foaming, if you have any foaming. Bring the fruit to a full rolling boil on high heat and boil for 1 minute, stirring constantly. Remove from the heat and skim off any foam if necessary.

processing our jam
The dishwasher cycle should be complete; pull the hot, dry jars from the dishwasher and place on a towel on the counter. Ladle the fruit into the prepared jars, filling to within 1/4 inch of the top. Wipe the jar rims and threads. Cover the jars with the two-piece lids and screw bands tightly. Place the jars on an elevated rack in a giant pot of water on the stove, or in a canner. If you don’t have a rack or canner, you can use extra screw bands or metal cookie cutters and tie them together and use them on the bottom of the pot to elevate your jars. Submerge the jars; the water in the pot must cover the jars by 1 to 2 inches. Add more boiling water if necessary. Cover; bring water to a gentle boil. Let the jars process for 10 minutes in the gently boiling water. Using tongs, remove the jars and place them upright on a towel to cool completely. After the jars cool, check the seals by pressing the middles of the lids with your finger. If the lids spring back, they did not seal properly and you can try again. If you don’t want to try and re-seal, the jam is still perfectly useable, but refrigeration will be required and it won’t have the same shelf life as your properly sealed jars.

Ball brand No Sugar Needed fruit pectin
About the Sugar
This method only adds around 4 grams of sugar (from the low sugar juice) per jar of jam you make, so it makes ridiculously low sugar grape jam that tastes deliciously fresh, allowing the natural sugars of the grapes to provide all of the flavor. Alternately you can use 1 cup of water in place of the 1 cup of grape juice to eliminate all added sugar, but the juice gives just a hint of sweetness to keep the grapes from being a bit tart without pouring on cup after cup of granulated sugar. The 1/4 cup of Splenda added in with the pectin is negligible and can be omitted completely if you’d prefer.
And there you have it! After the jars cooled and we had checked the seals and found them to be satisfactory, we just let the jars of jam sit, undisturbed, for 12-24 hours. I plan to knit doilies to adorn the jar lids and make pretty little tags for them before we gift them this holiday season. Enjoy, and good luck making jam!
Cabled Wine Bottle Bag

copyright Lesley Karpiuk / pinktoque
My parents’ anniversary is fast approaching (July 27) and I’ve had it in my head that I would make them something wine-related as they enjoy wine-ing with friends. I know that wine-ing isn’t a true word, but just go with it, ok? While Lucas and I were in Nova Scotia last month we picked up a bottle of local wine for them, keeping in mind that I was going to be knitting them up a wine bag for it later. This was an important choice to ponder as most wine bags are meant for typical shaped bottles of wine while my favorite wine to buy my parents is usually some kind of Canadian ice wine, which likes to come in these super skinny tall bottles instead. I picked out some Kellermeister by Jost Vineyards that has a very normal wine bottle shape. I’d like to be able to say that we’ve tried this wine and can give you an opinion, but we picked up a bottle of something else while we were in Nova Scotia and the name completely escapes me. But I’m sure Kellermeister is good. It’s a 4 out of 5 on the sweetness scale, and my parents enjoy wines on the sweeter side.

copyright Lesley Karpiuk / pinktoque
When searching for a pattern I had a few requirements. First of all, I wanted something that could be done in the round from top to bottom; just say no to seaming, folks (if saying no is an option). I also wanted something pretty. My recent interest obsession with cables had me looking for a cabled wine bag, but I wasn’t having much luck. Then I came across the Wine Bottle Cozy pattern by Tara’s Knits — her original bag is fantastically plain and simple, and so I decided I’d be able to modify the stockinette body of the bag by throwing in a cable pattern to spice it up. I’ve done enough cables to have a vaguely accurate idea of how to write up a cabled pattern and so that’s what I did. When it was all said and done I was happy; I think I would’ve liked to have made the cables bigger, but it definitely turned out lovely, don’t you think?

copyright Lesley Karpiuk / pinktoque
The yarn. Let’s talk about the yarn. Earlier in the new year, signs started cropping up in my local Michaels. “New yarn department coming spring 2009!” they said. I waited. And waited. It was discussed a lot on the Ravelry forums. Michaels finally unveiled their “new yarn department” and at first I was a bit disappointed because it basically just looked like they finally restocked the yarn aisles for a change and added more acrylic yarns to the mix. Like we need more acrylic! I was secretly hoping for a little more wool and other natural fibers, but I have to accept that Michaels is a big-box craft store that hosts thousands of other crafts besides knitting and crochet, so I guess I should be lucky that they’ve stocked so many different kinds and colors of acrylic instead of complaining; it may not be the yarn favorite, but I’m not a yarn snob and can admit openly without shame that acrylic definitely has its place. I have plenty of acrylic in my stash; it’s very multipurpose and washable. As part of the new yarn department unveiling, Michaels came out with their own new brand of acrylic. The brand is called Loops & Threads and the yarn’s name is Impeccable; it comes in ombres (mixed colors) and solids and is fairly soft for being acrylic. I’d been kinda drooling over the way the Seaside ombre colorway looked on a previous trip to the store (It’s gotta be the gorgeous shades of blues and greens that blend together so well. Oops, did I mention my recent infatuation with blue greens again?) and with a wine bag plan in mind, I saw it: the Impeccable colorway that blends violets and lavendars and greens together: Fresh Lilac Ombre. I don’t know, but doesn’t a colorway in grapes and greens seem like the perfect combination for something wine-related? I thought so.

copyright Lesley Karpiuk / pinktoque
If you’re interested in my modifications of Tara’s pattern to create your own cabled wine bag, all you have to do is sub in my cable pattern repeat (4 rows) in place of the stockinette body of the pattern. I did the ribbed top cuff the same and did the decreases at the end the same; the only thing that changed was instead of knitting row after row around and around for the body in stockinette, I created and followed the 4 row repeat below:
rows 1, 2, & 4: (k6, p1, k4, p1) each needle/repeat until end of round
row 3: (k6, p1, sl2 to cn & hold in front, k2, k2 from cn, p1) each needle/repeat until end of round
And there you have it! I’m thinking if I make another cabled wine bag in the future that I’ll switch the 4 stitches of cable with the 6 stitches of stockinette in between the cables. So I’ll cable for 6 stitches and only have 4 stockinette in between the cables. Does that make sense? I like big cables and I cannot lie… you other knitters can’t deny… ok I’ll stop there.
Unoriginal Bordered Basket Weave Dishcloth Pattern

photo copyright Lesley Karpiuk / pinktoque
Happy Canada Day! If you’re looking to whip up something patriotic today (or on Saturday for the 4th of July) check out my free pattern suggestions over at Knitting Under The Desk – I think you’ll like both the Canadian and U.S. holiday ideas. And if you’re an American like me living in Canada, you’ll find time to squeeze in one of each! Celebrating two holidays just plain rules.
I’ve been working lately on a dishcloth set for my boss. It’s summertime, and that usually means some kind of temporary office job to keep me busy between school years. Lucas and I are looking at moving back to Indiana very soon, and I recently realized that my time at the office will very quickly be coming to an end. Everyone there has been really fantastic, and I wanted to make a little something for my boss, who is wonderful, and the girl who showed me the ropes and trained me for the job, who is also really great. (See the bookmark I made for her a few weeks back here.) Sort of a “so long, thanks for being awesome” gift.

photo copyright Lesley Karpiuk / pinktoque
My boss mentioned not too long ago that her kitchen is done in black and red. Mostly black and dark wood with punches of red. When I started trying to figure out what I wanted to make for her as a “so long and thanks for being awesome” gift this summer, I decided some bright red dishcloths would be perfect. Then the search began. You know, there’s an awful lot of dishcloth patterns out there. I tried out a few and just kept getting discouraged. Nothing seemed to be just right. Then I started messing around with the basket weave stitch (more like alternating stitches evenly to create a basket weave effect more than a stitch), which was featured on a ton of the dishcloth patterns I was perusing, but eventually I just said “forget it” and put together my own version of a bordered basket weave dishcloth pattern. Unoriginal, I know. And seriously, just what the world needs is another dishcloth pattern, but really… this turned out well and I like how the borders gave it a really sharp, neat look to it when all was said and done.
So my pretties, as a Bonne fete du Canada gift, I present to you… my Unoriginal Bordered Basket Weave Dishcloth pattern. Free, of course. I think you’ll rather like the simplicity and reversibility of it! Not to mention that the little pocket square texture makes a great surface for scrubbing with. I have made three so far and am planning on making one more and then folding them up all pretty (after blocking for presentability’s sake, of course) and tying with a black ribbon.
What You’ll Need
x1 skein of Lily’s Sugar’n Cream worsted weight cotton (1 skein = 2 dishcloths. Score!)
US size 8 needles
Download the PDF here [non-Ravelry users] or on Ravelry as a free [Ravelry PDF download].

Download my Unoriginal Bordered Basket Weave Dishcloth Pattern FREE!
Well that wraps it up for today; Happy Canada Day (and Independence Day on Saturday!) Lots of love and hope you enjoy the pattern :)