10 Squares Down, 30 to Go
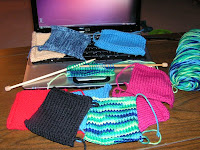 As I’ve mentioned in a few of my most recent posts, I’ve been working on knitting a blanket for Lucas’ mom for Christmas. Now that my zombie projects are done in time for Halloween and Tom’s event (going on this evening), I am fairly clear until Christmas, so it’s time to turn my attention towards items I’m making as gifts for the holidays. The blanket is probably the largest and most time consuming project on my plate, but definitely something I think is worth it. Lucas’ mom taught me the basics of knitting back in June when she was here visiting us for a few weeks, and so it’s important to me to knit her something to show her what I’ve learned.
Based on a fleece throw we have here at home, I’ve decided that my blanket needs to be about 25 inches wide and 40 inches long. It won’t be HUGE or anything, but it will be something that Lucas’ mom can wrap around herself like a hug. I plan to knit a bunch of squares and then sew them together to form the blanket, and so I made a pattern that’s fairly basic and easy for a new knitter like me to handle. I just have to do it 40 times. As far as the yarn I’ve chosen, I’ve not picked out set colours — in fact, to make it more interesting I’ve decided to make squares out of all of the yarn in various colours I have lying around the house that are all of the same weight. I’m using size 9 (5.5 mm) bamboo knitting needles and 100% acrylic , 4 ply worsted weight yarn. The basic square pattern I’m knitting goes something like this:
– co 20 st
– k 1
– p 1
– repeat x12 (for a total of 13 sets of k 1 p 1, or 26 total rows)
– bo
It’s nothing fancy nor do I know much (or anything really) about gauge, but for me, this pattern creates a square that is approximately 5 inches by 5 inches. So that means my blanket will be 8 rows of 5 squares sewn together if I want to get the dimensions I estimated based on a throw we have in the living room. I’ve just completed my 10th square, so I only have 30 more to go at an hour each (or longer if I’m paying close attention to the television or movie we’re watching) between now and Christmas. I think it’s a manageable project, as long as I don’t let myself procrastinate. I’ll keep you posted on my progress – wish me luck!
Tutorial: Handpainted Photo Bottlecap Magnets
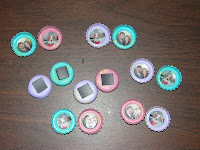 So earlier this week I finished up my Easter gifts – stuffed bunnies holding little plastic eggs. I made magnet sets to stick inside the little eggs as little additional gifts for Lucas and I’s family and friends. Here’s how I made them!
Materials
bottlecaps
acrylic paint
paintbrushes
small photos
Mod Podge
magnets
super glue
Optional Materials
toothbrush
Gather your materials and wash your bottlecaps thoroughly. Nothing worse than giving a painted photo bottlecap magnet to your grandmother who starts asking where that beer smell is coming from. I found that by soaking my bottlecaps in hot sudsy water first, it was a breeze to clean them. Rinse clean and let them dry completely.
Step 1
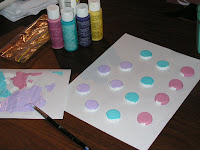
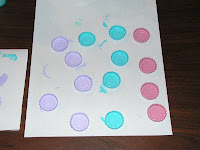
Let’s paint your bottlecaps! I started by giving each one a primer coat of white, then once that was dry, I painted each one individually with a coat of acrylic paint in my desired color choice.
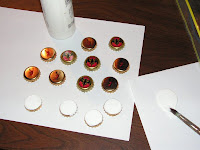 Optionally you could spray paint your bottlecaps or dip them in paint if you’re in a hurry or if that’s easier for you. If you choose to spray paint, be sure to do it in a well ventilated area, preferrably outdoors.
Step 2
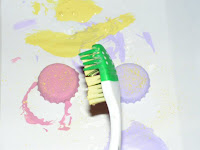
Once each bottlecap has its main coat, you may wish to also do this optional step to add a little flair to your flat color caps. I dipped an old toothbrush into yellow paint and held it close to the bottlecaps and then ran my finger up and down the brush part. This creates a great speckling effect, and gave my finished bottlecaps a little added yellow speckled flair.
Step 3
Let your bottlecaps dry thoroughly. While they’re drying, it’s time to plan out what images you are going to use as your magnet subject. My magnets are going to be given as mini spring/Easter gifts for friends and family, so I chose to use little photos of Lucas and I and our dog, Oliver. Small photos give your magnets a personal touch, but small stickers or even just handpainting a design works well, too. So do images found in magazines.
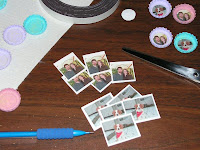 Before cutting up pictures, I made a template circle and cut it to fit the insides of each bottlecap. Once I had a template, I traced the shape onto my photos, then cut them out and tailored each to be sure they fit exactly how I wanted them to.
Step 4
Here’s where the Mod Podge comes in. I chose Mod Podge because it’s both a glue and a sealant, and that’s really helpful for this project. Mod Podge comes in matte, glossy or sparkle finishes, so choose the one that best fits your project’s style. I chose matte for this project. First, using a paintbrush, I applied Mod Podge to the inner circle of my bottlecap where the photo goes.
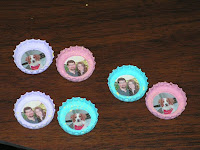
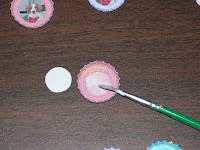 Next I gently eased the photo into its spot with my fingernail. Once the photo was glued into place, I then used the Mod Podge applied thinly over the entire inside of the bottlecap, including the photo. That’s right – paint Mod Podge right over the photo and the inner side of the cap. It will look funny at first, but don’t worry- Mod Podge dries clear. Just be sure you don’t heap on globs of it, or it won’t dry as well or as neat. Beware if you’re using cheap plastic paintbrushes that tend to lose their bristles easily… you don’t want a strand of paintbrush “hair” in your finished project.
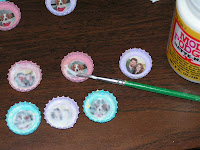 Set your bottlecaps aside to dry. This process can take anywhere from 30 – 60 minutes, depending on how thick you applied the Mod Podge. Thicker coats take a bit longer to dry thoroughly.
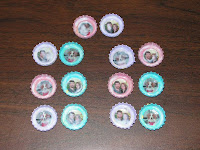 While the inside of your bottlecaps are drying, you may wish to flip them over now and apply a thin coat of Mod Podge to the outside of the bottlecap. This gives your finished project a uniform look and helps seal the paint. If you’re using glossy or sparkle finish Mod Podge, you’ll definitely want to do this.
Step 5
Once everything is dry, it’s time to apply the magnets! I bought a long roll of magnet where you peel off the backing to reveal a sticky back. You can cut the magnets into your own chosen sizes. I cut up the magnets into small squares that fit nicely on the back of each bottlecap. I removed the backing, but added extra strength to the stickiness by adding a dab of super glue before applying. Affix magnets to the backside of your bottlecaps and allow the glue to dry completely before use.
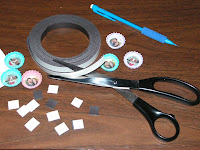
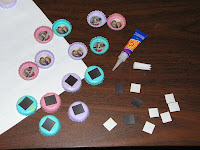
Voila! You now have handpainted photo bottlecap magnets to use on your refrigerator or share with family and friends! Experiment with different images, colors, and Mod Podge finishes to make unique magnets that suit your style. Make a set of Christmas magnets or Valentine’s Day magnets, or just make some that match the decor of your kitchen. They’re quick and easy to make in large quantities, and make a great gift. :)
Whew! It took longer to insert all the images into Blogger than it did to write the tutorial up. Is there a trick to inserting images so you don’t have to go to the top and drag them down to the correct place where you want them inserted into your paragraph each time? Maybe I’m missing something, but it’s really annoying when you have a fairly long blog post and lots of images to insert throughout. Why they always default to the top and I have to drag them down is beyond me. Maybe I’m just doing it the hard way?
Plush House Ornament with Tutorial
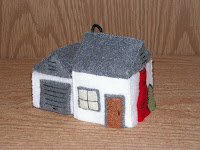 Some good friends of ours just got engaged AND they bought a house and move in on April 1st. They have a thing for Christmas tree ornaments, so I decided to make them a little congratulations gift for their engagement and their new house by making them a little plush house… ornament :)
I had the idea the other night when I went to bed, and layed awake making a list in my head and designing the house and how I would make it and put it together in my head. (my brain never sleeps it seems.) The next morning I started working on it. I don’t have a pattern to share since it’s just a bunch of squares/rectangles with a couple triangles, but I did take a lot of pictures along the way to give you an idea of what I did so I could present a half-tutorial for anyone that might want to make one for themselves :)
Plush House Tutorial
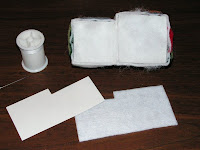
First I cut out the pieces – no bottoms or tops for the square that made up the shape of the house nor the rectangle that made up the garage: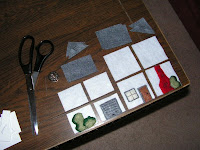 Every little item like the bushes, fireplace, window and door was cut by hand from felt and carefully handsewed on. No machine on this one! It’s way too small and intricate for my personal sewing machine abilities, anyway. I’m digging the handmade look that the showing stitches give it, though.
I formed the roofs and then started putting the walls together:
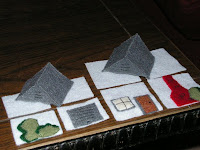
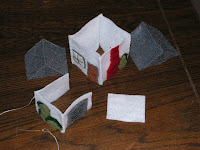
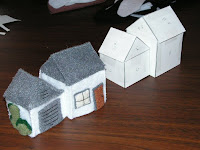
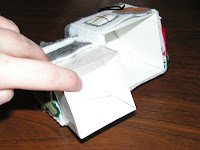
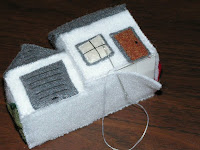
Voila! I forgot to mention that just before I inserted the cardboard supports in the house that I used embroidery floss to make the hanging loop, and knotted it well inside so it’d not come out. I chose a spot in the roof that was somewhat centered as far as the entire final piece goes so it’d hang as evenly as possible.
And that’s it! This is a really basic house – if you use your imagination you could make many more squares and rectangles and make your house much bigger and more complex. It’s all up to you! I hope that our friends like it! :) The cardboard inserts and polyfil really makes it sturdy and hold its shape well. I’m really happy with it!
How To: Easy Glass Pendants
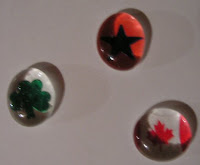 So I got an idea from someone who had made a zipper pull out of a flat-backed glass marble (which I had a bunch of already), and then as I was digging around on the Craftster forums for more inspiration, I found a few different ways to achieve the look. I have come up with a few of my own ideas and wanted to share my preferred method and suggestions on this fantastic (and addicting!) craft. I bet you can’t make just one!
A quick note on the photographs with this blog/article
Please forgive my crappy photographing of this craft – I’m just learning how to use the macro setting on the digital camera successfully with the right lighting, etc. Bear with the bad pics for now, and once I take some better ones, I’ll replace these… because these really do not do this project justice at all.
Materials
Mod Podge
Super Glue
flat-backed clear glass marbles
scissors
small images or designs
Variations on Materials
You can use other types of clear crafting glue gel instead of Mod Podge, or a hot glue gun instead of super glue. I like Mod Podge because it seals well in addition to being a clear “glue” which is important in this project, and I prefer super glue over a hot glue gun just for less mess and prep, and (in my opinion), more glue control. I tend to have a lot more uncontrollable clumps of glue when using a hot glue gun and I can’t stand those long thin strands of sticky hot glue leftovers that get everywhere. Thinner, clearer super glue in a tube seems much more manageable with less mess. And you don’t burn your fingers on it!
Optional Materials (depending on what you’re making)
wire (20 or 22 gauge)
jump rings
nylon cord
fishing line
thin ribbon
chain
felt
magnets
So Where Can You Get Great Images for Your Glass Pieces?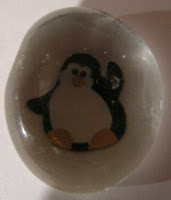
Stickers work exceptionally well. They come in tiny sizes and a wide variety of subject matters. One sheet of tiny stickers can make hundreds of pendants if you find just the right sticker. Good for specific subject designs, and when you apply a sticker to your preferred background paper first, it creates a neat raised effect on the final product.
I love using pieces of scrap fabric because it’s great if you plan to add a zipper pull to that fabulous new purse you just made. By using a scrap of the fabric you just used in your sewing project, you can create a fantastic matching pull or embellishment that really looks professional. Have a plain bag that has a funky lining fabric? Make the pull out of the lining fabric to bring out the fun in the bag and add a splash of color to the drab exterior. Lace 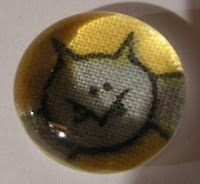 works well because like fabric, it gives a textured look to the image behind the glass.
Pieces of decorative scrapbook paper are instant hits with this project because you can find all sorts of designs and colors in various pieces of paper meant for scrapbooking. Good for abstract designs, too.
Print them out! The Internet has a plethora of imagery right at your fingertips on any subject. If you can’t find something small enough, use free image manipulation software such as GIMP to resize it to fit your needs. This would be a fabulous idea for those who have their own logo or signature icon that they use for their crafty “business”, because a printed logo behind glass on a zipper pull or attached to your craft would leave a lasting professional impression on your customers.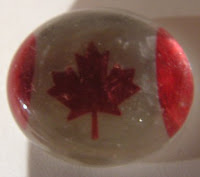
Products around the house are other locations for inspiration. It sounds funny, but the design on that Kleenex box or the character on that cereal box will look great when made into a glass piece! If these images are on packaging that’s too thick or difficult for your project, try scanning them from the product package with your computer scanner and printing them out instead. Check the previous tip on resizing them if they turn out to be too big.
And don’t forget, there’s always magazines and catalogs that are full of designs just waiting to be cut up and made into a new pendant!
Method
I use a paintbrush and spread the Mod Podge evenly on the back of a flat piece of glass marble, then lay the marble flat side down on top of the image I want to use. I immediately apply pressure to further even out the Mod Podge and seal the image. When that’s dry, I’ll cut nice and neat around the glass piece for a perfect image fit. I then tend to add another thin layer of mod podge to the back after trimming, especially around the outer edge (being careful not to get on the sides of the glass) to ensure that my image is truly sealed onto the marble.
Other Suggestions Don’t limit yourself to just clear glass – lightly colored glass gives neat hue results. Using felt on the back can help cover up glue gone wrong, wire, or just add a nice soft touch to the finished product. And thin ribbon or fishing line is a nice alternative to nylon cord if you’re making pendants, pulls, or ornaments. Have a really abstract or fantastic plain color image to use and want to make it even more interesting? Try baking the glass marbles in your oven in a pan for 45 minutes at 500 degrees F, and then immediately pull them from the oven and dump them into ice cold water to fracture the insides of the marbles. This will add more funk to the finalized look and spruce up a plain colored piece. Be s
ure to wear protective eye covering when baking and dumping the glass marbles into ice water on this one, just in case!
What Else Can You Do With These?
The potential is overwhelming! There’s all kinds of great things you can make from this simple craft. Here are a few that I came up with off the top of my head.
Pendants
By applying a little wire that has a loop in it via super glue on the back and adding a jump ring, you’ve just created a pendant that you can then string up with nylon cord or a chain and voila! Instant necklace that’s easy to change as often as your outfits. I also like to use fishing line instead of thick nylon cord for more of an “invisible chain” look. It also doesn’t break out my neck like metal does.
Zipper pulls
This idea was my inspiration to look into this craft further, and done similarly to the pendant method. Instead of adding a nylon necklace cord or necklace chain, add a small simple loop chain or thin ribbon that you can attach easily to zippers or sew into your projects.
Bracelets
This uses the pendant method, but instead calls for two wire loops on either side of each pendant and uses multiple jump rings to fasten pendants in a row. Once you have a good length that will fit onto your wrist comfortably, add your preferred method of bracelet closures on the end jump rings. I suggest adding a piece of felt or decorative fabric to cover the wire on back side of each piece to make the bracelet look cleaner with less of a raw look when its worn. Other light hues of glass besides just clear also work well in this project.
Magnets
After you’ve applied the image, add a thin layer of super glue on the back of your sealed glass piece and attach a magnet instead. These make great decorative magnets for your fridge!
Good luck charms
St. Patrick’s Day is coming up, and I found a bunch of tiny shamrock stickers that I applied to white paper and used. I covered the back with a small piece of green felt to give it a sof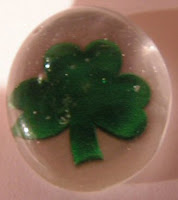 t finish, and it sits nicely on desks or in a drawer or pocket and brings good luck to anyone you give them to. You could use any image for this – a heart for love to slip into your loved one’s pocket and remind them that you’re thinking of them, or even just a smiley face to brighten someone’s day. The possibilities are endless when you pick the images, and you can create a great little token to give those around you to suit any occasion.
Ornaments
By creating two of these glass pieces that are similar in subject matter or colors and then gluing their flat sides back-to-back with either super glue or hot glue, you can create an ornament! This may require a bit of time since you’ll want to make sure you pick out two glass marbles that are similar in size so that the backs line up as best they can. Don’t forget to sandwich a loop of thin ribbon in between the two halves before gluing them together so that you can hang your new glass ornament when it’s done.
Mosaics
I’ve always wanted to use mosaics to cover the entire top of a little side table or decorative table. With this project, you can create very unique and one-of-a-kind “mosaic pieces” by crafting a bunch of various glass pieces to use as your mosaics. They can be all clear with similar images behind them or different colors with all different kinds of images instead. Once you’ve made up a couple hundred, you can easily use caulking or a cement paste to affix them in your own artistic arrangement to cover a table top or other item.
The possibilities really are endless. I’m sure you’ll find other uses for these glass pieces, too. They’re really addicting; once you make one, you just want to keep making more. You’ll also notice yourself looking for great “glass piece images” on all kinds of things now. It really helps to open up your eyes to all of the great imagery around you! Capture your life and beautiful images with this craft and enjoy all of the various ways you can use them to embellish your surroundings.
