Cabled Wine Bottle Bag
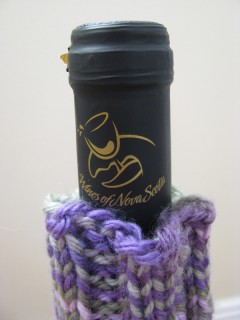
My parents’ anniversary is fast approaching (July 27) and I’ve had it in my head that I would make them something wine-related as they enjoy wine-ing with friends. I know that wine-ing isn’t a true word, but just go with it, ok? While Lucas and I were in Nova Scotia last month we picked up a bottle of local wine for them, keeping in mind that I was going to be knitting them up a wine bag for it later. This was an important choice to ponder as most wine bags are meant for typical shaped bottles of wine while my favorite wine to buy my parents is usually some kind of Canadian ice wine, which likes to come in these super skinny tall bottles instead. I picked out some Kellermeister by Jost Vineyards that has a very normal wine bottle shape. I’d like to be able to say that we’ve tried this wine and can give you an opinion, but we picked up a bottle of something else while we were in Nova Scotia and the name completely escapes me. But I’m sure Kellermeister is good. It’s a 4 out of 5 on the sweetness scale, and my parents enjoy wines on the sweeter side.
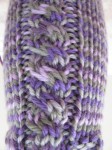
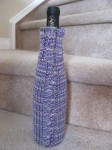
When searching for a pattern I had a few requirements. First of all, I wanted something that could be done in the round from top to bottom; just say no to seaming, folks (if saying no is an option). I also wanted something pretty. My recent interest obsession with cables had me looking for a cabled wine bag, but I wasn’t having much luck. Then I came across the Wine Bottle Cozy pattern by Tara’s Knits — her original bag is fantastically plain and simple, and so I decided I’d be able to modify the stockinette body of the bag by throwing in a cable pattern to spice it up. I’ve done enough cables to have a vaguely accurate idea of how to write up a cabled pattern and so that’s what I did. When it was all said and done I was happy; I think I would’ve liked to have made the cables bigger, but it definitely turned out lovely, don’t you think?
The yarn. Let’s talk about the yarn. Earlier in the new year, signs started cropping up in my local Michaels. “New yarn department coming spring 2009!” they said. I waited. And waited. It was discussed a lot on the Ravelry forums. Michaels finally unveiled their “new yarn department” and at first I was a bit disappointed because it basically just looked like they finally restocked the yarn aisles for a change and added more acrylic yarns to the mix. Like we need more acrylic! I was secretly hoping for a little more wool and other natural fibers, but I have to accept that Michaels is a big-box craft store that hosts thousands of other crafts besides knitting and crochet, so I guess I should be lucky that they’ve stocked so many different kinds and colors of acrylic instead of complaining; it may not be the yarn favorite, but I’m not a yarn snob and can admit openly without shame that acrylic definitely has its place. I have plenty of acrylic in my stash; it’s very multipurpose and washable. As part of the new yarn department unveiling, Michaels came out with their own new brand of acrylic. The brand is called Loops & Threads and the yarn’s name is Impeccable; it comes in ombres (mixed colors) and solids and is fairly soft for being acrylic. I’d been kinda drooling over the way the Seaside ombre colorway looked on a previous trip to the store (It’s gotta be the gorgeous shades of blues and greens that blend together so well. Oops, did I mention my recent infatuation with blue greens again?) and with a wine bag plan in mind, I saw it: the Impeccable colorway that blends violets and lavendars and greens together: Fresh Lilac Ombre. I don’t know, but doesn’t a colorway in grapes and greens seem like the perfect combination for something wine-related? I thought so.
If you’re interested in my modifications of Tara’s pattern to create your own cabled wine bag, all you have to do is sub in my cable pattern repeat (4 rows) in place of the stockinette body of the pattern. I did the ribbed top cuff the same and did the decreases at the end the same; the only thing that changed was instead of knitting row after row around and around for the body in stockinette, I created and followed the 4 row repeat below:
rows 1, 2, & 4: (k6, p1, k4, p1) each needle/repeat until end of round
row 3: (k6, p1, sl2 to cn & hold in front, k2, k2 from cn, p1) each needle/repeat until end of round
And there you have it! I’m thinking if I make another cabled wine bag in the future that I’ll switch the 4 stitches of cable with the 6 stitches of stockinette in between the cables. So I’ll cable for 6 stitches and only have 4 stockinette in between the cables. Does that make sense? I like big cables and I cannot lie… you other knitters can’t deny… ok I’ll stop there.
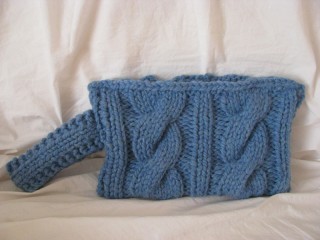
The Cabled Wristlet That Couldn't.
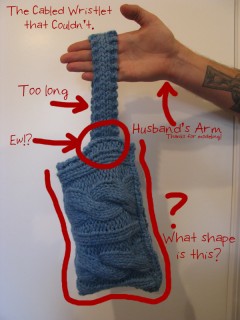
I would be a bad blogger (and a liar) if I said that everything I attempt to make turns out as planned. Or even that I never have a craft failure, cuz’ clearly I have had my share. It’s not really that this cabled wristlet I whipped up didn’t look nice when finished. I mean, it doesn’t look too bad in the pic, right? Its functionality went down the tubes somewhere along the way, though, and that’s what made this project fail on me.
I was so looking forward to this post way back when I was still designing the wristlet. I couldn’t wait to share it, couldn’t wait to finish it in time for an upcoming trip, and couldn’t wait to give you all the pattern and my instructions so you could make something equally beautiful for yourself. In my lack of design experience I missed a few key things, however.
The idea was that I wanted to try cables. I had it in my head that cables were so hard. But then I actually sat down and made myself try them. They were such a piece of cake! And wow, did I ever really love the look of cables. Cables make it seem like I’m so much fancier and so much of a better knitter than I am. They’re easy, but to the untrained or inexperienced eye, they look super intricate and difficult. Add cables to an otherwise boring knit and suddenly it’s magic and you’re a superstar! I still feel that way about cables, which is why I think this wristlet project looks nice, but it just didn’t work out when it came time to use it. I haven’t decided if I’m going to even bring it this weekend on our trip or not.
Oh ya, the trip! That was really what inspired this knit; Lucas and I are celebrating our wedding anniversary and we decided to go somewhere that neither one of us have ever been, but that we’d been wanting to see. As we’re planning to move back to the states in the somewhat near future, we decided to stay within the country and finally make a trip out to the far east coast of Canada. Nova Scotia, to be exact. We’d talked about going out there for our honeymoon last year but never got around to it. So instead we’ve decided to treat ourselves to a 4 day getaway with no real set plans and no family members nearby. We realized recently that we’ve never taken a vacation that didn’t involve visiting family or friends. Every trip we’ve ever taken together has been to visit our family either in British Columbia or Indiana, and while the trips were fantastic and we enjoyed every minute of visiting with family we don’t see very often, we decided it was high time we take a trip for just the two of us. Our plans loosely include flying into Halifax overnight Thursday and staying until late Monday afternoon. No hotels are booked yet; we are renting a car and just driving… just planing to stay wherever we end up. We do know that for Saturday, our actual anniversary date, we want to stay in a really nice bed and breakfast way up on Cape Breton Island and eat somewhere nice. The exact how, when and where is still up in the air, and believe it or not, I rather like it that way.
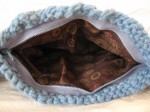
...not horrid but not the best. You can't see the "invisible" stitches, but I promise they're there.
Anyway, back on topic… this beautiful province we’re planning to visit in Latin means “New Scotland.” When the trip was planned (very recently) I realized I had just over 2 weeks to knit something to use/wear on the trip. I’m a slow knitter and have lots of things with a deadline coming up to finish, so I knew it wouldn’t be anything large and most likely I’d not have enough time to knit a shrug, either — though I’m dying to make one. I decided something cabled because for some reason, thick cables and either greens and blues sound like something that would fit in a place called “New Scotland.” Something I am really looking forward to experiencing in Nova Scotia is the Scottish flavor of music and culture that I keep hearing about up in Cape Breton. Cables make me think of (or remind me of) celtic knots in a way, and so a cabled wristlet idea was born, even if that reasoning sounds silly or illogical to anyone else.
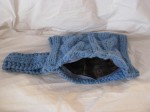
In looking at basic cable patterns I kept seeing the same sorts of variations on a rib/cable pattern; ribbing along the sides and a cable winding up the middle. I stuck with that idea and using chunky yarn in a pretty sky blue, I whipped up a big rectangle. Wtih those cables, gah, it was just SO gorgeous. I was so proud! They looked so fancy! I folded the rectangle in half, and then to form the strap I just did a simple 6-stitches-across and repeated the rows until it was “long enough.” Design problem number one was not thinking ahead as to how that strap would stretch later on. I sewed up the side seams of the rectangle, sticking the ends of the strap inside one side seam. So far so good! I decided to line it and include a zipper, because I coudn’t very well let an open pouch dangle from my arm; all my stuff would fall out! The most secure way would include a zipper so there were no openings for my belongings to fall out through. I guess this is where the rest of the failure continued to go: I had a horrible time lining such a thick knitted pouch. I did the lining fabric pouch separately and used my machine to sew the zipper neatly to the lining. Then all I had to do was hand stitch the zipper neatly inside the knitted pouch. This all went according to plan, but the hand stitching looks awful (I even used invisible thread!) and when it was all finished, I realized how off my proportions were in the design. The handle is too long and stretches a lot, and the bag’s size is a bit big and looks a little awkward. Even with nothing IN the pouch, it’s so heavy and bulky that it makes the handle stretch, which makes the side seam of the pouch stretch in a very unflattering way. The end result really isn’t very flattering at all, to be honest.
I don’t know what I expected, but the vision in my head didn’t match up with the end result, and so to me it’s a failure. Lucas would say I was being too hard on myself, though, so maybe I shouldn’t use the word “failure” … on the bright side, I got in a lot of practice with cabling (which is my new obsession and I love it, which is automatically another ‘plus’ to the project) and so it wasn’t all bad and thus not a total failure. What do you all think? Would you make one for yourself? If so I could throw together the loose outline. Any suggestions on design changes for a future attempt or should I just leave it dead? Is the stretching as bad as I think it is?
Despite this not-so-great result with the wristlet, I did get in some really simple projects over the weekend: some dishcloths and a cabled (I told you I was obsessed) bookmark for a co-worker. More on those (with pics) later this week :)
