My First CU Freebie: Paper Edger Templates
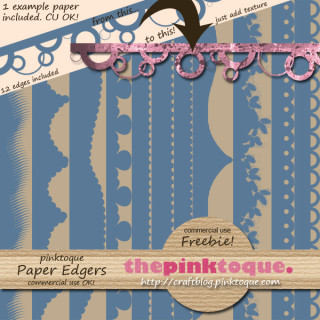
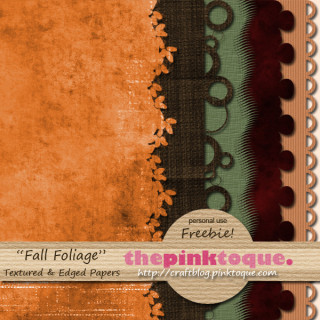
As I promised yesterday, I’m back with my very first commercial use freebie for you today :) Yesterday I gave away the beautiful Fall Foliage Textured Edger Papers (see below) which are personal use only, HOWEVER, the templates I used to create those gorgeous papers are what I’ve got to give away today, and they are commercial use! Feel free to use the edgers to create your own unique papers by adding your own overlays and colours to them. The edger templates are for commercial use as mentioned, but be sure to read the CU TOU included (or you can read about them here) because it’s a new set of terms for my freebies, being my first CU giveaway. Basically the only major thing to keep in mind (besides the obvious… don’t pass them off as your own templates or re-distribute them) is that while you can use the templates to create your own papers to use commercially, be sure to give credit where credit is due when you use them. It’s only right ;)
So in case you missed yesterday’s beautiful Fall Foliage papers (see left), rush back and nab them here. In today’s CU freebie pack you’ll find 12 unique edger templates and a sample paper that I made with one of the edgers so you get an idea of what you can do with the templates. The pink grungy sample paper in the download is yours to keep and use how you wish (within the TOU) as well :) And you don’t just have to make paper with these templates, either! I made them 3600 pixels tall by default so that it was easy for paper makers, but the templates can be resized and used as edges on anything you can imagine, from notepapers to journal tags and everything in between. Get creative! Simply add them to what you want to edge, apply your chosen colour to the shape and then add a decorative overlay to give it character. Just like the Fall Foliage papers! And Voila! You’ve now got something unique to use in your kits, give away, or scrap with.
What are you waiting for? Download my CU Paper Edger Templates HERE! And be sure to show some love here on my blog if you download. I love to hear your comments, and they help me to grow as a digi scrapping designer. Thanks!
Hope you’ve had a nice weekend :) I have plenty of other freebies coming your way over the next week, so I’ll see you back here soon <3


These are great! ! Thank you for sharing.
Thank you very much for sharing. great looking blog!!!
Thank you for sharing,they will be very usefull.
Thank you!
these are great, loved yesterdays papers
The templates look fantastic! Thank you for your generosity in giving such a great gift!
Wow! These are really cool. I just found your website! LOVE it! Thanks so much for sharing these GREAT templates. I’m looking forward to using them in my projects! Have a GREAT day!!!
These are soo-o-o great. Thank you for being so generous!
I love these! Thanks for sharing.
You are all so very welcome :) Thanks for the kind comments!! <3
These look great – I can’t wait to try them out! Thank you so much for creating and sharing them with me! Hugs!
Thank you so much! I can’t wait to use these!
Thank you! I especially like the one on the third from the right that you used to create the orange paper in “Fall Foliage”, which I’m off to get next. Thank you for that, too!
thanks!
Thanks for still having these around as I found a need for some paper edges today.
Vielen Dank für diese tollen Ränder!
I just love your edgers, but I am new to digital scrapbooking and I am not sure how to use these in photoshop so that just the edge is removed from my papers. Do you have a tutorial? I have worked out how to change the colour of the edges by “filling” them with my paper, but i dont know how to add them to my paper so there is no mismatch to the papers patern. Im sure there is a simple answer. Thanks
Andrea:
In Photoshop, open up a 3600 x 3600 transparent new image. Open up the edger you want to use and put it along whatever side of the page you want. Then fill the rest of the page behind the edger with the same shade of blue — now you have made a large shape with the edger as part of it along the side. This is now your paper template.
Now open a second file — 3600 x 3600 pixels, 300 dpi, etc. OR open the 3600 x 3600 paper that you want to make into an edger. Paste the big blue template shape with the edger over top of this file. Now use the magic select and select the entire blue shape, which will include the edger. Go up to your menu options under select and choose “inverse” — this will now select everything outside of the blue shape. Click on the paper layer (not the blue template layer) now and then hit delete — this will remove everything of the decorative paper that is not part of the paper edger shape. Now you can remove the blue template, and you’re left with the paper in the shape of the edger.
Alternatively, you can arrange the two layers so that the template shape with the edger is underneath the paper you want to decorate. With the decorative paper layer selected, hit ctrl+ALT+G — this will make it “snap” to the shape of the layer below it, making the decorative paper snap into the edger template shape automatically for you. This is the method I use.
I hope that makes sense. If not, let me know and I can try to make a tutorial at some point — I’ve been so busy lately, though, so no guarantees when I can get around to it :( Let me know if these instructions need clarification.
these are so pretty! You did an awesome job on them and I am sure I will be using them in the near futre…thank you so much! Jodi of Throwing Some Scraps Around
Hiya! I am new to your blog, ty so much for the edges! these are so so hot!! Thx for sharing!
Thank you for the edges!
Is there a way to use these awesome edges as shapes in My Memories Suite?
Carrie–
Sorry, these are meant to be used in a graphics editing tool like Photoshop because they are shapes to “snap” your papers to. If I want to use these in MMS, I will first go into Photoshop and use them as guides to create pretty textured and fancy-edged papers. Then I save them as high quality .png files and then open and use those papers within MMS as an embellishment. Hope that helps! :) Check out my MMS tutorials (I think the 2nd one) that shows you how to use papers, graphics and embellishments that you make yourself or download elsewhere so that you can open them within MMS :)
Thank you sooo much!
You’re so welcome! :D
Thank you so much for these, they’re fantastic!
I can’t wait to try them out :)
Thank you so much for sharing…awesome work!
thank you! beautiful :)