DIY: Batman Soap Tutorial
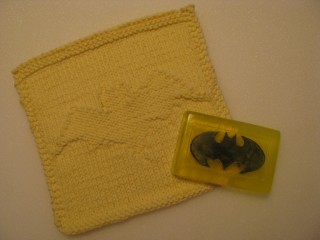
I realize that crafting Batman soap does not seem like something you’d find at The Pink Toque craft blog, but rest assured you’re still at the right blog, and today we’re going to do something ‘different’. Soapmaking is a lot of fun – I spent a brief period back at Indiana University playing with the very basics of making handmade soap. When I was trying to come up with a great gift idea for my good friend Michelle (whose birthday is coming up on Monday) I immediately thought of knitting her something, since of course that’s the craft I’ve been doing a lot of lately. I should also mention that Michelle loves Batman. (That’s kinda an important point to this story.) So then I was thinking knitting + Batman. (Awwe, knitting + Batman forever!) I came up with the idea of knitted washcloths with the Batman logo on them. (Side note: I was unable to find a pattern for this already, but the Batty Dishcloth by BlackRayne is pretty close and looks good in yellow cotton!) And then I remembered how I made basic soaps back in university and envisioned a way to incorporate the Batman logo into the project so that I could create a Batman cloth and soap set for Michelle. So now you have the backstory, and now I can get on to the DIY part!
Materials:
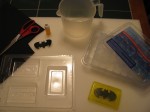
First of all, let’s talk about materials. I mentioned that this is very basic soapmaking. It is. It’s very easy. We’re talking about melt, pour and voila here, people. I made my first Batman soap last night in about 15-20 minutes, including prep time. Head on over to Michaels (or your local craft store) and find the soapmaking aisle and pick up the following items:
1. Glycerin – “bricks” of clear or creamy white glycerin is sold usually in 2lb plastic containers like you see in the materials photo. (Click here to see what mine looks like.) Pick up some of the clear, since you want to be able to see the Batman logo when you’re done.
2. Soap coloring – this is packaged similarly to food coloring and the little bottles of color look just like it. It says it’s specially formulated for soap making, though, and since food coloring stains my hands and I’m not sure if the color will stain your skin when you use the soap, I go ahead and pick up specially made/packaged soap coloring instead of risking food coloring, just in case. Grab a little bottle of yellow. You’ll only be using a few drops per bar, so this stuff will last a long, long time.
3. Soap mold – there are likely several various plastic soap molds there in the soapmaking aisle – I just chose a plain and basic rectangular soap mold shape; approximately 4 inches wide by 2.5
4. Black foam – in the kids craft aisle I found a single sheet of black craft foam. It’s around the thickness of a piece of posterboard, maybe a little thicker, for $0.99. This is what we’ll make the logo out of.
That’s all you need from the store. You most likely already have a computer at home to grab the logo template with for printing, scissors for cutting out the logo, and a small container or liquid measuring cup to microwave and stir hot liquid soap in. It’s also recommended to grab a little spray bottle with rubbing alcohol in it. These spritzer bottles can be recycled from an old one you have at home (make sure it’s been thoroughly cleaned!) or you can get a cheap one in the travel aisle of your local grocery store or Wal-Mart, for example. Rubbing alcohol can be found in the beauty/pharmacy department of your local store, too. It’s commonly found with peroxide. Ok now let’s get started!
Directions:
1. Print off the logo template I’ve made onto regular paper. I made my logo to be around 3 inches wide x 1 inch tall so that it will fit nicely in the center of my rectangle of soap.
2. Cut out the logo carefully. Lay it on the black craft foam and trace with a pencil. It may seem like you won’t be able to see the pencil lines, but trust me – you will.
3. Cut out the logo shape from the black craft foam. This is getting very Batman very quickly.
4. Open your brick of clear glycerin. It’s usually scored for you so you can cut off even sized chunks. I found that one complete slice along the short side of the brick was the perfect amount for one bar of soap. See the materials picture to see where I cut mine if I don’t make sense. Using a butter knife (this is where kids will need help if kids are involved!) slice off a chunk of glycerin.
5. Microwave your chunk of glycerin in a small microwaveable bowl OR liquid measuring cup. I recommend using something like your Pyrex or plastic liquid measuring cup since it has a lip that will make pouring the hot liquid soap later much easier. For the amount I sliced off, this only took around 30 seconds on high. You will have hot liquid soap in no time! Do a little Batman jig while you wait. I’m not sure what a Batman jig would look like, but if you do one, please be sure to YouTube it.
6. Squeeze 5 drops of yellow soap coloring into the liquid soap and stir. I found 5 drops to be adequate to get the color I was looking for, but feel free to use more or less as desired.
7. Now pour (see why using a liquid measuring cup was recommended?) your yellow liquid soap into the soap mold BUT ONLY FILL IT HALFWAY. Reserve the remainder of the yellow liquid soap and set it aside. If you see any air bubbles in your mold, gently use a toothpick or the end of the knife you used to cut the glycerin with to swirl them out. You can also use the spray bottle of rubbing alcohol and lightly mist the surface of the soap to remove air bubbles.
8. Wait 10 minutes. You could put the mold in the fridge while you’re waiting if you’d like, but it’s not necessary. You’d be surprised at how fast this stuff hardens! This is also an excellent time to upload that YouTube vid of you doing the Batman jig from earlier.
9. The soap in the mold should be solidified enough for the next step at this point. If the reserve liquid soap has hardened during the 10 minutes (which it will have), pop it back in the microwave to re-liquify it for 15 seconds or so. Now we’re going to add the logo. A note on that:
Basically what you’re doing is layering; creating two layers of soap and placing the foam Batman logo in between the two. You let the first layer harden enough to add the logo, then pour the remainder of the liquid soap on top and let the whole thing harden so that your logo is “trapped” between the two soap layers and therefore in the middle of the soap.
**FIRST** Using your mini spray bottle of rubbing alcohol, gently spritz the hardened surface of hardened layer one. This will ensure the two layers don’t separate later. OK now on with the show…
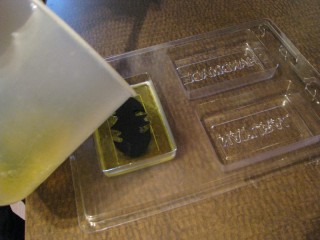
10. Pour a DROP of hot liquid soap in the center of your mold, on top of the hardened first layer. This drop of liquid soap will act like “glue” to hold your logo in place. Gently place your logo on top of the first layer, pressing on it gently so the liquid soap spreads out and helps the logo stick to that first layer. Now gently pour the remainder of the hot liquid soap on top of the logo to fill up the mold and create the second layer. Again, if there are any air bubbles on the surface, swirl them out with a toothpick or something so that the soap hardens as smooth as possible. And again, you can also use the spray bottle of rubbing alcohol and lightly mist the surface of the soap to remove air bubbles.
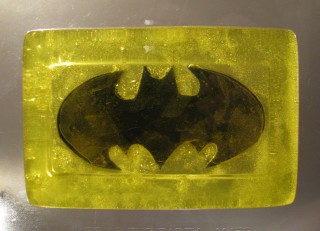
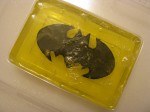
Let your soap sit overnight to completely cool and harden. In the morning you will be delighted to see your finished soap! Turn the mold over and gently pop it out. Voila! You now have awesome Batman soap.
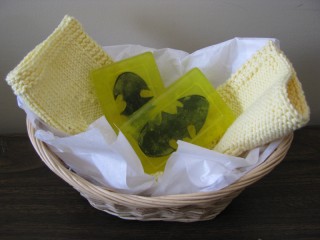
This method would work for lots of things, so use your imagination! I hope you enjoyed the tutorial :) And I hope Michelle loves her handcrafted Batman soap! I took a picture of the first bar alongside the first knitted Batman cloth. Lucas is making a second cloth and we’ll make a second bar of Batman soap to go with it. This gift will truly be completely handmade from both of us :)
Tutorial edited 6/6/09 to add in information about using a spray bottle of rubbing alcohol to help with air bubbles in the soap and in between the layers, thanks to comments below from Gina and suggestions on Craftster, where this tutorial was also posted. Thanks! :)


[…] Original post by Lesley […]
Thank you for this great idea!! thank you for the easty direction.im making them as invitations to my sons prty.
Excellent! I’ve been knitting face cloths as graduation presents but this combo is even better.
Very cute. :) As a soapmaker, let me suggest a couple of things, though. When making layers, make sure to spritz the hardened layer with alcohol prior to pouring your next layer. You risk the two layers separating, if you don’t. And also, to get rid of air bubbles, another spritz of alcohol will get rid of all of them at once.
Again, cute design!!
thanks for sharing this idea! i am so going to make this for my nephew who is a batman fan. i’ve been trying to think of something for his christmas stocking and this is perfect.!!
holy crap les, you are all over the internets yet again! seriously, I think you were made for craft blogging. happy canadiaversary, enjoy the snow, hee hee
Thanks Claire! :D
Gina – fantastic tip, thank you! I will edit and add that info accordingly — they told me that over on Craftster too, and I had no idea! Much appreciated.
Thanks for the comments everyone! <3
Oh how cute! I saw this on Craft and I got so excited. I know what my Batman-obsessed friend is getting for his birthday this year! I’d also love to link to this if you didn’t mind!
Thanks, Rachel! :) And by all means, I’d be honored… link away! <3
Clicked over from Craft…This is sooo cool and would make a fun gift for a kid! I’d love to link to you also!
Thanks, Chrissy! Please do link – and thank you so much! :)
[…] I love this soap, and it’s ok if your kids aren’t into Batman. Just follow the tutorial at The Pink Toque and personalize to suit your […]
I love this idea (as the mother of 3 boys). I wish I had used it as party favors for my 4-year old’s Batman party in March. I have never made soap before…can you use a photo in the soap or something printed on cardstock or does that get gross and hard to see? Wondering if you have any tips.
Hi,
You can use just about anything, however papers, photos etc must be laminated or completely covered with packing tape.
@Heather
I am not sure whether a photo or something on cardstock would hold up, to be honest. I’ve not tried! I chose the foam because I thought it would be sturdier than paper, but perhaps cardstock weight would be ok? You could always just give it a try and see what happens – the supplies are fairly inexpensive and provide more than enough to make many bars of soap. It could be turned into a fun experiment with the boys! And if the cardstock doesn’t seem to hold up, ask their input on what to try next. Small toys should work, as should pre-cut foam shapes they might find at the craft section. Good luck!
Great tutorial thanks for the info.
hello..I just wanted to say thanks for the this blog idea!! my fiance is a big batman fan and we’re really considering using this idea for our wedding favors ;) thanks again for the great and easy tutorial.
Lori — thank you for your very kind comments; I’m so happy to have helped :) Enjoy!
[…] Find the details on The Pink Toque. […]
This is such a great tutorial and you are such a great writer! I loved reading it.
I make a lot of glycerin soap and have wondered about using the foam in soap. I figured it would float so was reluctant to try it. Your glue method is perfect and so simple! Yay!
Thanks for the inspiration! :)
Debbie, thank you SO very much for your kind words :) I’m so glad to have inspired someone! Best of luck :)
[…] related to this article Top 10 DIY Cellphone Mods and Accessories – Cellphones – Lifehacker | The Pink Toque» Knit & Crochet Soapmaking Tutorials » DIY: Batman … | How to Dry and Store Herbs for Soap Making | An Eco-Friendly DIY Felted Stone Soap from Martha […]
Hey, I just wanted to say thanks for posting such a great idea. What I love about this is, you can get boys involved in crafts. I think crafts are great for everyone, but for some reason it seems to be more of a “girl” thing. Hopefully we can start a new trend!
I just made one today, it was my first soap making attempt. It was so easy because of your tutorial Thanks!
Here’s mine (not bad for a first shot) :D
http://www.facebook.com/photo.php?fbid=10151575814710043&set=a.10151575814330043.847113.673370042&type=3&theater
When my now-husband and I first started dating, I called him my superman, and he said: “No, I’m your batman!”
I just started making soap, and was so excited to find this.
I just made my first bar of soap today, and decided to try this out. I made two bars to give to my husband tomorrow – I know he’s going to love it.
Thanks so much for this!
im gonna make these as wedding favors im having a batman themed wedding i cant wait! and these seem so very simple but how can i add scents?
Firstly, CONGRATS on your upcoming wedding. Secondly, you’re AWESOME for having a Batman themed wedding :) You can add scents using bath fragrance oils to the melted soap base. The fragrance oils are liquid, and you stir them in really well to the melted soap before pouring. You can find fragrance oils wherever you purchase your melt-and-pour soap base supplies. Read the instructions carefully to find out how much to add, etc. Good luck and congratulations again!