DIY: Batman Soap Tutorial

© Lesley Karpiuk / pinktoque
I realize that crafting Batman soap does not seem like something you’d find at The Pink Toque craft blog, but rest assured you’re still at the right blog, and today we’re going to do something ‘different’. Soapmaking is a lot of fun – I spent a brief period back at Indiana University playing with the very basics of making handmade soap. When I was trying to come up with a great gift idea for my good friend Michelle (whose birthday is coming up on Monday) I immediately thought of knitting her something, since of course that’s the craft I’ve been doing a lot of lately. I should also mention that Michelle loves Batman. (That’s kinda an important point to this story.) So then I was thinking knitting + Batman. (Awwe, knitting + Batman forever!) I came up with the idea of knitted washcloths with the Batman logo on them. (Side note: I was unable to find a pattern for this already, but the Batty Dishcloth by BlackRayne is pretty close and looks good in yellow cotton!) And then I remembered how I made basic soaps back in university and envisioned a way to incorporate the Batman logo into the project so that I could create a Batman cloth and soap set for Michelle. So now you have the backstory, and now I can get on to the DIY part!
Materials:

click to see materials
First of all, let’s talk about materials. I mentioned that this is very basic soapmaking. It is. It’s very easy. We’re talking about melt, pour and voila here, people. I made my first Batman soap last night in about 15-20 minutes, including prep time. Head on over to Michaels (or your local craft store) and find the soapmaking aisle and pick up the following items:
1. Glycerin – “bricks” of clear or creamy white glycerin is sold usually in 2lb plastic containers like you see in the materials photo. (Click here to see what mine looks like.) Pick up some of the clear, since you want to be able to see the Batman logo when you’re done.
2. Soap coloring – this is packaged similarly to food coloring and the little bottles of color look just like it. It says it’s specially formulated for soap making, though, and since food coloring stains my hands and I’m not sure if the color will stain your skin when you use the soap, I go ahead and pick up specially made/packaged soap coloring instead of risking food coloring, just in case. Grab a little bottle of yellow. You’ll only be using a few drops per bar, so this stuff will last a long, long time.
3. Soap mold – there are likely several various plastic soap molds there in the soapmaking aisle – I just chose a plain and basic rectangular soap mold shape; approximately 4 inches wide by 2.5
4. Black foam – in the kids craft aisle I found a single sheet of black craft foam. It’s around the thickness of a piece of posterboard, maybe a little thicker, for $0.99. This is what we’ll make the logo out of.
That’s all you need from the store. You most likely already have a computer at home to grab the logo template with for printing, scissors for cutting out the logo, and a small container or liquid measuring cup to microwave and stir hot liquid soap in. It’s also recommended to grab a little spray bottle with rubbing alcohol in it. These spritzer bottles can be recycled from an old one you have at home (make sure it’s been thoroughly cleaned!) or you can get a cheap one in the travel aisle of your local grocery store or Wal-Mart, for example. Rubbing alcohol can be found in the beauty/pharmacy department of your local store, too. It’s commonly found with peroxide. Ok now let’s get started!
Directions:
1. Print off the logo template I’ve made onto regular paper. I made my logo to be around 3 inches wide x 1 inch tall so that it will fit nicely in the center of my rectangle of soap.
2. Cut out the logo carefully. Lay it on the black craft foam and trace with a pencil. It may seem like you won’t be able to see the pencil lines, but trust me – you will.
3. Cut out the logo shape from the black craft foam. This is getting very Batman very quickly.
4. Open your brick of clear glycerin. It’s usually scored for you so you can cut off even sized chunks. I found that one complete slice along the short side of the brick was the perfect amount for one bar of soap. See the materials picture to see where I cut mine if I don’t make sense. Using a butter knife (this is where kids will need help if kids are involved!) slice off a chunk of glycerin.
5. Microwave your chunk of glycerin in a small microwaveable bowl OR liquid measuring cup. I recommend using something like your Pyrex or plastic liquid measuring cup since it has a lip that will make pouring the hot liquid soap later much easier. For the amount I sliced off, this only took around 30 seconds on high. You will have hot liquid soap in no time! Do a little Batman jig while you wait. I’m not sure what a Batman jig would look like, but if you do one, please be sure to YouTube it.
6. Squeeze 5 drops of yellow soap coloring into the liquid soap and stir. I found 5 drops to be adequate to get the color I was looking for, but feel free to use more or less as desired.

© Lesley Karpiuk / pinktoque
7. Now pour (see why using a liquid measuring cup was recommended?) your yellow liquid soap into the soap mold BUT ONLY FILL IT HALFWAY. Reserve the remainder of the yellow liquid soap and set it aside. If you see any air bubbles in your mold, gently use a toothpick or the end of the knife you used to cut the glycerin with to swirl them out. You can also use the spray bottle of rubbing alcohol and lightly mist the surface of the soap to remove air bubbles.
8. Wait 10 minutes. You could put the mold in the fridge while you’re waiting if you’d like, but it’s not necessary. You’d be surprised at how fast this stuff hardens! This is also an excellent time to upload that YouTube vid of you doing the Batman jig from earlier.
9. The soap in the mold should be solidified enough for the next step at this point. If the reserve liquid soap has hardened during the 10 minutes (which it will have), pop it back in the microwave to re-liquify it for 15 seconds or so. Now we’re going to add the logo. A note on that:
Basically what you’re doing is layering; creating two layers of soap and placing the foam Batman logo in between the two. You let the first layer harden enough to add the logo, then pour the remainder of the liquid soap on top and let the whole thing harden so that your logo is “trapped” between the two soap layers and therefore in the middle of the soap.
**FIRST** Using your mini spray bottle of rubbing alcohol, gently spritz the hardened surface of hardened layer one. This will ensure the two layers don’t separate later. OK now on with the show…

© Lesley Karpiuk / pinktoque
10. Pour a DROP of hot liquid soap in the center of your mold, on top of the hardened first layer. This drop of liquid soap will act like “glue” to hold your logo in place. Gently place your logo on top of the first layer, pressing on it gently so the liquid soap spreads out and helps the logo stick to that first layer. Now gently pour the remainder of the hot liquid soap on top of the logo to fill up the mold and create the second layer. Again, if there are any air bubbles on the surface, swirl them out with a toothpick or something so that the soap hardens as smooth as possible. And again, you can also use the spray bottle of rubbing alcohol and lightly mist the surface of the soap to remove air bubbles.
Let your soap sit overnight to completely cool and harden. In the morning you will be delighted to see your finished soap! Turn the mold over and gently pop it out. Voila! You now have awesome Batman soap.

© Lesley Karpiuk / pinktoque
This method would work for lots of things, so use your imagination! I hope you enjoyed the tutorial :) And I hope Michelle loves her handcrafted Batman soap! I took a picture of the first bar alongside the first knitted Batman cloth. Lucas is making a second cloth and we’ll make a second bar of Batman soap to go with it. This gift will truly be completely handmade from both of us :)
Tutorial edited 6/6/09 to add in information about using a spray bottle of rubbing alcohol to help with air bubbles in the soap and in between the layers, thanks to comments below from Gina and suggestions on Craftster, where this tutorial was also posted. Thanks! :)

The finished gift set © Lesley Karpiuk / pinktoque
Tutorial: My Memories Suite Error Resolved
Let’s set the scene: You’ve recently added some new content that you’ve downloaded to the My Memories Suite program directories and you can’t wait to get in and make some fantastic new scrapbook pages with them. You start up the software and rush in to browse in the new directory you’ve created where all the new content is stored. As soon as you do, an error message pops up. Something about a corrupted file. Annoyed, you click ‘OK’ and realize that you were able to “bypass” the error and still access the files after clicking ‘OK’, but the error keeps popping up and you have to click ‘OK’ for all of the errors before you can use anything in that directory. Every. Single. Time. Ouch.
Some of you have experienced this situation multiple times. And many of you have emailed me, asking about the error and how to fix it, or what was causing the problem. Was it the content you downloaded? The error used the term ‘corrupted’ in reference to a particular file as you were browsing content directories; was there a corrupted image file in your download? Rest assured, it’s not anything you’ve done wrong, and believe it or not, the actual image file in your download isn’t corrupted. (Which is why most of you realized you could just click “OK” and it would allow you access to those files.)
Thanks to a helpful Pink Toque Craft Blog reader, Cam, we now have a resolution straight from My Memories Suite customer service that fixes the problem. And the answer is so simple I keep wondering why I never bothered to call them myself.
Apparently Windows Vista doesn’t like to play nice with My Memories Suite. (Wait, Vista isn’t 100% compatible with everything? NO WAI!) You know how when you go browsing for scrapbooking items such as backgrounds or embellishments within the software and you see various thumbnails there to choose from? The first time you browse new content to use within the software that My Memories Suite hasn’t accessed before, the program renders thumbnail versions of every single image file in the new directory when you browse in it right then and there — backgrounds, embellishemnts, etc. — so that when you are browsing your options you have a little preview thumbnail image of the items to choose from. The error comes into play when you’ve added new content, go to browse it within MMS and you use Windows Vista, as Vista doesn’t like to render the thumbnails properly, hence the error message. The error is basically just letting you know that the thumbnail isn’t present and it can’t be rendered, but it forgets to mention that it’s all Vista’s fault.
The Solution?
I know you’re thinking, “Great, Lesley, but how do we FIX it?” Well, after adding new content to your My Memories Suite software, be it additional content you’ve created or you’ve downloaded from others, (See my tutorial on how to add additional content HERE) you need to right click on your shortcut to launch My Memories Suite and choose “Run as Administrator” from the popup menu. If you run MMS as an administrator and THEN go in and browse the new content you added, My Memories Suite will render the thumbnails properly. My Memories Suite only needs to render thumbnails once — the first time the program accesses the new stuff — and then the thumbnails will always be there. So this is why right after adding new content you may get errors for certain embellishments. You will continue to get those errors every time you run My Memories Suite afterwards until those thumbnails are created properly. Once the thumbnails are rendered, the errors will go away.
You will only need to run My Memories Suite as an administrator once after adding new content to your software directories. If later on down the road you add more new content, be sure that the next time you run My Memories Suite that you run it as an administrator and then go browse to the new content so that the thumbnails for the new files are made correctly, and you’ll be good to go. If you ever run into the error while you’re working within the software, simply save what you’re working on, exit out of the program, and restart My Memories Suite, being sure to run it as an administrator. Then go back to the directory you were trying to access before and the errors should be gone.
The only part of this that still doesn’t make sense to me is how Vista decides which files it cannot render properly. Sometimes I get the error after adding new content but other times I don’t get any errors at all. Sometimes it’s not the entire contents of the new directory I’ve added, just a few select files among an entire folder of new stuff that produces the error. Previously I believed it affected files that were small in size or too small of a resolution to be used properly within MMS. I was fairly regularly getting the error on tiny items or very thin ribbons, which tend to be a lot of pixels wide but only a few pixels tall and I thought that was the contributing factor. Perhaps that is part of it; perhaps the reason Vista is having issues rendering these thumbnails has to do with file sizes, dimensions or resolutions. But the most important part to note is that it is not an error or problem with My Memories Suite; it is a Windows Vista problem.
Bottom line: If you’re getting errors about corrupted image files after adding new content, run My Memories Suite as an administrator (right click on your desktop/taskbar shortcut and choose “Run as Administrator” from the popup) and browse to the new directories to ensure thumbnails are rendered properly to alleviate errors. Special thanks to Cam for sharing this information with us :)
Papier-Mache (Part 1) and a Crochet Huug©
 This weekend I found a little time to get some crafting done. Mostly because one of my projects I started is also kinda school/work related, so anytime you can combine your hobbies with work it’s a good thing.
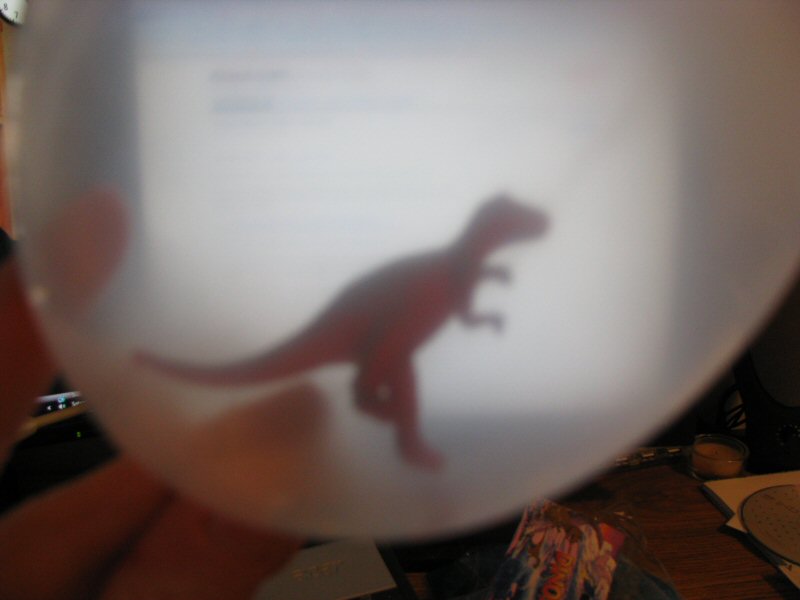
My students are going to have dinosaur week the week after next, and I’m prepping ahead of time to have some really cool things available to them. I decided to start out this papier-mache dinosaur egg project over the weekend because it would need around a week’s worth of time for preparation to ensure they were ready for the kids.
So how do you make dinosaur eggs? Well, I bought a package of 24 transparent balloons (any balloon colour would work) and two 12-piece packages of tiny little plastic dinosaurs. Both of these things I found at Dollarama by our house, so it was an even better score! To make dinosaur eggs, you first put one dino inside each balloon and then blow the balloons up to around “dinosaur egg size” (whatever that is!) and voila! You have a plastic dino inside of a balloon. Why do I want a dino in a balloon? Well, the balloon is a vehicle for papier-mache really. Later this week I’ll get to the messy part 2 and papier-mache over these balloons to create a nice firm egg, leaving a little opening around where the tie off for the balloon is for later. Once the papier-mache dries I can pop the balloon and discard it from within the egg, then add a little layer or two of papier-mache over the opening to seal up the egg for good. I suppose if you would rather add the dino then, as opposed to earlier you could, as long as you leave a large enough opening to fit the dinosaurs. I plan to take the hardened eggs into the classroom and distribute them to my students. After explaining that I found some dino eggs we can speculate what dinosaur eggs looked like and they can have fun painting the eggs however they want :) The next day when the paint has dried they can “hatch” their eggs and receive the little dino inside as a keepsake of the project. I’ll post about part 2 later this week :)
Now normally I would prefer the students make the papier-mache and do everything themselves, but our school has a policy about using balloons with the younger kids and I’d rather not risk it. Not to mention kiddos trying to fit dinos into balloons could be a bit of a challenge. Instead I really like the idea of sparking their imagination when I come in with a bunch of dinosaur eggs I “found” and letting them run wild when they get to paint them. I also like the element of surprise that comes with them having no idea what dinosaur is inside or what they’ll get when their egg hatches. All while they are painting their egg they will be able to hear their dinosaur rattling around inside but they won’t know for sure what it looks like or what kind it is until hatching day. I’m hoping this will be a memorable project for them — and hey, they’ll love being able to take something home with them as a result of the lesson.
 As for crochet this weekend, I finished my crochet version of Huug the Hug Monster© — a character I dreamed up one day on the way to work. I originally created Huug a year ago and knitted the prototype Huug, but this weekend I decided to make Huug in crochet form. I think the newest one turned out pretty well! He is part of my recent retail plans, as I hope to be able to sell him in a boutique-y shop or two locally. I officially copyrighted the character and his knit/crochet patterns this weekend as well, dating back to last year, for the sole purpose of having that all registered officially on paper and all. Wish me (and Huug) luck!
My Memories Suite Tutorial 4: Layered Paper Tricks

My Memories Suite Tutorial 4 - Layered Paper Tricks
Finally!! I know it’s been a month since my last tutorial and I meant to get this up a few weeks ago, but as I’m sure you all have experienced… life got busy. Anyway, here is my final tutorial that I have planned for My Memories Suite digital scrapbooking software by Polaroid. I say final only because I can’t think of any other topics to do a tutorial on within the software. If you think of something you’d like me to explain or demonstrate let me know and I’d be happy to make more tutorials :)
This fourth installment of my tutorial series shows you how to achive the layered paper look within the program. Not only does it show you how to layer background papers but it also shows you how you can turn those simple square or rectangular background papers into various shapes, too, when you layer.
If you’d rather watch this on YouTube so you can bookmark it to watch when convenient, head on over to YouTube, where you can also choose to watch in high quality.
Hope you enjoy this latest tutorial and it helps you out. If you have any questions, please don’t hesitate to ask here by replying on the thread or send me an email: craftblog at pinktoque dot com. Oh and special thank to all of you that enjoyed and downloaded my The Road Not Taken quick page on Friday. Glad you liked it! :) Have a great week!
Updated January 28, 2009: I am now part of the affiliate program and can offer readers of my craft blog who enjoyed this tutorial a $10 discount on the My Memories Suite software, plus an additional $10 to spend in the MMS online store! To get the discount, click the banner link in the upper right corner/sidebar of my blog (Where it says “Get My Memories Suite”) or the link below, and use coupon/promo code STMMMS21122. Enjoy! :D
My Memories Suite $10 discount PLUS $10 to spend in the MMS online store, ORDER NOW! (with code STMMMS21122)
My Memories Suite Tutorial 3: Using Quick Pages

My Memories Suite Tutorial 3 - Using Quick Pages
My latest tutorial for My Memories Suite is ready to go! Today’s tutorial, the third in the series, teaches you how to use quick pages within the My Memories Suite software. The tutorial assumes that you have already watched tutorial 2 and understand how to add additional content to your program’s directories (which you must do to add quick pages) and then how to physically use quick pages you’ve added within My Memories Suite. It’s a quick and simple video this time (under 8 minutes, whew!), and I’ve put it over at YouTube since YouTube will allow you to watch in high quality and bookmark it for later use.
If you have any questions about the third installment of the My Memories Suite tutorial series I’ve been creating, let me know and I’d be happy to help or explain anything that isn’t clear :)
Need a quick page to use as a test when you follow along with the video? Nab my “Thankful for You” quick page from Sunday — it’s a great way to show off the things you’re thankful for this season :) Happy scrapping!
Updated January 28, 2009: I am now part of the affiliate program and can offer readers of my craft blog who enjoyed this tutorial a $10 discount on the My Memories Suite software, plus an additional $10 to spend in the MMS online store! To get the discount, click the banner link in the upper right corner/sidebar of my blog (Where it says “Get My Memories Suite”) or the link below, and use coupon/promo code STMMMS21122. Enjoy! :D
My Memories Suite $10 discount PLUS $10 to spend in the MMS online store, ORDER NOW! (with code STMMMS21122)
My Memories Suite Tutorial 2: Adding Additional Content

My Memories Suite software Tutorial 2
The second installment of the My Memories Suite tutorial series that I’ve been working on is ready for view! This time around I address adding additional content such as freebies or other graphics to the program’s directories for use within the software. This allows you to use digi scrapping freebies (or ANY image files such as clip art from the internet, things you design yourself OR even items you scan!) in My Memories Suite just as if it were pre-loaded content.
The fact that My Memories Suite allows you to use any and all common image files (such as .JPG or .GIF or .PNG) means that your possibilities with the software are endless. While the program comes with tons of pre-loaded backgrounds, embellishments, etc. one day you’ll want to add more, and it’s very easy to do as you can see in Tutorial 2. You’re not just limited to adding just digi scrapping freebies, either. In this tutorial I show you how to add a typical digital scrapbooking freebie kit and how you can scan personal mementos like movie stubs or concert ticket stubs and add them the same way so that you can digitally scrap with physical mementos you’d normally paste in a traditional scrapbook. The sky’s the limit with My Memories Suite, and I’m here to show you how easy it is to make the software your own. Easily add downloaded freebie kits from DigiFree or scan physical objects such as a napkin from your friend’s wedding or a greeting card you’d normally scrap traditionally and use it within My Memories Suite digitally instead!
This is the second tutorial in the My Memories Suite software tutorial series and is roughly 18 minutes total in length. You can check it out over on YouTube where you can bookmark it, download it and save it just in case you don’t have all 18 minutes to spare all at once.  If anything is unclear, just let me know! I have plans for at least 3 other tutorials as well. If you missed the first tutorial, which was an introduction to the software’s basic features and capabilities, click here. Each new tutorial piggybacks off of the previous videos, so you’ll want to watch them all! Stay tuned for more tutorials in the near future, and if you have any suggestions for future tutorials (wondering if My Memories Suite can do this or that? Just ask!) drop me a line and let me know; if it’s not already something I’m planning to do, I’d be happy to make more.
And thanks for the kind comments on yesterday’s Tags and Scraps freebie; I’m glad you enjoy them! :) See you back soon for more goodies. Take care!
Updated January 28, 2009: I am now part of the affiliate program and can offer readers of my craft blog who enjoyed this tutorial a $10 discount on the My Memories Suite software, plus an additional $10 to spend in the MMS online store! To get the discount, click the banner link in the upper right corner/sidebar of my blog (Where it says “Get My Memories Suite”) or the link below, and use coupon/promo code STMMMS21122. Enjoy! :D
My Memories Suite $10 discount PLUS $10 to spend in the MMS online store, ORDER NOW! (with code STMMMS21122)
Updated April 23, 2011: Google Videos is ceasing to exist- you will now find the tutorial above on YouTube, and all links and embeds have been updated to reflect this change :)
Free Pattern: Scalloped Baby Blanket

My Scalloped Baby Blanket for the Ckalieys
I’ve finally completed it: a scalloped edge baby blanket for our friends Kali and Caley, who are expecting their first baby (a boy) sometime in January. Â I just learned crochet about a month ago, so this was a very ambitious project for me! Â I tried to make everything as simple as possible so I created my own pattern that would be elegant, and yet also allow me to really practice those basic crochet stitches. I added the scalloped border to be “wild” because I was feeling confident. Â Now that I’ve completed a baby blanket, I can do anything! Â It took me a month to do, but I was only putting in a few hours or so here and there (maybe once a week?) and taking my time. Â This could easily be done in a weekend if you are a veteran crocheter. Â So enough jabbering, here’s the pattern! (And please be kind, it’s my first time writing a crochet pattern!)
The Ckalieys’ Scalloped Baby Blanket
Materials
- 3 skeins (1365 yards/15 oz) Bernat Softee Baby Solids in Pale Blue
- US H/8-5.00mm crochet hook
Notes
This blanket is built body first, then the scalloped top and bottom edges are done afterwards. Â The body has a simple pattern that even the newest crocheter can handle!
Stitches/Abbreviations Used
sc = single crochet
dc = double crochet
ch = chain
st = stitch
Shell Stitch (described below)
Instructions
Body
ch 110
row 1: sc in second chain from hook, sc in each st across (109 sts)
rows 2 – 20: ch 1, sc in each st across (109)

Close up of the pattern
[The “decorative pattern”]
row 21: ch 2, dc in each st across (109)
row 22: ch 1, sc in each st across (109)
row 23: ch 2, dc in each st across (109)
You will alternate between doing 20 rows of sc and then the three rows that make up “the decorative pattern” until the blanket is as long as you want it to be.
Basic Pattern Idea
*20 rows of sc
(ch2) 1 row of dc
(ch1) 1 row of sc
(ch2) 1 row of dc*
Repeat from * to * until you reach your desired length. I went around 34″ or so. Since you start with 20 rows of sc, make sure you end with a completion of a group of 20 rows of sc to make it look even. (So don’t end with the dc/sc/dc pattern.)
Border
Once the body of the blanket is the length you want, you’re going to immediately turn your work and do the shell stitch back across that final row.
Shell Stitch
*Skip 2 ch, dc 5 times in the third ch : skip 2 ch, sc in the third ch* across (18 shells)
Once you have completed your last shell stitch, you’ll now turn your work clockwise and slip stitch down the long side of the blanket to get to the opposite end. Â Once you get there, turn your work again clockwise and you’ll see you’re at the opposite long end of the blanket. Â Your first set of shell stitches should be on the furthest end from you. Now shell stitch across this bottom row. You now have shell scallops at the two farthest ends of the blanket. Â Turn your work clockwise one final time and slip stitch up the long side until you reach your initial shell. Â You should have made a complete square trip around the outer edge of your blanket, giving the two furthest ends from each other a pretty scalloped edge and slip stitching the two longest sides.
Fasten off and weave in all ends. Â Tada!
Bernat Softee Baby is machine washable and dryable. Instructions:
Machine Washing and Drying: Wash in water (not exceeding 40°C/104°F) at permanent press setting. Do not bleach. Tumble dry at low heat, at delicate setting. Do not iron or press. Do not dry-clean.
Good luck! :) And if anything is unclear or I’ve made a mistake, please let me know, since as I mentioned, it’s my first time ever writing up a crochet pattern. Â If you make any scalloped edge baby blankets, I’d LOVE to see them! Â Drop me a line at craftblog at pinktoque dot com so I can feature you. :)
My Memories Suite Tutorial 1: Introduction

My Memories Suite software Tutorial 1
I’ve received a few emails over the past several months asking me some more specific questions about the digital scrapbooking software I use: My Memories Suite by Polaroid. Â One of the more recent emails I got asked a lot of good questions that I realized isn’t very obvious based on the website ad and video. Â They’re more technical use questions that aren’t modeled on the infomercial or explained on the site for someone who may be trying to check out the program’s capabilities before buying. Â Now that I have been using this amazing software for nearly a year, I felt inspired to create some video tutorials that cover some of the more important aspects of the program and some of the common questions I’ve been asked about it. Â Today I’m releasing my first freebie software tutorial, which is a basic introduction. Â In this video I do a 30 minute walkthrough of the program’s main features and show you the basic capabilities of My Memories Suite. Â The video is embedded below, or you can click here to watch the video over on YouTube, where you can bookmark it and rate it to come back to in case you don’t have 30 minutes all at once to spare.
I hope that the video goes into enough detail to give you a better idea of how powerful My Memories Suite is, and perhaps even encourage you to purchase it for yourself. Â I couldn’t possibly rave more about how much I love it! Â And if you’re a newcomer to the pink toque craft blog, you may wish to read my review of My Memories Suite here. Â Stay tuned, I have FOUR additional tutorial videos planned for this software that I will make and release as soon as I can :) Â And speaking of upcoming things to release, I have so many freebie goodies coming very soon! Â I’ll go ahead and announce that my next freebie will be a 3 day extravaganza starting this Friday (Freebie Friday!) in honour of the start of the new hockey season. Â If you’re a Calgary Flames fan, you won’t want to miss it!
And WOW! Thanks to all of you that downloaded my CU paper edgers freebie the other day — they seem to be quite popular :) And I really appreciate all of the kind comments <3 Â I hope to make some more CU items in the future, too. Â Enjoy the tutorial and I’ll see you back in a few days for the hockey special Freebie Friday!
Updated January 28, 2009: I am now part of the affiliate program and can offer readers of my craft blog who enjoyed this tutorial a $10 discount on the My Memories Suite software, plus an additional $10 to spend in the MMS online store! To get the discount, click the banner link in the upper right corner/sidebar of my blog (Where it says “Get My Memories Suite”) or the link below, and use coupon/promo code STMMMS21122. Enjoy! :D
My Memories Suite $10 discount PLUS $10 to spend in the MMS online store, ORDER NOW! (with code STMMMS21122)
Updated April 23, 2011: Google Videos is ceasing to exist- you will now find the tutorial above on YouTube, and all links and embeds have been updated to reflect this change :)
Huug the Hug Monster©
 On my way to work the other morning I got an idea in my head for a new knitted plushie pattern I wanted to create. I wanted to name him Huug, and he would be the Hug Monster… so Huug the Hug Monster©! I made a few sketches and started guesstimating stitch counts and then went home and began testing. My final result turned out pretty much how I wanted it; the face is something I want to work more on. The original idea was that Huug has two small beady little eyes and two fairly big buck front teeth sticking out. I’m not so good with embroidery on knitting, so I hope that my future versions of Huug’s face turn out a little better with some tweaking. Anyway, he was originally released here as a fairly popular free pattern, however due to a retail venture I’ve decided to remove it. Sorry :( Huug the character and his knit/crochet pattern was officially and legally copyrighted recently for said venture. I will share more Huugs I make in the future and more backstory about this wonderful creature in the future instead.

Huug the Hug Monster© can / will come in many different colours — I just used orange because this Huug is for my fiance, Lucas. I envision Huugs of every colour of the rainbow and even made from fuzzy and furry yarns to make hairier cousins.
Free Pattern: Knitted Duck Plush
 A few weeks ago I attempted to make Lion Brand Yarn’s Pocket Pet Duckling. In the end, I didn’t like the Fun Fur, didn’t like the fact it was a duck without wings, and really really disliked the look of using felt to make the beak and feet… wishing instead that it was truly a fully knitted duck. My solution to a better knitted duck plush? Make my own!
I use the same concept of knitting a square that is folded in half to make a triangle for the duck’s body as inspiration, but that’s where the similarities end. This duck sports fully knitted wings, feet and beak, and sits up on its own instead of laying down. Here’s the pattern!
Materials
Size US 9/5.5mm needles
Bernat Satin Solids yarn in Sunrise yellow
Bernat Satin Solids yarn in Sunset orange
ribbon, tapestry needle, black yarn for eyes or seed beads
If you can cast on, use the plain knit stitch (garter stitch), can knit 2 together (K2T) and bind off, you’re set! Here we go.
Duck Body
* CO 30 sts
* Knit (garter stitch) 50 rows
* BO, leaving a 12 inch tail
 You now have a square. Fold it in half so that you form a triangle. Using your lengthy tail and a tapestry needle, stitch up one side of the triangle. Open it up and you’ll see that you now have a cone. You may wish to flip it inside out so that your seam looks neater. Stuff the cone, keeping in mind that the pointed end is going to end up being the head, and the seam goes up the stomach of your duck. At the top of the cone, you’ll have an extra “flap” that you now fold over like a triangle. Sew the edges closed, and you’ve formed the rear end that the duck will sit on. Shape it to “sit” up on its rear like in the photo. Now it’s time to make the other body parts.
Wings & Feet – Make 2 in Yellow and 2 in Orange
* CO 9 sts
* knit 5 rows
* K2T, knit 5, K2T (you have 7 sts left)
* knit 2 rows
* K2T, knit 3, K2T (you have 5 sts left)
* knit 2 rows
* K2T, knit 1, K2T (you have 3 sts left)
* knit 2 rows
* K2T, knit 1 (you have 2 sts left)
* K2T to bind off
Weave in ends. Stitch wings and feet to duck in appropriate places. I positioned the wings so that they were like hands — sewing them on their side so that the pointiest end where I bound off was facing the stomach. I used the bottom seam as a guide and lined up each foot along that seam when I stitched it on.
Beak – Make 1 in Orange
* CO 7 sts
* knit 5 rows
* K2T, knit 3, K2T (you have 5 sts left)
* knit 2 rows
* K2T, knit 1, K2T (you have 3 sts left)
* knit 2 rows
* K2T, knit 1 (you have 2 sts left)
* K2T to bind off
Weave in ends. Stitch beak to duck at the end of the face, making sure the pointy end where you bound off is hanging a bit over the edge of the face. Once you’ve stitched the back of the beak onto the face, fold the pointy end under the “chin” and stitch down, making a more blunt beak.
Tie a ribbon around the duck to clearly define the neck area. You can make eyes either by sewing on black seed beads or embroidering the eyes with black yarn. Voila!
 Enjoy the pattern, and if you make any ducks, I’d love to see them! Send them my way to craftblog @ pinktoque.com and I’ll showcase them here :) Remember that the pattern is protected under the Attribution-NonCommercial-NoDerivs 2.5 Creative Commons license, and anything made from it may not be used for commercial purposes. You may not make anything from the pattern and sell it or resell/redistribute the pattern in part or in whole.
As you can see from my WIP list, I am almost done with all of my Christmas gift knitting and crafting with one week to go before we leave for Indiana. Check back soon to see a final post before Christmas to see all of the little things I’ve finished lately just in time for the holidays :)